Introduction
This article describes how to easily and quickly create scalable and secure web applications with the free Scavix Web Development Framework ("Scavix-WDF"). This framework was released under LGPL and can be used and extended by anyone for free. It's available in full source code on GitHub.
Audience
Experienced software developers with solid PHP, JavaScript, Apache, and SQL knowledge.
History
In the past few years, we have developed multiple professional web applications for our own company or as software development projects for our customers. One of the main problems when starting new web application was that the customers always wanted to have full rights on all source code although it made sense to reuse some components that have been developed earlier and have proven rock-solid and fast.
That's why we decided to create a web development framework and release it under LGPL so that anybody (including us) can use some often needed functions. This also made projects cheaper for our customers to develop and much easier and cheaper to maintain. One of the biggest advantages of using such a framework in multiple projects is that bug fixes and improvements (be it in security or performance) can be directly used in all other apps that base on this framework.
Structure
The framework runs on any web server that is able to execute PHP scripts. We prefer Apache webserver as it’s stable and fast. Please make sure that you have short_open_tag enabled in your PHP settings to run the framework.
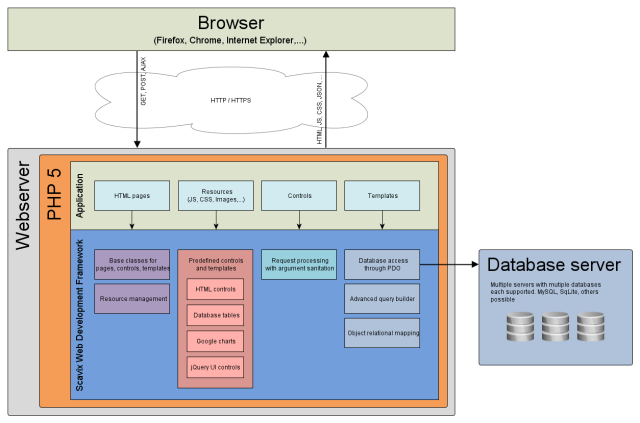
Generally the framework is an underlying abstraction layer between the application code and the webserver/database. It manages the main basic functionalities needed for nearly every web application including template engine, database access, session handling, security, localization, translation, caching, … and a lot more.
Although it offers a lot of predefined functionalities, it also gives you the full power to write code or SQL on a very low level yourself.
So, let’s dive deeper and...
Get started
The WebFramework is designed to help you developing web applications as fast as possible. So the easiest setup is to git clone git://github.com/ScavixSoftware/WebFramework.git or download the ZIP. Make your web server document root point to the sample_blog folder or create your own application folder next to it. You will only need at least two files: index.php and config.php. If you have mod_rewrite enabled and want nice URLs (and we know you want them) add a simple .htaccess file too. There's one in the sample_blog app. All urls in this article refer to nice urls which require mod_rewrite to be enabled on your server.
The index.php file will not contain much, just few lines of initialization:
<?php
require_once(__DIR__."/../system/system.php");
system_init('sample_blog');
system_execute();
?>
That's it. When WDF is included, it automatically loads the config file. There are ways to use it in another way, but we'll ignore those cases for now.
The config.php contain basic application setup what is in fact more than the index file contains:
<?php
$CONFIG['system']['default_page'] = "Blog";
$CONFIG['system']['default_event'] = "Index";
classpath_add(__DIR__.'/controller');
$CONFIG['model']['system']['connection_string'] = "sqlite:../blog.db";
ini_set("error_log", __DIR__.'/../logs/blog_php_error.log');
?>
The default controller is what will be called when user accesses your domain without further arguments. Lets call it the index action.
Like most others too, the WDF provides a class auto-loading mechanism. If you store your classes in files named <classname>.class.php and add their path to the classpath, the WDF will find them. Sounds complicated, in fact it's just a line of code:
classpath_add(__DIR__.'/controller');
This makes all files in the subfolder 'controller' available to the autoloader. And if used like this, all subfolders too.
Database
We always need a database. That's a rule from many years of development, so WDF will need one as well to function properly. To allow you to just start over, the WDF can handle SQLite databases (if PHP supports it on your host!), so that configuration is just a single line:
$CONFIG['model']['system']['connection_string'] = "sqlite:../blog.db";
will make your database available aliased as 'system'. There are a lot other options like connecting to MySQL or SQLServer, but we will skip them for now.
Logging
Finally for the logs: We want them in the docroot or next to it so that they are easily accessible anytime. So in this case we set PHPs error log to a new folder. WDF can handle other logging formats like the traced one readable with the WdfTracer tool, but for now we will stay with this very simple method:
ini_set("error_log", __DIR__.'/../logs/blog_php_error.log');
As we specified the 'default_page' in the configuration above, we now need to set up a controller named 'Blog' with a method 'Index'. And we already adjusted the classpath so we create a folder 'controller' and in there a file named blog.class.php (note: all lowercase!).
<?php
use ScavixWDF\Base\HtmlPage;
class Blog extends HtmlPage
{
function Index()
{
$this->content("Hello world!");
}
}
?>
That's it. Now enter your URL http://your.project.com/Blog/Index into a browser and see the result. As you see, this controller class is derived from the base class HtmlPage, which has the basic HTML structure in it which can be extended with any of your own CSS and JS (see below).
In fact you may also want to pass some arguments to methods. WDF provides an annotation pattern for this. WDF attributes are all wrapped in @attribute[] annotations. The most commonly used is the RequestParam attribute.
You use it like this:
<?php
use ScavixWDF\Base\HtmlPage;
class Blog extends HtmlPage
{
function Index(){$this->content("Hello world!");}
function GetSome($index)
{
$this->content("You are looking for index $index");
}
}
?>
Arguments passed through this mechanism are automatically sanitized to their type, so no need to validate a user-input that is i.e. requested as integer type against <script/> tags. Currently allowed types are int, bool, float, string, currency, URI, email, array and object.
You can call this via URL http://your.project.com/Blog/GetSome?index=123 or http://your.project.com/Blog/GetSome/123.
To build those URLs from code WDF offers the buildQuery function which will respect your setup: It will build nice URLs if you have mod_rewrite enabled and stay with GET argument syntax if you don't.
<?php
use ScavixWDF\Base\HtmlPage;
class Blog extends HtmlPage
{
function Index()
{
$q = buildQuery('Blog','GetSome',array('index'=>42));
$this->content("<a href='$q'>Get Some!</a>");
}
function GetSome($index)
{
$this->content("You are looking for index $index");
}
}
?>
Cool features so far, but UI is still not very nice, right? So let's pimp it, using...
Templates
The WDF follows the model-view-controller pattern, to be more specific it implements the presentation-abstraction-control pattern.
That's for the theory. For us, it means every system part can act as a standalone component (at least the logic part). A template consists of a .class.php file and a template in a .tpl.php file next to it.
<?php
use ScavixWDF\Base\Template;
class MyTemplate extends Template
{
function __initialize($text)
{
$this->set('text',$text);
}
}
?>
templates/mytemplate.tpl.php:
<div class='hello'><?=$text?></div>
There are some points to mention now:
- don't forget to
classpath_add(__DIR__.'/templates'); in your config.php - the WDF does not use an external template-engine, but PHP inline syntax
We decided to not use external templating engines to keep the learning curve as flat as possible: You already know PHP. It also makes porting over existing PHP applications much easier.
Another important reason is that most template engines put too much logic into their templates.
Of course you can do that with inline PHP too, but we want to minimize logic in there because it is simply not good readable and we want to keep the logic and presentation separated. You know what we mean if you ever saw a complex smarty template, do you :) ?
Knowing about all this, our "Blog" sample controller looks like this:
<?php
use ScavixWDF\Base\HtmlPage;
class Blog extends HtmlPage
{
function Index()
{
$tpl = new MyTemplate('Hello world!');
$this->content( $tpl );
}
}
?>
So this all means that you have to create two files for each template, right?
Wrong. Again WDF provides a short way of doing things: Anonymous templates allows you to skip the logic part of a design only component.
Template::Make('mytemplate')->set('text','Hello world!');
will do the job too and you can safely delete the mytemplate.class.php file.
WDF also provides the other way round: Skip the template and create 'logic only' components. That does not mean they have no UI, but it means they are containers or simple UI controls. And that's why these are called "Controls" in the WDF. Here's a sample Control representing a DIV element:
<?php
use ScavixWDF\Base\Control;
class MyControl extends Control
{
function __initialize($text)
{
parent::__initialize('div');
$this->class = 'hello';
$this->content($text);
}
}
?>
Using it that way the Blog class from above won't even change. But of course if controls are that simple, you could skip them completely:
<?php
use ScavixWDF\Base\HtmlPage;
use ScavixWDF\Base\Control;
class Blog extends HtmlPage
{
function Index()
{
$div = new Control('div');
$div->class = 'hello';
$div->content('Hello world!');
$this->content($div);
}
}
?>
Or use method chaining:
<?php
use ScavixWDF\Base\HtmlPage;
use ScavixWDF\Base\Control;
class Blog extends HtmlPage
{
function Index()
{
$this->content( new Control('div') )->addClass('hello')->content('Hello world!');
}
}
?>
And that would be the same as this:
<?php
use ScavixWDF\Base\HtmlPage;
use ScavixWDF\Base\Control;
class Blog extends HtmlPage
{
function Index()
{
Control::Make('div')->appendTo($this)->addClass('hello')->content('Hello world!');
}
}
?>
So as you can see there are many ways to achieve the same result. It depends on what you prefer and what the exact use case is. Each of the methods above has it's specialties, for example will the Control::Make() method trick out many IDEs (like NetBeans) thus having intellisense for the Control class, while the $this->content() method lacks this. The constructor method is the common way, but needs the most lines of code which may become unreadable at some point where it gets more functionalities. Sometimes even a combination may be useful.
So nice code so far, but UI still ugly? So lets talk about...
Resources
The WebFramework treats client-side static stuff all the same way: images, CSS and JavaScript files are delivered using the same mechanism.
While resource-dependencies from the WDF itself are resolved automatically, you will need to configure your own resource folder or folders. For small projects one 'res' folder may be enough, larger applications may want to separate i.e. 'js' from 'css' files, so the WDF allows this.
Here's a sample how to set up a resource folder, as usual that's only a configuration.
<?php
$CONFIG['resources'][] = array
(
'ext' => 'js|css|png|jpg|jpeg|gif|htc|ico',
'path' => realpath(__DIR__.'/res/'),
'url' => 'res/',
'append_nc' => true,
);
?>
If you want to use a resource in your HTML code from there, you can simply get it's URL like this:
<?php
$url1 = resFile('myCoolSkin.css');
$url2 = resFile('myCoolSkin/background.png');
?>
This can be even used in the templates like <img src="<?=resFile('myCoolSkin/background.png')?>" />.
We could say "That's it!" again, but there are some more things to mention this time.
- You can 'override' resources from the WDF by creating one with the same name in one of your resource folders (create a file named htmlpage.js to see the WDF crash :) ).
- WDF will take the first match from your resource folders. This way you could implement some kind of theme support by chaining resource folders and overriding the default theme.
- Resource folders are not searched recursively, so when you reference resources you must do it relative to the resource folder.
- Resources for classes are found automatically if they match their names
The last point is the most important. It means that in most cases you will not need to care about resources at all. Remember our controller from above?
We named it 'Blog', so if we create the files 'blog.js' and 'blog.css' in the 'res/' folder they will be included automatically.
wdf.ready.add(function()
{
$('body').append("blog.js loaded");
});
body { color: red; }
This name-based resource loading is also capable of loading resources for base classes. Simple sentence but powerful feature!
It means that if you implement a base class for all your controller classes, that one can have resources and they will be automatically included before the current class' resources. So you can override CSS classes of JS objects in the derived classes safely.
If you want it the other way round (include my resources before my parents resources) you can do this by noting resource attributes to your class:
<?php
class MySubcontroller extends MyControllerBase
{
}
?>
This will load mysubcontroller.js, mysubcontroller.css, mycontrollerbase.js, mycontrollerbase.css in this order and of course only if they exist.
Of course you can also use the resource attributes to load anything you want like the other_stuff.js file in the sample above.
A note about caching: The whole process of resource-searching is quite expensive in the meaning of CPU cycles and network traffic (think about clustered setups with a central file storage and such things). So the WDF will cache the results of resource-searches internally.
If you use some global caching mechanism, WDF will store the results there so that these recursive searches must not be performed again for other users. At least it will store the results in the users' SESSION if you have not configured any global caching mechanism (like MemCache or APC, see below) in your WDF app. So if you added resource files that you referenced before you must refresh your session.
Sounds complicated, but just delete your cookies and you will be fine (unless you use a global cache! In that case you will have to clear that one too).
In our sample, the two resource files blog.js and blog.css will not be loaded when you reload the page in your browser because you loaded the page before these files existed and the WDF has cached this information.
Wonder about the JS code? Let's head over to...
The client side
Every modern web application contains many client-side parts, in other words a nice UI requires that you write JS code too. The WDF wraps some of the common use-cases and makes intensive use of jQuery and jQuery UI. AJAX communication is wrapped automatically so that controllers may return different types (objects, strings,...) while JS side is still able to use them without parsing errors. This requires that you use wdf.post() and wdf.get() JS functions instead of the corresponding jQuery methods, but we think that's not that bad.
The global wdf JS object provides some useful shortcuts like the wdf.controller object that wraps post and get information for the current active page or the wdf.reloadWithoutArgs() function which ensures GET arguments are omitted when location.reload() is called.
You may also find the AjaxResponse and AjaxAction classes useful to generate JS code from within PHP.
Connecting the database
As already mentioned above: You will need a database connection. The WDF provides some different ways to fetch data from MySQL or SQLite databases.
First, you will need a DataSource object. According to the sample configuration above, we configured one with the alias 'system', so the model_datasource() function will get it back to you.
Let's assume there's a table 'blog' in the database with columns 'id' (integer), 'title' (varchar) and 'body' (text).
This sample shows different ways with the same result on how to query data rows with the WDF:
<?php
$ds = model_datasource('system');
foreach( $ds->ExecuteSql("SELECT * FROM blog WHERE id>10 ORDER BY id DESC") as $row )
echo "{$row['id']} - {$row['title']}";
foreach( $ds->ExecuteSql("SELECT * FROM blog WHERE id>? ORDER BY id DESC",10) as $row )
echo "{$row['id']} - {$row['title']}";
foreach( $ds->Query('blog')->gt('id',10)->orderBy('id','DESC') as $row )
echo "{$row->id} - {$row->title}";
class BlogPost extends Model{ function GetTableName(){ return 'blog'; } }
foreach( BlogPost::Make()->gt('id',10)->orderBy('id','DESC') as $row )
echo "{$row->id} - {$row->title}";
?>
Putting this in our Blog app sample context with all the knowledge we now have would look like this:
<?php
use ScavixWDF\Base\HtmlPage;
use ScavixWDF\Base\Control;
class Blog extends HtmlPage
{
function Index()
{
foreach( BlogPost::Make()->limit(20)->orderBy('id','DESC') as $post )
{
$q = buildQuery('Blog','GetSome',$post->id);
Control::Make('div')->appendTo($this)->content("<a href='$q'>{$post->title}</a><br/>");
}
}
function GetSome($index)
{
$post = BlogPost::Make()->eq('id',$index)->current();
Control::Make('div')->appendTo($this)->content("<h1>{$post->title}</h1><p>{$post->text}</p>");
}
}
?>
You see some method chaining here in this code again. There are quite some methods ready for use, please refer to the Model class in the API reference for all of them.
Some are
- equal, eq: Tests for equality
- lowerThan, lt: Test if lower than
- greaterThan, gt: Test if greater than
- isNull: Test if NULL
- like: Test if is like (with % placeholders)
- andX: Nests an AND query
- orAll: Treats all subsequest queries as OR connected
- ....
You can use a query anytime in a foreach loop because it is accessible like an array (see the samples above).
You may also use the same base query for different queries:
<?php
$q = BlogPost::Make()->gt('id',10)->lt('id',100);
$q_asc = $q->orderBy('id','ASC');
$q_desc = $q->orderBy('id','DESC');
?>
Queries will be executed when you access the data by iterating them or when you access them with one of the following methods (they break the chainability!):
current(): Returns the current row as Model objectscalar($field): Returns one column from the current rowenumerate($field,$distinct): Returns all values for $field (if $distinct if true result will not contain any duplicates)
Debugging code
The WDF provides more logging and debugging features than the normal PHP error_log function. The one we use most is log_debug() which will write the passed data to whatever you've configured. There are other useful functions like log_error(), log_warn(), log_hint() that write to the same logs, but with another severity so that logs can be filtered easily. In addition, you can add categories to log entries (for example a username) to have even more information in there.
How to use this? Pretty easy! Start with a configuration in your config.php:
<?php
$CONFIG['system']['logging']['human_readable'] = array
(
    'path' => __DIR__.'/../logs/',
    'filename_pattern' => 'blog_wdf.log',
);
?>
This creates a logger that will write into the 'blog_wdf.log' file in the 'logs' folder. There are more setting like logrotate and lifetime, but we will leave them to the default values for now. See the WDF logging documentation for additional options. The result will look similar to the normal error_log output so let's see the real powerful trace logger:
<?php
$CONFIG['system']['logging']['trace'] = array
(
    'class' => 'TraceLogger',
    'path' => __DIR__.'/../logs/',
    'filename_pattern' => 'blog_wdf.trace',
);
?>
This will put log entries into 'blog_wdf.trace' file. Use the WdfTracer application from the WebFramework repository to read those files: they provide stacktraces with full argument contents and the WdfTracer allows you to double-click-open a file in your IDE. This is really a time saver!

BTW: You can have both (or even more) loggers configured at the same time so that different logs will be written. We often use human readable loggers in live systems and tracer on development and beta servers to catch errors.
Once configured, logging this is easy:
<?php
use ScavixWDF\Base\HtmlPage;
use ScavixWDF\Base\Control;
class Blog extends HtmlPage
{
function Index()
{
log_info("Index called");
foreach( BlogPost::Make()->limit(20)->orderBy('id','DESC') as $post )
{
log_debug("BlogPost:",$post);
$q = buildQuery('Blog','GetSome',$post->id);
log_debug("URL:",$q);
Control::Make('div')->appendTo($this)->content("<a href='$q'>{$post->title}</a><br/>");
}
}
function GetSome($index)
{
log_info("GetSome called",$index);
$post = BlogPost::Make()->eq('id',$index)->current();
log_debug("BlogPost:",$post);
Control::Make('div')->appendTo($this)->content("<h1>{$post->title}</h1><p>{$post->text}</p>");
}
}
?>
This will fill your log-/tracefiles with some data.
Among it you will see entries like this: "No translations found!"
So let's see what that means...
Translations
There's another rule we learned from many years of development: You always need a good translation mechanism!
So the WDF will require you to create one, but will also make it as simple as possible. You can create a translation anytime by using text placeholders like 'TXT_MAIN' or 'BTN_SAVE' instead of the real texts. WDF will recognize them and prepare everything for you to create a translation with it's integrated SysAdmin controller (see below).
WDF will recognize placeholders that start with 'TXT_', 'BTN_, 'ERR_', 'WINDOW_' and 'TITLE_' (note that this is case sensitive, so write them uppercase).
To make translations very simple, the WDF integrates a simple translation system. In fact you can use professional translation systems too, but currently POEditor.com is implemented. For now we will show the integrated translator.
<?php
$CONFIG['translation']['data_path'] = realpath(__DIR__.'/strings');
$CONFIG['translation']['sync']['datasource'] = 'system';
$CONFIG['translation']['sync']['provider'] = 'Scavix';
?>
All texts are stored in .php files on the web server for quick access and easy management in the 'data_path' folder. When you use the "Fetch strings" mechanism of the SysAdmin, it gets all the texts from the online translation platform (i.e., POEditor.com) and stores these in separate language-include-files one language per file in the data_path folder. This gives you perfect control over updating the texts on the live system only when you've previously checked them on your development or beta system (Edit in POEditor -> Fetch to development system -> Check -> Upload to live servers). It also allows perfect trace of all changes in all texts when you also store these files along in your source repository (like Git or SVN) with all the other source code of your application.
Gray theory so far, here are some samples:
<?php
use ScavixWDF\Base\HtmlPage;
class Blog extends HtmlPage
{
function Index()
{
$this->title = "WINDOW_MYBLOG";
$this->content("<h1>TITLE_MYBLOG</h1>");
$this->content("<p>TXT_MYBLOG_INTRO</p>");
}
}
?>
<div class='blogpost'>
    <div>TXT_POST_HEADER</div>
    <div><?=$title?></div>
    <div><?=$text?></div>
    <div>TXT_POST_FOOTER</div>
</div>
See? Once this is configured you just need to use text constants everywhere. WDF will notify about the need to add some text to these undefined constants.
This is done using the integrated...
SysAdmin
That one is born out of the need to maintain some parts of the system in the development process. Translations are the most commonly changed things while developing an application, but there are more like clearing the cache and so on.
So we packed that into one controller and to have it secure, it's disabled by default.
We strongly advice you to enable it only on development systems!
<?php
$CONFIG['system']['admin']['enabled']  = true;
$CONFIG['system']['admin']['username'] = 'admin';
$CONFIG['system']['admin']['password'] = 'admin';
?>
You can now access SysAdmin via browser like this: http://your.project.dev.url/SysAdmin/ and log in there using the credentials you configured (admin:admin in our sample).
This is how it looks like when creating new strings:
Once strings have been created you may want to translate them. Following screenshot shows the integrated translator but if you choose PoEditor you will have to do your translations over there.
This is when fetching strings from the translation system to the project:
Note that translations and even new string creation will have no effect to your project until you 'fetch' them. This way we ensure that some guys can edit strings while others work on the code without beeing surprised by new texts all the time.
Finally you may already have some translations or you prefer another translation system, so you may use the import feature to upload JSON encodes strings into your project:
There are some hints about the format over at GitHub in the API reference documentation.
Other SysAdmin modules are:
- Minify (CSS and JS code)
- Cache (information and management)
- PhpInfo (searchable to easily find mis-/configs)
Modules
The WDF offers some additional functionalities, but as we want to keep the footprint small, these are offered as optional modules to be used in the web apps. Guess what: you will find them in the 'modules' folder :) .
There are two ways to load a module:
- Add it to the $CONFIG['system']['modules'] array
- Use system_load_module function
There are various modules, some are
- browser: Browser detection from UserAgent
- geoip: GeoIP services
- mail: send mails via SMTP
- textdata: CSV, LDIF and VCard processing
- payment: raw payment classes/interfaces
- globalcache: Caching beyond SESSION borders
- minify: Minifies JS and CSS
They all are very useful but we will only describe the last two that are used for...
Optimizing for speed
The WDF is designed to be fast out of the box, but there are some techniques that allow speeding up your application even more. The WDF will assist you in at least two of them: Caching and Minifying JS and CSS code.
Caching is done kind of automatically for some parts like the resource-search as mentioned above, but of course you can use the same functions to cache your own data. Those functions will work on two levels: the session cache and a global cache.
The session cache is basically what you'd expect: It uses the SESSION variable to set/get data. The globalcache is used to cache data for all sessions, so it is user-independent. That can really boost your application as only the first user will perform an action and then (for a specified amount of time) that result will be used for all other users too. And even more useful: the WDF provides methods to cache database queries automatically so that you wont need to check the cache before executing.
<?php
$currencies = model_datasource('system')->CacheExecuteSql(
"SELECT * FROM currencies",false,3600);
cache_set('my_data',array('hello'=>'world'));
cache_set('my_data',array('hello'=>'world'),300);
cache_set('my_data',array('hello'=>'world'),300,false,true);
$md = cache_get('my_data',array());
?>
So we used the global cache, but what is that?
The WDF can use different caches: eAccelerator (1), MemCache (2), Zend (3), APC (4) or a database (5). 'Database' is our own implementation and can be used with any defined datasource.
To use it, we only need some lines of configuration:
<?php
$CONFIG['system']['modules'][] = 'globalcache';
$CONFIG['globalcache']['CACHE'] = 5;
$CONFIG['globalcache']['datasource'] = 'system';
?>
Of course other caches need other config, but we'll skip that for now.
Now there's a second possibility to speed up your application with nearly no work: Minifying JS and CSS code.
That's also done by a WDF module called 'minify'. It will find out what resources you use in your application, collect them and compress them to be small. Of course you know about the benefits of minifying, do you? So we'll skip the explanation of benefits of minifying JS and CSS code.
Just some lines of config are needed to have your application prepared for that:
<?php
$CONFIG['system']['modules'][] = 'minify';
$CONFIG['minify']['target_path'] = __DIR__.'/res';
$CONFIG['minify']['url'] = cfg_get('system','url_root').'res/';
$CONFIG['minify']['base_name'] = "sample_blog";
?>
Now you can use the SyAdmin "Minify" menu to create minified files in the 'target_path' folder.
Note: Once they have been created, they will be used unless you delete them from the file system, so that's probably not a good idea in development.
About the authors
Scavix Software is a Germany based software company that has specialized on software development for mid- to large-sized companies. In the past years we've developed many applications (mostly web applications) for companies like Intel, AMD, Sage, eBay and Skype. Whatever software your company needs to have developed, contact us for a quote. Our motto is "German High Quality Software Engineering" and that is what you can expect from us. This article was written by Daniel Spors, Steffen Macke and Christoph Bünger, all working for Scavix Software.
Changelog
- 2013/03/09: Initial publishing
- 2013/03/28: Some improvements. Renamed PHPTracer to WdfTracer.
- 2013/04/25: Updated parts about translations to reflect new features in the WebFramework
- 2013/04/26: Updated some paths and filenames for logging to match changes in the WebFramework
- 2013/05/08: Changed some filenames from 'sample*' to 'blog*' as we now have another sample
- 2013/06/12: added DaSpors as author
- 2014/10/31: Added namespacing code
Scavix Software offers high quality software development and consulting. That's what customers like Intel, AMD, eBay and Sage Software trusted in the last years. Be it on the desktop, in the web browser, on a mobile phone, on a tablet or on the TV: we can make your software visions come true.
Are you our next customer? Don't hesitate to contact us.
Imprint/Impressum: https://www.scavix.com/imprint/


 General
  News
News  Suggestion
  Question
  Bug
Bug  Answer
  Joke
Joke  Praise
  Rant
Rant  Admin
Admin 


