Here we learn how to create a personal tab app for Microsoft Teams using Java. This process starts with our new or existing web application. We create a new Spring MVC app and deployed it to Azure Spring Cloud to be available on the Internet. Finally, we review how to make a Teams app manifest with App Studio, then installed the app in the Teams client for testing.
In the first article of our three-part series, we laid the foundation for a Java app for Microsoft Teams. This article will explain how to use Java to create a custom tab that embeds custom web content in Microsoft Teams.
There are two kinds of tabs: personal and channel or group. Personal tabs are scoped to a particular user. Users can add those tabs to the Teams app, and then access them from the left pane. With personal tabs, users can access relevant information without leaving Teams.
You can use group or channel tabs to provide web content to a group of users or the entire channel. These tabs enhance collaboration between users.
In this tutorial, we’ll create a personal tab to render a Java Spring MVC app. The app interacts with an external web service to fetch data to the personal tab. In this case, we’re using a sample to-do list. We use the {JSON} Placeholder Fake API, specifically, the todos resource.
The Java app contains two views to serve web content: index and details. The index enables the user to choose the to-do item’s identifier to fetch from the web service. The details view renders detailed information about a to-do item.
At the end of this tutorial, you’ll have a Teams tab that looks like the screenshots below. You can find the companion code on GitHub. To follow along, you should know Java. We’ll walk through the rest together.

Creating a Java Application
We start by creating a Spring MVC application using Spring Initializr. We select Spring Web, Spring Boot DevTools, and Thymeleaf as the rendering engine. Additionally, we add Azure support (see pom.xml for details).
After creating the project, we add the class representing ToDo items (see GitHub for the full source code):
public class ToDo{
@JsonProperty("userId")
public int getUserId() {
return this.userId;
}
public void setUserId(int userId)
{
this.userId = userId;
}
int userId;
}
Then, we implement the ToDo controller, which uses RestTemplate to interact with the external web service:
@Controller
public class ToDoController {
private final RestTemplate restTemplate;
public ToDoController(RestTemplateBuilder restTemplateBuilder) {
this.restTemplate = restTemplateBuilder.build();
}
}
ToDo controller contains two methods: index and getToDoById. The first one returns the view enabling the user to choose the to-do identifier:
<head>
    <link rel="stylesheet" href="https://www.w3schools.com/w3css/4/w3.css">
</head>

<body>
    <div class="w3-container">
        <form class="w3-panel w3-card-4" th:action="@{/{id}}" width="150">
            <h1>Enter ToDo id:</h1>
            <hr/>

            <input type="number" class="w3-input" th:name="id" min="0" max="200" value="0"/><br/>
            <button class="w3-button w3-black" type="submit">Submit</button>
        </form>
    </div>
</body>
</html>
The second method, getToDoById sends the GET HTTP request to the {JSON} placeholder. The resulting JSON with a to-do item is deserialized to a ToDo class instance. Then, the getToDoById method returns an instance of the ModelAndView class regarding the details view and ToDo class instance:
public ModelAndView getToDoById(@RequestParam(value = "id", required = true) Integer id) {
    String url = "https://jsonplaceholder.typicode.com/todos/{id}";
    ToDo todo = this.restTemplate.getForObject(url, ToDo.class, id);

    ModelAndView modelAndView = new ModelAndView("details");
    modelAndView.addObject("todo", todo);

    return modelAndView;
}
The ToDo properties then render using the details view, with help from the Thymeleaf rendering engine (see GitHub for the full source code):
<table>
    <tr>
        <td><b>Id:</b></td>
        <td><th:block th:text="${todo.id}">todoId</th:block></td>
    </tr>

    <tr>
        <td><b>UserId:</b></td>
        <td><th:block th:text="${todo.userId}">todoUserId</th:block></td>
    </tr>

    <tr>
        <td><b>Title:</b></td>
        <td><th:block th:text="${todo.title}">todoTitle</th:block></td>
    </tr>

    <tr>
        <td><b>Is completed?</b></td>
        <td><input type="checkbox" th:checked="${todo.completed}" /></td>
    </tr>
</table>
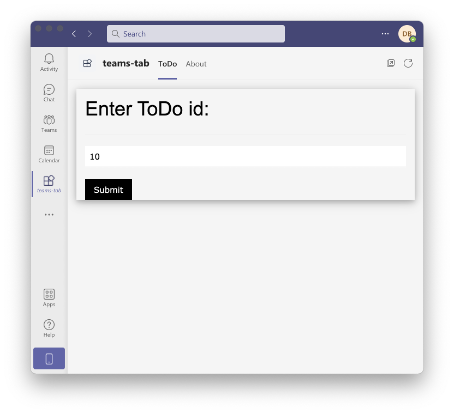
After running the app locally, we see the following view. Then, we type the valid identifier for the ToDo item (an integer value between 0 and 200) and click the Submit button. The app renders the ToDo details:
Deploying to Azure Spring Cloud
After ensuring that the app works locally, we deploy it to Azure Spring Cloud. This is because Teams doesn’t host our application, and it needs to be available on the Internet.
To deploy our application to Azure Spring Cloud, we use our previously provisioned Spring Cloud service. First, we install the Azure Toolkit for IntelliJ, as shown below:
While IntelliJ is the top IDE choice among Java developers, we should note that Visual Studio Code has excellent Java support. There’s even an Azure Spring Cloud extension!
You can also deploy using the Maven plugin. For more information, check out Spring’s instructions. Or use any other deployment tool of your choice.
Next, we deploy the app using Azure Toolkit (or a method of your choice). We right-click the project under IntelliJ IDEA, then select Azure > Deploy to Azure Spring Cloud:
The new window now appears. We use this window to confirm the Artifact, Subscription, and Service fields have the proper selections. Then, we click the + icon next to the App textbox. This action creates the new app instance in the selected Azure Spring Cloud service.
Finally, we click Run to start the deployment. The app deploys after a few minutes.
Next, we go to Azure Portal, then the Azure Spring Cloud service, and find our new app under Settings/Apps. As shown in the following screen, we click Assign endpoint:
This operation takes a short while. Then, our app’s public address appears in the URL section. It may take a little longer for our app to become available. Now we can reach it from the Internet.
Creating a Teams Manifest
Now that our app is on the Internet, we can create the Teams manifest. We’ll then test the personal tab directly in the Microsoft Teams client.
To create the Teams manifest, we open our Microsoft Teams client. Open Apps on the left pane. We look for App Studio, install, then open it. We see the following screen:
Next, we click the Create a new app button. We fill in the required fields, including app name, version, and so on. You can find the full manifest in the GitHub repository).
Then, we go to the second step to specify Capabilities. We add the personal tab there. To do so, we click the Add button under Add personal tab. Then, we configure the Personal tab, such that its Content URL property points to the app we deployed to Azure Spring Cloud:
In the third step, we can configure languages for our tab. Here, we use English:
Finally, we go to the Test and Distribute section and Install the app to the Teams client:
We now see a confirmation screen like this:
Subsequently, our new personal tab becomes available in the Teams client.
We can now test the app. We should get results similar to the screenshots near the beginning of this article.
Next Steps
In this article, we learned how to create a personal tab app for Microsoft Teams using Java. This process starts with our new or existing web application. Here, we created a new Spring MVC app and deployed it to Azure Spring Cloud to be available on the Internet. Finally, we reviewed how to make a Teams app manifest with App Studio, then installed the app in the Teams client for testing.
We now have a custom tab in Microsoft Teams that can pull in external data and display it to our organization’s users. For example, we can show a to-do list, so everyone in the organization (or just group members or individuals) knows the status of a project’s components.
In this series’ third and final article, we’ll learn how to add a conversational bot to Microsoft Teams to echo back text messages.
Dawid Borycki is a software engineer and biomedical researcher with extensive experience in Microsoft technologies. He has completed a broad range of challenging projects involving the development of software for device prototypes (mostly medical equipment), embedded device interfacing, and desktop and mobile programming. Borycki is an author of two Microsoft Press books: “Programming for Mixed Reality (2018)” and “Programming for the Internet of Things (2017).”


 General
  News
News  Suggestion
  Question
  Bug
Bug  Answer
  Joke
Joke  Praise
  Rant
Rant  Admin
Admin 


