Here we explore how to create a Microsoft Teams bot using Spring, Java, and IntelliJ IDEA. We deploy the bot to Azure Spring Cloud and integrate it with the Teams tab we created in the second article of this series. Users can then message the bot for it to echo their text.
Bots enable task automation. Also, conversational bots add ax communication layer between Microsoft Teams users and web services. As users chat with the bot the same way they would talk with co-workers, they can easily access web services or start business workflows within Microsoft Teams.
When users send a message, Teams automatically routes it to the bot. You can define core bot commands and add a command menu with a drop-down list of options to help your users understand your bot’s capabilities. Your users can also mention bots during the conversation using @botname.
In addition to receiving commands, bots can send proactive messages. The bots can automatically generate messages. These include dynamic and interactive content like buttons, images, and videos.
The bot is, in essence, a web application. This means you can wrap several of your existing web services into bots and even enhance them with AI power. For example, you can add Language Understanding (LUIS) or QnA Maker for natural language processing.
This article will explore how to create a Microsoft Teams bot using Spring, Java, and IntelliJ IDEA. We’ll deploy the bot to Azure Spring Cloud and integrate it with the Teams tab we created in the second article of this series. Users can then message the bot for it to echo their text.
Creating the Bot Project Template
We start by creating the Bot project template using Bot Framework SDK for Java. Microsoft’s Yeoman templates enable us to quickly create three different bot projects:
- Echo Bot: A template for creating a simple bot that resends every message it receives
- Empty Bot: An empty project template for the bots
- Core Bot: A template for building advanced bots that use LUIS, for example
To start using Yeoman, ensure you have Node.js installed. Then, install the latest version of the Node package manager:
npm install -g npm
Next, we install Yeoman and the templates for building bots:
npm install -g yo
npm install -g generator-botbuilder-java
Then, to start creating the template, we invoke the following command and answer a few configuration questions (see screenshot below):
yo botbuilder-java -T "echo"
We configure our bot as follows:
- Name: teams-bot-echo
- Package name: db.bots.example
- Template: Echo Bot
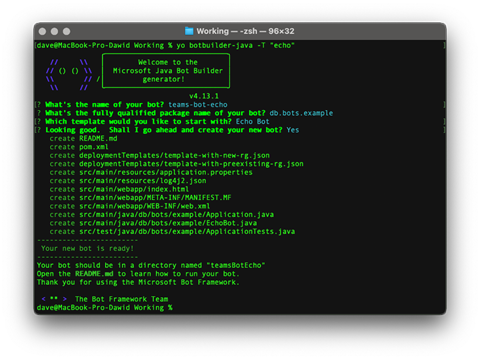
Yeoman generates the project’s skeleton. As the above screenshot shows, it creates our project template in the teamsBotEcho folder. When we open this folder in IntelliJ IDEA, the rendered README.md tells us what to do next.
However, Java developers should have all the tools ready (including Maven and Java). The Bot Framework Emulator is an optional tool that we may find helpful for local bot testing. A desktop application is available for Windows, Linux, and macOS. Here, we use the macOS version, which, after the first start, looks as follows:

We can choose from plenty of links to start building bots. We can make bots like echo or AI-powered conversational bots based on natural language processing. We can even set up CI/CD pipelines to automate bot deployments.
Let’s start by exploring the project template we created with the Yeoman generator. Our generated app is a Spring Boot web application. The entry point implemented within the Application class derives from BotDependencyConfiguration (com.microsoft.bot.integration.spring).
Here is this class’ skeleton:
public class Application extends BotDependencyConfiguration {
    public static void main(String[] args) {
        SpringApplication.run(Application.class, args);
    }

    @Bean
    public Bot getBot() {
        return new EchoBot();
    }

    @Override
    public BotFrameworkHttpAdapter getBotFrameworkHttpAdaptor(Configuration configuration) {
        return new AdapterWithErrorHandler(configuration);
    }
}
We see there are two bot-related elements:
getBot method, which returns a new instance of the EchoBot classgetBotFrameworkHttpAdaptor, a method returning a custom adapter for error handling
The class implementing the bot is EchoBot. It looks like this:
public class EchoBot extends ActivityHandler {

    @Override
    protected CompletableFuture<Void> onMessageActivity(TurnContext turnContext) {
        return turnContext.sendActivity(
            MessageFactory.text("Echo: " + turnContext.getActivity().getText())
        ).thenApply(sendResult -> null);
    }

    @Override
    protected CompletableFuture<Void> onMembersAdded(
        List<ChannelAccount> membersAdded,
        TurnContext turnContext
    ) {
        return membersAdded.stream()
            .filter(
                member -> !StringUtils
                    .equals(member.getId(), turnContext.getActivity().getRecipient().getId())
            ).map(channel -> turnContext.sendActivity(MessageFactory.text("Hello and welcome!")))
            .collect(CompletableFutures.toFutureList()).thenApply(resourceResponses -> null);
    }
}
The EchoBot class derives from the ActivityHandler, which is from com.microsoft.bot.builder. The "Activity" prefix highlights that an Activity object represents each message in a bot conversation. That’s why EchoBot overrides the onMessageActivity base method. In the default echo implementation, the bot resends the text of the message it received.
We can also obtain information about the message the bot received from the instance of the TurnContext class. We inject this instance into the onMessageActivity method. In particular, we can use it to get an instance of the Activity class (turnContext.getActivity()), then read the message text.
Additionally, EchoBot handles the events of adding new members to the channel by overriding onMembersAdded method. If a new member joins the channel, the bot sends the static message "Hello and welcome!"
We'll test this function in the next section.
Testing the Bot
Let’s now use Bot Framework Emulator to explore how the bot works. We start the application, then open Bot Framework Emulator. Then, we click the Open Bot button.
Doing this opens a pop-up window where we type the bot messaging endpoint:
http:
Here, the SERVER_PORT comes from the application’s properties. In our case, it’s 3978:
After clicking Connect, we see a chat window on the left and logs on the right. The chat window should display the welcome message. Now, we can type our custom messages. The bot republishes them to the communication channel:
After ensuring that everything works as expected, we’ll register the bot in Azure AD, then publish it to Azure Spring Cloud. Afterward, we’ll add it to the Microsoft Teams app we created in the second article of this series.
Creating the Bot Service and Application Registration
We need to register our new bot in Azure AD before we publish it. First, in the Azure portal, we go to Bot Services. There, we click on the Create bot service button. We choose Azure Bot from the list of available bot service templates, then click Create:
In the Create an Azure bot screen, we choose our subscription and resource group and specify the bot handle (we use teams-bot-java). Then, we select Create new Microsoft App ID under the Microsoft App ID group:
We can optionally add Tags by clicking Next: Tags. Then, we Review + create the bot. Along the way, Azure also provisions a new vault under the Key Vaults service containing the application password. We'll need this password along with our application ID later in our project.
To obtain the application ID, we go to the deployed bot service and open the Configuration tab. Then, we copy the value from the Microsoft App ID text box (here, it’s 6554dd02-14c9-48e5-8734-83c487cd4f2b).
Next, we navigate to Azure Key vaults and look up the vault with the prefix bot-secrets.
To access the secret containing the application password, we first need to add an access policy for the user who is currently logged into the Azure portal. To do so, we click on Access Policies under Settings. Then, we click the Add Access Policy link:
In the Add access policy view, we choose Key, Secret, & Certificate Management from the Configure from template (optional) drop-down menu. Then, we click the link next to Select principal, and the right pane appears. We use this pane to look up our username:
After choosing the user, we click Add. This action takes us back to the vault configuration, where we need to click the Save button.
We now have access to data stored in the vault. We go to Secrets, then click on the bot-teams-java-pwd secret:
We next read the current secret version by clicking Show Secret Value and store the secret for the next step.
Deploying the Bot to Azure Spring Cloud
Before deploying our bot to Azure Spring Cloud, we need to open application.properties and update MicrosoftAppId and MicrosoftAppPassword with our values. We also change server.port to 80:
We’re ready to deploy the bot to Azure Spring Cloud. We follow the same path as in the second article of this series. We sign in to Azure (Azure Explorer->Sign in) and right-click on the project in the IntelliJ IDEA project’s explorer. Choose Azure, then Deploy to Azure Spring Cloud:
IntelliJ IDEA displays another window, where we configure the deployment:
We use the Azure Spring Cloud service we previously created (db-spring-cloud-82) and make the new app instance (springcloud-app-20211004090957).
After we deploy the application, we need to assign the public endpoint. We do this in the Azure portal by clicking Assign endpoint in the Overview tab of the newly deployed app. The screenshot below shows the URL this operation generated for us.
We use the assigned endpoint to configure the bot service in Azure. We go back to teams-bot-java, and on the Configuration page, we paste the app endpoint URL in the Messaging endpoint text box and supplement it with /api/messages.
Finally, we click Apply to register and configure the bot. Now we need to add it to the Teams app in the next section.
Creating the Bot’s Capability
Now, we add our bot to the Teams app named teams-tab that we created in the previous article. We find teams-tab in App Studio, as the screenshot below shows:
Then, we click on teams-tab. This displays our app’s manifest editor. In the manifest editor, we go to Capabilities, then click the Bots tab. Doing so opens another view, where we click the Set up button, as shown below. Next, in the Set up a bot form, we choose the Existing bot tab. Paste in the Application ID we received when registering the bot. After, we can configure our bot's attributes.
We can enable uploading and downloading files or one-way notifications. We can also specify if our bot supports video and audio calls. Finally, we can configure our bot’s scope: personal, team, or group chat, and the bot responds accordingly. This scope works similarly to tabs: a personal bot is for conversations between the bot and a single user, while all team members can use the team-scoped bot.
Bots configured for team or group chat are only invoked if users use the @mention attribute in their conversations. One-way notification-only bots don’t require the @mention attribute. All messages directly route to such bots.
Here, we select all three possible scopes and keep all other options unchecked:
After clicking Save, we see the bot capability in the Teams application manifest.
Optionally, we can add bot commands.
After configuring the bot, we go to Test and distribute and click Install. Our organization’s Teams users can now access an echo bot from a Teams tab to repeat their messages.
Next Steps
We have created a bot for Microsoft Teams by developing the project template, deploying it to the cloud, and updating the Teams app manifest. Now we’re ready to add more advanced bot functionality. Start with the sample code and replace the echo bot with a bot of your choice.
You now know how to get started developing in Java for Microsoft Teams. You know how to create a Teams tab and import an application, helping workers access information and functions from the software they’re already using daily. You also know how to create a bot to help automate work and save employees time to devote to more productive work.
Although getting workers to use new software can be challenging, it’s easy when you place simple-to-use Java tools where employees already collaborate with their teammates. They’ll be happy with their new easy-to-use productivity software, you’ll be satisfied with how easy it is to integrate these apps, and management will be pleased with the uptick in company productivity. Expand these capabilities with your unique app ideas by developing applications for Microsoft Teams.
Dawid Borycki is a software engineer and biomedical researcher with extensive experience in Microsoft technologies. He has completed a broad range of challenging projects involving the development of software for device prototypes (mostly medical equipment), embedded device interfacing, and desktop and mobile programming. Borycki is an author of two Microsoft Press books: “Programming for Mixed Reality (2018)” and “Programming for the Internet of Things (2017).”


 General
  News
News  Suggestion
  Question
  Bug
Bug  Answer
  Joke
Joke  Praise
  Rant
Rant  Admin
Admin 


