Here load our TensorFlow Lite (.tflite) model to Android Studio and choose the right TensorFlow Lite Android Support Library to run the inference.
Introduction
In this series of articles, we’ll present a Mobile image-to-image translation system based on a Cycle-Consistent Adversarial Networks (CycleGAN). We’ll build a CycleGAN that can perform unpaired image-to-image translation, as well as show you some entertaining yet academically deep examples. We’ll also discuss how such a trained network, built with TensorFlow and Keras, can be converted to TensorFlow Lite and used as an app on mobile devices.
We assume that you are familiar with the concepts of Deep Learning, as well as with Jupyter Notebooks and TensorFlow. You are welcome to download the project code.
In the previous article, we saved and loaded our TensorFlow Lite (.tflite) model. In this article, we’ll load it to Android Studio and choose the right TensorFlow Lite Android Support Library to run the inference.
Preparing the Android Studio Environment
The first step toward building an Android app is to download Android Studio. Once it has been downloaded, we start what is called “machine learning (ML) and module dependency binding” by importing our .tflite model into an Android Studio file.
To import the model into Android Studio, right-click the module you would like to use the TFLite model or select File > New > Other > TensorFlow Lite Model.
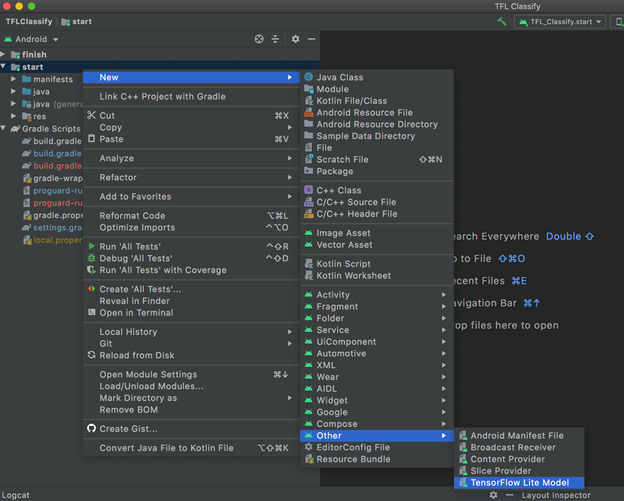
Then, select the location of your TFLite file. Note that the tool will configure the module's dependency on your behalf with ML Model binding and all dependencies automatically inserted into your Android module's build.gradle file.

Click Finish after that.
Selecting TensorFlow Lite Interpreter and Android Support Library
To interpret the model output, we must integrate the TensorFlow Lite Android Support Library into our app. This will provide high-level APIs that help transform and preprocess the raw input data to fit the size and format the model expects.
This interpreter library supports common input and output data formats, including images and arrays. In addition, this library includes some preprocessing functions, such as image resizing and cropping.
Import Gradle Dependency and Other Settings
To import the Gradle dependency, we first copy our .tflite model file to the assets directory of the Android module in which our model will run. We specify that the file should not be compressed, and add the TensorFlow Lite library to the module build.gradle file:
dependencies {
    // Other dependencies

    // Import tflite dependencies
    implementation 'org.tensorflow:tensorflow-lite:0.0.0-nightly-SNAPSHOT'
    // The GPU delegate library is optional. If needed, select the second checkbox for importing TensorFlow GPU if you want to use GPU acceleration.
    implementation 'org.tensorflow:tensorflow-lite-gpu:0.0.0-nightly-SNAPSHOT'
    implementation 'org.tensorflow:tensorflow-lite-support:0.0.0-nightly-SNAPSHOT'
}
Deploy the model on Android
At this point we have a neural network stored in the file tflite_model.tflite. If we want to use it, we need to create a new project ( named, for example, CycleGAN_App ) with Android Studio, and place our model file in the CycleGAN_App/app/src/main/assets folder. Since Android Studio compresses resource files by default for performance reasons, we also need to explicitly tell it not to compress the neural network with the following line inside the gradle file :
aaptOptions {
    noCompress "tflite"
}
Secondly, we need to add the required dependencies: update the gradle file with the following lines :
implementation 'org.tensorflow:tensorflow-lite:1.13.1'
To demonstrate mobile image-to-image translation, we've created a simple Android app with a button to upload an image, run it through our TensorFlow Lite model, and display the translated image.
You can download the project code to see it in action! Although a full discussion of the app's code is beyond the scope of this article, we'll explore the most important parts of it next.
Import Basic Image Manipulation and Conversion Methods
Before we can feed an image into the model, we have to convert it into a size and format the model can work with.
In order to use Tensorflow Lite's image manipulation and conversion methods, we must create an ImagePreprocessor and add the required operations. To convert images into the tensor format the TensorFlow Lite interpreter requires, create a TensorImage to be used as input:
import org.tensorflow.lite.support.image.ImageProcessor;
import org.tensorflow.lite.support.image.TensorImage;
import org.tensorflow.lite.support.image.ops.ResizeOp;

// Initialization code
// Create an ImageProcessor with all ops required. For more ops,
// refer to the ImageProcessor Architecture section in this README.
ImageProcessor imageProcessor =
    new ImageProcessor.Builder()
        .add(new ResizeOp(224, 224, ResizeOp.ResizeMethod.BILINEAR))
        .build();

// Create a TensorImage object. This creates the tensor of the corresponding
// tensor type (uint8 in this case) that the TensorFlow Lite interpreter needs.
TensorImage tImage = new TensorImage(DataType.UINT8);

// Analyse code for every frame
// Preprocess the image
tImage.load(bitmap);
tImage = imageProcessor.process(tImage);
Create Output Objects and Run the Model
To run our model, we need to create container objects that will be used to store results (TensorBuffer):
import org.tensorflow.lite.support.tensorbuffer.TensorBuffer;

// Create a container for the result and specify that this is a quantized model
// Hence, the 'DataType' is defined as UINT8 (8-bit unsigned integer)
TensorBuffer probabilityBuffer =
    TensorBuffer.createFixedSize(new int[]{1, 1001}, DataType.UINT8);
To load the model and run inference:
import org.tensorflow.lite.support.model.Model;

// Initialise the model
try{
    MappedByteBuffer tfliteModel
        = FileUtil.loadMappedFile(activity,
            "mobilenet_v1_1.0_224_quant.tflite");
    Interpreter tflite = new Interpreter(tfliteModel)
} catch (IOException e){
    Log.e("tfliteSupport", "Error reading model", e);
}

// Run inference
if(null != tflite) {
    tflite.run(tImage.getBuffer(), probabilityBuffer.getBuffer());
}
Develop ImageProcessor Architecture
As discussed above, ImageProcessor supports some basic image manipulation methods; namely cropping, resizing, and rotation:
int width = bitmap.getWidth();
int height = bitmap.getHeight();

int size = height > width ? width : height;

ImageProcessor imageProcessor =
    new ImageProcessor.Builder()
        // Center crop the image to the largest square possible
        .add(new ResizeWithCropOrPadOp(size, size))
        // Resize using Bilinear or Nearest neighbour
        .add(new ResizeOp(224, 224, ResizeOp.ResizeMethod.BILINEAR));
        // Rotate counter-clockwise in 90 degree increments
        .add(new Rot90Op(rotateDegrees / 90))
        .add(new NormalizeOp(127.5, 127.5))
        .add(new QuantizeOp(128.0, 1/128.0))
        .build();
Implement Quantization
During initialization of our input and output objects such as TensorImage or TensorBuffer, we’ll need to specify the object type as either DataType.UINT8 or DataType.FLOAT32:
TensorImage tImage = new TensorImage(DataType.UINT8);
TensorBuffer probabilityBuffer =
    TensorBuffer.createFixedSize(new int[]{1, 1001}, DataType.UINT8);
TensorProcessor is used to quantize input tensors or dequantize output tensors:
import org.tensorflow.lite.support.common.TensorProcessor;

// Post-processor that dequantizes the result
TensorProcessor probabilityProcessor =
    new TensorProcessor.Builder().add(new DequantizeOp(0, 1/255.0)).build();
TensorBuffer dequantizedBuffer = probabilityProcessor.process(probabilityBuffer);
The end result: an Android app that uses image-to-image translation to turn donkeys in zebras!
Conclusion
We have reached the end of our series. We hope that reading it will help you implement your own image-to-image translation apps. If you liked what you encountered in this series, always remember that you can improve upon it! Why not take your new skills, create something great, then write about it and share it on CodeProject?
Dr. Helwan is a machine learning and medical image analysis enthusiast.
His research interests include but not limited to Machine and deep learning in medicine, Medical computational intelligence, Biomedical image processing, and Biomedical engineering and systems.


 General
  News
News  Suggestion
  Question
  Bug
Bug  Answer
  Joke
Joke  Praise
  Rant
Rant  Admin
Admin 


