Here in the final article of the series we deploy our Rest API service to the cloud using Azure Container Instances
Introduction
Container technologies, such as Docker, simplify dependency management and improve portability of your software. In this series of articles, we explore Docker usage in Machine Learning (ML) scenarios.
This series assumes that you are familiar with AI/ML, containerization in general, and Docker in particular.
In the previous article, we’ve debugged an NLP model exposed via Rest API service using Fast API and Gunicorn.
In this article (the last one in the series), we’ll deploy our Rest API service to the cloud using Azure Container Instances. You are welcome to download the code used in this article.
Application Code
We’ll use the same application code and container definition that we’ve used in the previous articles. To keep the solution clean and focused, the attached code archive contains only those files required to publish our sample to Azure. If you’d like a challenge, you can extend the solution from one of the last two articles with the code snippets we’ll discuss here (instead of using the code download for this article).
Preparing Azure Resources
If you don’t yet have an Azure subscription, you can create a free account.
First, let’s set the proper Azure AD directory and subscription:
$ az login --tenant <your_tenant_uri>
$ az account set --subscription <your_subscription_guid>
Make sure to replace the <your_tenant_uri> and <your_subscription_guid> placeholders with the correct values (for example, your_directory_name@onmicrosoft.com and 222aaa2a-a2a2-22aa-a222-2aaaa2a22a22, respectively). Note that if you have only a single Azure subscription with a single Azure Active Directory, the az login statement, without any additional parameters, will suffice.
To publish our application, we need to set up some Azure resources, namely: storage account with a file share and a container registry. We can create them using either the Azure portal or the command line. We’ll use the latter option, with bash and azure-cli:
LOCATION='westeurope'
BASE_NAME='mld10api'
RG_NAME='rg-'$BASE_NAME
STORAGE_NAME=$BASE_NAME'store'
SHARE_NAME=$BASE_NAME'share'
ACR_NAME=$BASE_NAME'acr'

az group create --name $RG_NAME --location $LOCATION
STORAGE_ID=$(az storage account create -n $STORAGE_NAME --resource-group $RG_NAME --location $LOCATION --sku Standard_LRS --query 'id')
STORAGE_KEY=$(az storage account keys list --resource-group $RG_NAME --account-name $STORAGE_NAME --query '[0].value' --output tsv)
az storage share create --name $SHARE_NAME --account-name $STORAGE_NAME  --account-key $STORAGE_KEY
ACR_ID=$(az acr create -n $ACR_NAME --resource-group $RG_NAME --sku 'Basic' --admin-enabled --query 'id')
ACR_KEY=$(az acr credential show --name $ACR_NAME --query 'passwords[0].value' --output tsv)
Make sure you use a single console session for all steps, as we’ll need to access the freshly defined variables (including STORAGE_ID, STORAGE_KEY, ACR_ID, and ACR_KEY) in the subsequent statements.
Building and Pushing Container Image to the Azure Container Registry
To build the container image and push it to our newly created Azure Container Registry, we need a simple command:
$ IMAGE_TAG=$BASE_NAME'img:v1'
$ az acr build --registry $ACR_NAME --image $IMAGE_TAG .
Note that you don’t even need Docker installed to use this command as the build runs in the cloud. Alternatively, if you prefer to build your image using a local Docker installation, you can use the following sequence:
$ docker login $ACR_NAME.azurecr.io
$ docker build -t $IMAGE_TAG .
$ docker tag $IMAGE_TAG $ACR_NAME.azurecr.io/$IMAGE_TAG
$ docker push $ACR_NAME.azurecr.io/$IMAGE_TAG
Creating and Running Container
Now we have only one step left – to create and run a container Instance on Azure. We can do it using the az container create command. In the simplest form, we specify all the required parameters directly. For example:
$ ACI_NAME=$BASE_NAME'aci'
$ ACI_DNS=$BASE_NAME'-nlp-api'
$ az container create \
    --resource-group $RG_NAME \
    --name $ACI_NAME \
    --image $ACR_NAME.azurecr.io/$IMAGE_TAG  \
   --dns-name-label $ACI_DNS \
   --ports 8000 \
   --cpu 1 \
   --memory 4.0 \
   --registry-username $ACR_NAME \
   --registry-password $ACR_KEY \
   --azure-file-volume-account-name $STORAGE_NAME \
   --azure-file-volume-account-key $STORAGE_KEY \
   --azure-file-volume-share-name $SHARE_NAME \
   --azure-file-volume-mount-path /home/mluser/.cache
The last four --azure-file-volume-* attributes map our Azure file share as a volume to our container. This way, the NLP models we download and use in our service will be persisted even if we stop, delete, and recreate the container.
After a few minutes (and we mean minutes here – this will take a while), our container should be up and running:
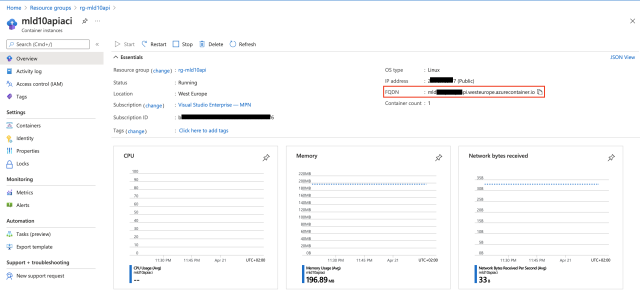
Using the FQDN address of our container services, followed by ":8000/docs", we can access the OpenAPI interface of our service, same as we did before. The only difference is that now it is hosted on Azure:

Creating Container Instances with GPU Support
You may have noticed that the az container create command has very few configuration options (the number of CPUs and the RAM size). To add a GPU to the container, we need to use a configuration file, which can be implemented as either YAML or Azure Resource Manager (ARM) Template.
With this knowledge, we can re-create our container again using the YAML configuration, this time with the GPU support added:
$ az container delete --name $ACI_NAME --resource-group $RG_NAME

$ echo "
apiVersion: '2018-10-01'
name: $ACI_NAME
properties:
  containers:
  - name: $ACI_NAME-1
    properties:
      image: $ACR_NAME.azurecr.io/$IMAGE_TAG
      ports:
      - protocol: TCP
        port: 8000
      resources:
        requests:
          cpu: 1.0
          memoryInGB: 4.0
          gpu:
            count: 1
            sku: K80
      volumeMounts: # Array of volume mounts for the instance
      - name: mluser-cache
        mountPath: /home/mluser/.cache
        readOnly: false
  imageRegistryCredentials: # Credentials to pull a private image
  - server: $ACR_NAME.azurecr.io
    username: $ACR_NAME
    password: $ACR_KEY
  osType: Linux
  restartPolicy: OnFailure
  ipAddress: # IP address configuration of container group
    ports:
    - protocol: TCP
      port: 8000
    type: Public
    dnsNameLabel: $ACI_DNS
  volumes: # Array of volumes available to the instances
  - name: mluser-cache
    azureFile:
      shareName: $SHARE_NAME
      readOnly: false
      storageAccountName: $STORAGE_NAME
      storageAccountKey: $STORAGE_KEY
" >> .containers.yml

$ az container create --resource-group $RG_NAME --file .containers.yml --location $LOCATION
Note that the generated .containers.yml file contains keys (passwords) to both Azure Container Registry ($ACR_KEY) and Storage Account ($STORAGE_KEY). This is why you should be very careful when handling it. You should never add it to a code repository.
The az container create command uses the saved configuration file to create and start the container (this time with the GPU support).
If everything goes well, our new prediction times should be significantly reduced. In our experiments, inference on GPU was about two times faster than the CPU-only deployment.
Container Instances Limitation
Using Azure Container Instances is the simplest way to run a Docker container on the Azure cloud. Usually, it is recommended only for quick prototypes rather than production systems, though. The main reason is a crud set of scalability options at your disposal, limited to the number of CPUs, RAM size, and the number of GPUs. To changes any of these values, you need to recreate the Container Instances. If you need more advanced scalability options, such as horizontal or automated scaling, you may need to use something more robust, such as Azure Machine Learning Services or Azure Kubernetes Services.
Azure Clean Up
To avoid uncontrolled charges, you need to clean the Azure resources you don’t use anymore. It is particularly important when you use an expensive container host configuration (with lots of CPUs / RAM or with a GPU, for example).
At the very minimum, you should always stop the Container Instances when you don’t plan to use it anymore:
$ az container stop --name $ACI_NAME --resource-group $RG_NAME
If you want to get rid of all of the related resources, you may delete the entire resource group:
$ az group delete --name $RG_NAME
Summary
We’ve successfully published our Natural Language Processing REST API services to the Azure Cloud using Container Instances. Throughout this article series, we’ve explored several scenarios for applying Docker containers in ML tasks. We hope you were able to find something useful for yourself in our articles. If you have questions, don’t hesitate to ask in the comments.
Jarek has two decades of professional experience in software architecture and development, machine learning, business and system analysis, logistics, and business process optimization.
He is passionate about creating software solutions with complex logic, especially with the application of AI.


