Here we set up a GKE cluster.
In a previous series of articles, we discussed scripts executed in a group of Docker containers as part of a CI/CD MLOps pipeline. In this series, we’ll show you how to set up a Google Kubernetes Engine (GKE) cluster to deploy these containers. This article series assumes that you are familiar with Deep Learning, DevOps, Jenkins and basic Kubernetes.
GKE is a Kubernetes solution offered by Google Cloud Platform, which provides a lot of benefits. Kubernetes is a state-of-the-art open-source platform for deployment, scaling, and handling of containerized applications or microservices. It offers:
- Extremely easy auto-scaling
- Automated health-checks and self-repair options
- Automatic routing of network traffic between microservices inside the cluster
- Routing and load balancing of traffic coming from outside the cluster.
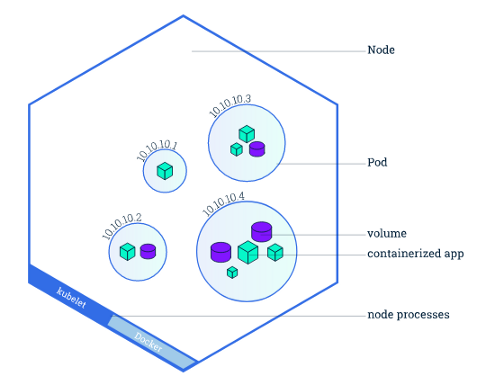
Kubernetes in a Nutshell
A Kubernetes cluster is made up of a master and one or more worker nodes. The master node manages the entire cluster, including communications. The worker nodes, as you may have guessed, do all the heavy lifting. Your microservices would be distributed over the worker nodes to make sure they stay healthy during the cluster lifetime.
Five Kubernetes concepts are relevant to the current article series – pods, jobs, deployments, services, and secrets:
- A pod is the smallest Kubernetes unit. It’s a group of one or more containers. Each pod is attached to a worker node, which can have several pods running within it. If this node fails, its pods are moved to another available worker node.
- A job starts one or more pods to perform a task. Once the task ends, all pods are terminated. If the task execution fails, the job will constantly retry it until it succeeds.
- A deployment is a set of rules provided to the master node. These rules define how to create your application and handle its life cycle across the worker nodes. The master node constantly monitors your deployment. If it fails, a new instance is launched, so your application always runs. To make your deployment accessible from outside of the cluster, you need to create a LoadBalancer service, which handles the incoming traffic to the Kubernetes cluster.

- A service is a set of pods and a policy that defines how to route traffic across them.
- Secrets are YAML files that can be accessed by any element in the cluster via environment variables. This is the default method of dealing with sensitive information within Kubernetes.
Setting Up a GKE Cluster
If you haven’t yet configured your Google Cloud Platform billing account, please follow these steps. If you haven’t configured the Google Cloud SDK, please check this article and also this, where we have the configuration guidelines.
Launching the GKE Cluster
Let’s launch the cluster via the terminal. If you plan to do GPU-enabled training, issue:
gcloud container clusters create training-cluster --num-nodes=2 --zone=us-central1-a --accelerator="type=nvidia-tesla-p100,count=1" --machine-type="n1-highmem-2" --scopes="gke-default,storage-rw"
Otherwise (for CPU training), run:
gcloud container clusters create training-cluster --num-nodes=2 --zone=us-central1-a --machine-type="n1-highmem-2" --scopes="gke-default,storage-rw"
The response will be similar to this:
Once the response notifies you that your cluster has been created, open the GCP console and go to Kubernetes Engine > Clusters.
You should find your Kubernetes cluster active:
Before moving on, install kubectl, the command line package that will allow you to interact with Kubernetes:
Creating the secrets.yaml File
To be able to send notification emails from within our microservices, we need to pass to these an email account address and the corresponding password. These credentials are sensitive information, that’s why we’ll use secrets. Replace the fields in the following file with your email address and password password. (If you use a Gmail address, check out this guide). The file is as follows:
apiVersion: v1
kind: Secret
metadata:
  name: gmail-secrets
type: Opaque
data:
  gmail_address: your_email_address
  gmail_password: your_app_password
Save the file as secrets.yaml. Open a terminal window and apply these instructions to the cluster:
kubectl apply -f secrets.yaml
Next Steps
We’re now ready to use GKE. In the next article, we’ll see how to define jobs, deployments, and services so that our containers can accomplish their objectives. Stay tuned!
Sergio Virahonda grew up in Venezuela where obtained a bachelor's degree in Telecommunications Engineering. He moved abroad 4 years ago and since then has been focused on building meaningful data science career. He's currently living in Argentina writing code as a freelance developer.


