In the previous article of this series, we learned how to build cloud applications using serverless Azure functions. We also learned that this approach has some limitations (like filtering data from Azure Table). We can get more flexibility if we use containerized Java microservices.
To use containerized services, we need a place to deploy them. Kubernetes is becoming the standard for managing distributed systems at scale. Consequently, major cloud providers deliver managed Kubernetes services to help you deploy production-ready, self-healing solutions that can automatically adjust to traffic spikes, with automatic rollouts and rollbacks.
From an architectural point of view, a cloud-managed Kubernetes cluster includes two major components: control plane and nodes. The control plane is composed of the kube-apiserver, etcd key value store, kube-scheduler, kube-controller-manager, and cloud-controller-manager. The controllers respond to requests sent through kube-apiserver and manage the application replicas, pod scheduling, and so on. They also communicate with the cloud to provision additional services during auto-scaling of a cluster, setting up a load balancer, and similar activities. The nodes are virtual machines (VMs) with additional Kubernetes components like kube-proxy, kubelet, and container runtime. Kubernetes uses worker nodes to run your workloads.
Azure Kubernetes Service (AKS) is a managed Kubernetes service, which means you don’t need to provision the control plane yourself. AKS does this job for you free of charge. You pay, however, for the VMs that implement the cluster nodes. You need at least one VM available in the primary node pool. You can configure your node pools so that more VMs are added, when needed — for example, if traffic spikes appear.
To set up a cluster in AKS you can use the Azure Portal, Azure PowerShell, Azure CLI, or Azure CloudShell. However these tools require you to manually perform repetitive tasks. At some point, this becomes too time-consuming and prone to human error.
Because all the operations you perform with the above tools are, under the hood, handled by Azure Resource Manager (ARM), you can also use ARM templates. These templates contain declarations of your infrastructure in the form of JSON files. You can keep the JSON files in a source control system (such as the Azure Git repositories), which will make them subject to pull requests in the same way as your source code files. This allows you to avoid many unintentional creation of resources, and avoid costly mistakes. This is what we call Infrastructure as Code (IaC). The declaration of infrastructure is kept in a declarative form (a JSON file) instead of the set of operations you need to perform one by one.
In this article, we’ll see how to set up AKS in the cloud native way, using IaC (ARM templates) and GitOps to provision our infrastructure automatically, via an Azure DevOps pipeline. We’ll then use the Azure Container Registry (ACR) to host the containerized Java microservice. A Docker image will be pushed to ACR, and from there AKS will pull that image for deployment.
Creating a Template
To create an ARM deployment template, you can use Visual Studio Code, and create your templates from scratch. However, in real life, creating a template from scratch is difficult, as you need complex templates like the one for Azure Kubernetes Service. Such a template would contain many configuration elements, including node pools, networking, and very often Azure Container Registry.
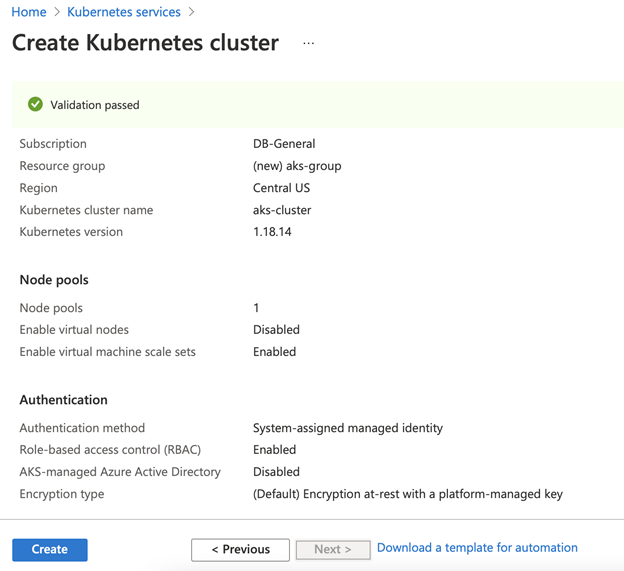
To simplify template creation, start with the Azure portal. First, created the aks-group Resource Group, and then configure the new cluster as follows using Azure Kubernetes Services:
- Kubernetes cluster-name: akscluster
- Region: US Central
- Availability Zones: 1, 2, 3
- Kubernetes version: 1.18.14
- Primary node pool: 2x Standard B2s
- Authentication method: System-assigned managed identity
- Network Policy: Calico
- Container Monitoring: Disabled
- All other settings: leave default values
On the final configuration panel (Review + Create) click Download a template for automation (see screenshot below) to download your ARM template.
The downloaded template includes two files:
- template.json — the actual ARM template that contains resource definitions.
- parameters.json — the template parameters for the template. You use this file for parameterized deployments. For example, you can deploy many clusters using the same template with the different parameters.
Setting Up an Azure DevOps Project and Repository
With the ARM template ready, we can go ahead and set up the project in Azure DevOps. After logging into this service, create a new Project named "TemperatureMonitoring." Then, go to Repos, click Import, and import the GitHub repository we created previously.

Upload template.json and parameters.json to the infrastructure/k8s folder using the built-in Azure DevOps code editor. After the above changes, our project has the following structure.
Building a Pipeline
With the project ready, we can set up a pipeline to deploy our cluster. Under Pipelines, click New pipeline. This will open the following page, where you select Azure Repos Git and point to your repository.
In the next step, pick the Starter pipeline.
This will open your pipeline definition in the YAML editor.
Remove everything below steps: (line 13-19). Then, click Show assistant pane and select the Copy files task.
Configure the Copy files task as follows:
- Source folder: infrastructure/k8s
- Contents: **
- Target folder: $(Build.ArtifactStagingDirectory)
Click Add. This will add to your pipeline YAML definition the following task:
- task: CopyFiles@2
  inputs:
    SourceFolder: 'infrastructure/k8s'
    Contents: '**'
    TargetFolder: '$(Build.ArtifactStagingDirectory)'
This task is used to copy the ARM template to the VMe that performs the build.
Using Task Assistant, create another task that will apply the ARM template. Find the ARM template deployment task and configure it as follows:
- Deployment scope: resource group
- Azure Resource Manager connection and Subscription: use these controls to authenticate to your Azure subscription
- Action: create or update resource group
- Resource group: aks-group (or the name of the group you’ve used when creating the ARM template)
- Location: Central US (or any other – just make sure that the selected region supports the AKS cluster version you have in your template parameters)
- Template: $(Build.ArtifactStagingDirectory)/template.json
- Parameters: $(Build.ArtifactStagingDirectory)/parameters.json
- Deployment mode: Incremental
After you click Add, the new task is added to the pipeline:
- task: AzureResourceManagerTemplateDeployment@3
  inputs:
    deploymentScope: 'Resource Group'
    azureResourceManagerConnection: '<YOUR_CONNECTION>'
    subscriptionId: '<YOUR_SUBSCRIPTION_ID>'
    action: 'Create Or Update Resource Group'
    resourceGroupName: 'aks-group'
    location: 'Central US'
    templateLocation: 'Linked artifact'
    csmFile: '$(Build.ArtifactStagingDirectory)/template.json'
    csmParametersFile: '$(Build.ArtifactStagingDirectory)/parameters.json'
    deploymentMode: 'Incremental'
You can now click Save and run.
Then, provide the commit message and click Save and run. This will trigger the pipeline. However, before the job starts, you need to give permissions.
The deployment should complete in a few minutes.
You will see your cluster in the Azure portal.
Updating Infrastructure Through GitOps
To showcase the advantage of infrastructure deployment through GitOps, let’s make a change in our template. Change the number of worker nodes from 2 to 4. After committing the change to template.json, Azure DevOps will automatically run the pipeline to modify the cluster configuration.
Proceed as follows (see screenshot below):
- Go to Repos and open template.json.
- Click Edit on the right.
- Go to line 113 and change the count parameter from 2 to 4.
- Click Commit, type your message, and click Commit.
This will trigger the pipeline.
Next Steps
In this article, we saw how to provision Azure Kubernetes Service in the cloud native way. We created an Azure Resource Manager (ARM) template, then configured a GitOps pipeline with Azure DevOps. We modified the template, which triggered the pipeline, and the updated configuration was deployed to Microsoft Azure. In the next article, we will use the cluster to deploy a Java-based containerized microservice.
Dawid Borycki is a software engineer and biomedical researcher with extensive experience in Microsoft technologies. He has completed a broad range of challenging projects involving the development of software for device prototypes (mostly medical equipment), embedded device interfacing, and desktop and mobile programming. Borycki is an author of two Microsoft Press books: “Programming for Mixed Reality (2018)” and “Programming for the Internet of Things (2017).”


