In scientific projects, it is often needed to sample sounds from remote locations, for classification or other purposes. As data link rates may be low or unreliable, transmitting raw samples to inland processing centers may not be an option. An alternative is to do off-line processing in batches. This means that raw data are stored in non-volatile memory untill a physical visit replaces the memory media and uses the first batch for processing after any events occurred. It is obvious that a module that performs real-time classification will have to send a very small amount of data to, possibly cloud-based data centers.
Towards this direction, we will show how to build the basic elements needed for such systems using simple parts and open-source software packages, to provide a platform to build classification systems for hydrophone sensors.
Hardware
The hardware we are going to use for this example is based on Raspberry Pi 4.
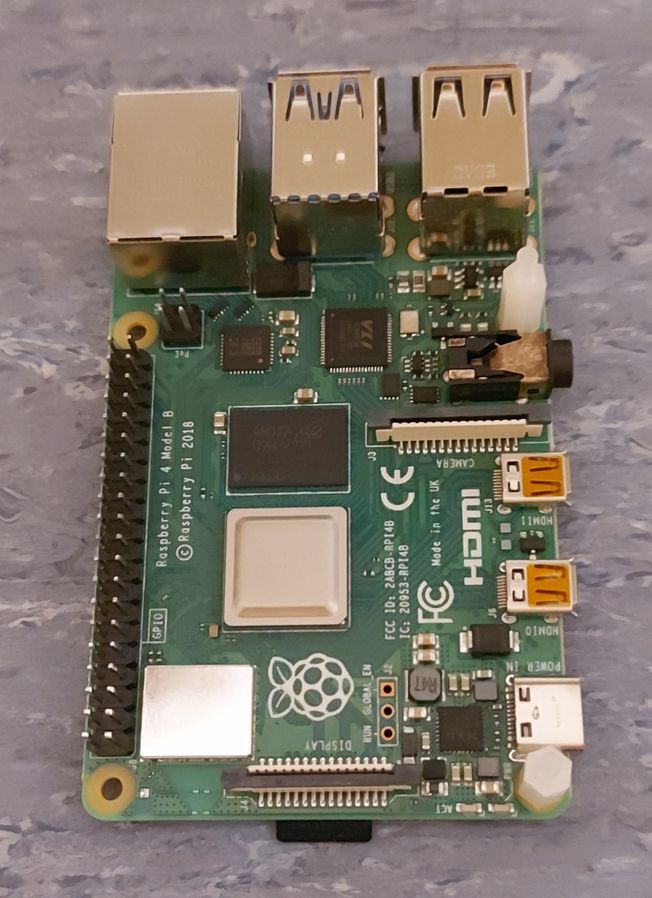 Raspberry Pi module
To interface we use a hydrophone an analog to-digital converter is needed. For our experiments we used the DAC+ADC Pro from HiFiBerry (HiFiBerry DAC+ ADC Pro | HiFiBerry). This module offers both audio input and output. In our case, we are only interested for the audio.
 HiFiBerry DAC+ ADC Pro
This HAT is placed on top of the Raspberry PI. To mount properly the module, we used the following items as seen in the next picture.
ADC and Raspberry Pi side to side
We used two of the nylon stands to hold the front side of the HAT. We skipped the back nylon stands as they wouldn’t allow to fully insert the connector. In the picture above we have assembled the front stands in the Raspberry Pi 4 and we are ready to connect the HAT. Also note the small nylon bolts for securing the HAT and two jumpers we will need for the hydrophone.
Next, we connect the HAT on top of the Raspberry PI module. We fully insert the connector; we should not see any naked pins protruding from the bottom as seen in the picture.
ADC on top of Raspberry Pi
We then place the bolts to be ready for tightening the HAT. The HAT will have a slight inclination as the front stands will keep it slightly upwards, in respect with the fully inserted connector.
ADC front side mount
After completing the mechanical fit, comes the jumper settings. The two jumpers J1 and J3 must be placed to provide power to the hydrophone. This is because our hydrophones are behaving like condenser microphones and they do not generate their own voltage. Make sure you check which type of hydrophone you use as depending of the hydrophone technology you may not need this power; Failing to properly identify the type of hydrophone may damage either your equipment.
ADC Jumper Settings
Our hydrophone is the H2a Aquarian Audio from Aquarian Hydrophones. Next pictures show the hydrophone and its connector ready to be connected on the platform. H2a Hydrophone (aquarianaudio.com)
H2a Hydrophone Just Before Connection
Next, we connect the hydrophone to the 3.5mm Jack input of the DAC+ADC Pro HAT and we are ready to go from the hardware standpoint.
H2a Hydrophone Connected
Conclusion
This ends the first part of the smart Hydrophone, concluding the Hardware. A setup showing how to integrate off the shelf components to support Hydrophone sound sampling from the sea was presented.
Acknowledgement
The SMART Cable was developed through the SMART Cable Project. This project is part of the Research & Innovation Foundation Framework Programme RESTART 2016-2020 for Research, Technological Development and Innovation and co-funded by the Republic of Cyprus and the European Regional Development Fund with grant number ENTERPRISES/0916/0066.
For more information you may visit: SMART Cable : Cyprus Subsea Consulting & Services (cyprus-subsea.com)/
This project is also part of the MARI-Sense Project INTEGRATED/0918/0032. The MARI-Sense project develops intelligent systems that allow human operators to make sense of the complex maritime environment for applications including transport and shipping, coastal tourism, search and rescue, and maritime spatial planning.
CodeProject


