Introduction
This is yet another in my series of articles that have been spawned as a direct results of real-world coding, and reflects a useful variation on the standard WPF ListView. I'm not going to pontificate on theory or best practice, but rather the end result of code I wrote to serve a specific purpose, and that is general enough to be useful by someone else. So, buckle up and enjoy the ride.
I organized the article to cater to diminishing degrees of attention spans. First up is the obligatory introduction text, followed by how to use the code, and finishing up with a reasonably detailed discussion of the code. This should satisfy pretty much everyone, so no complaining will be tolerated.
The download attached to this article provides both a .Net Framework and .Net 5.0 (Core) set of projects. They are clearly marked and operate identically. Because the solution includes two .Net 5 projects, you must use Visual Studio 2019 in order to compile it, or convert the two .Net 5 projects to use .Net Core 3.1.
Why We're Here
At work, I recently had to develop a tool that allowed us to test calculations performed during a database refresh process involving more than half a million members. This tool was going to involve about a dozen different windows that each of which would contain a ListView, and each of those being bound to collections of wildy different item structures. As you might guess, each entity collection would normally require extensive column definition work for each ListView, and I really didn't want to deal with that. The perfect solution would be a ListView that could auto-generate its columns based on the content of the entity. I was not at all surprised to find that the standard WPF ListView did NOT provide this kind of functionality out of the box. This meant I had to "roll my own", which ended up being a not too terrible task. This also let me add some customization in the form of optional attributes and resources.
Useage
Here are the steps to minimally implement the AutomaticListView. Sample code provided below is only here to illustrate what needs to be done, and is an abbreviated version of what is in the sample code.
0) Add a namespace entry to your
Window/
UserControl XAML file:
<Window x:Class="AuoGenListView_Example.MainWindow"
		...
		xmlns:aglv="clr-namespace:AutoGenListView;assembly=AutoGenListView"
		...>
1) Add an
AutomaticListView control to your
Window (or
UserControl):
<Grid >
    <aglv:AutomaticListView x:Name="lvData" SelectionMode="Single"
                            ItemsSource="{Binding Path=SampleData}" />
</Grid>
2) Create your viewmodel collection entity:
public class VMSampleItem : Notifiable
{
[ColVisible]
public int Identity { get; set; }
[ColVisible]
public int Ident2 { get; set; }
[ColVisible]
public string Name { get; set; }
[ColVisible]
public string Address { get; set; }
[ColVisible]
public string Info { get; set; }
public string MoreInfo { get; set; }
}
public class VMSampleItemList : ObservableCollection<VMSampleItem>
{
public VMSampleItemList()
{
this.Add(new VMSampleItem() {...} );
this.Add(new VMSampleItem() {...} );
this.Add(new VMSampleItem() {...} );
this.Add(new VMSampleItem() {...} );
}
}
That's pretty much it. Your ListView will display all of the columns decorated with the ColVisible attribute. Column widths are automatically calculated based on the measured width of the property names (which are also used as the header text). While interesting, there is much more we can do.
Additional Optional Visual Styling
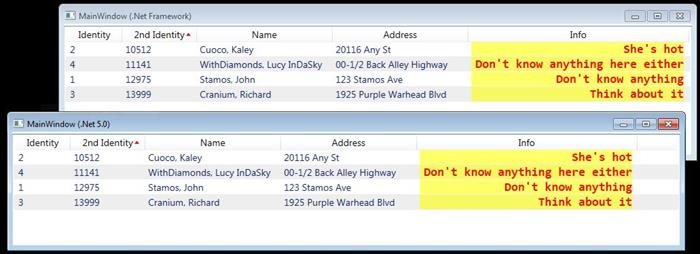
I prefer to see my lists with a gray-bar appearance, where every other line has a slightly darker background color (illustrated in the obligatory screen shot at the top of this article). To make this happen, you can add the following XAML to either your App.xaml file, or an appropriate resource dictionary.
<Style TargetType="{x:Type ListViewItem}">
<Setter Property="HorizontalContentAlignment" Value="Stretch" />
<Setter Property="Margin" Value="0,-1,0,0" />
<Setter Property="Padding" Value="0" />
<Setter Property="BorderThickness" Value="0" />
<Style.Triggers>
<Trigger Property="ItemsControl.AlternationIndex" Value="0">
<Setter Property="Background" Value="White" />
</Trigger>
<Trigger Property="ItemsControl.AlternationIndex" Value="1">
<Setter Property="Background" Value="#eeeeee" />
</Trigger>
<Trigger Property="IsSelected" Value="True">
<Setter Property="Background" Value="LightSkyBlue" />
</Trigger>
<Trigger Property="IsMouseOver" Value="True">
<Setter Property="Background" Value="LightBlue" />
</Trigger>
</Style.Triggers>
</Style>
To enable the gray-bar coloring, you also need to change the XAML for the ListView in your Window/UserControl (this is not confined to the AutomaticListView, and will work in any ListView in your app).
<aglv:AutomaticListView x:Name="lvData" SelectionMode="Single"  Margin="0,3,0,0"
                        AlternationCount="2"
                        ItemsSource="{Binding Path=SampleData}"/>
The ColWidth Attribute
While having column widths automatically calculated for you is handy, it's not very useful in the real world, where the data in the column is often (much) wider than the column header text. If you have such data, you can use the ColWidth attribute to specify the desired column width. The column width is still calculated according to the measured header text width, but the width that is actually used will be the higher of the calculated width and the specified width. As shown below, several of the columns in the sample application have column widths specified.
public class VMSampleItem : Notifiable
{
    [ColVisible]
    public int    Identity { get; set; }
    [ColVisible]
    public int    Ident2   { get; set; }
    [ColVisible][ColWidth(200)]
    public string Name     { get; set; }
    [ColVisible][ColWidth(200)]
    public string Address  { get; set; }
    [ColVisible][ColWidth(325)]
    public string Info     { get; set; }
    public string MoreInfo { get; set; }
}
The ColSort Attribute
By default, all columns are sortable, but there may be times when you don't want/need one or more columns to be sortable. If you have columns that fit this description, you can use the ColSort attribute to prevent sorting:
public class VMSampleItem : Notifiable
{
    [ColVisible]
    public int    Identity { get; set; }
    [ColVisible]
    public int    Ident2   { get; set; }
    [ColVisible][ColWidth(200)]
    public string Name     { get; set; }
    [ColVisible][ColWidth(200)]
    public string Address  { get; set; }
    [ColVisible][ColWidth(325)][ColSort(false)]
    public string Info     { get; set; }
    public string MoreInfo { get; set; }
}
Of course setting ColSort(true) will allow the column to be sorted, but since sorting is automatically enabled for each column, this is unnecessary, and is only included in the interest of completeness.
To actually enable sorting, you have to add an event handler for clicking the column header. In the XAML, it looks like this:
<aglv:AutomaticListView x:Name="lvData" SelectionMode="Single"  Margin="0,3,0,0"
                        AlternationCount="2"
                        ItemsSource="{Binding Path=SampleData}"
                        GridViewColumnHeader.Click="GridViewColumnHeader_Click" />
And in the code-behind, the associated code looks like this:
private void GridViewColumnHeader_Click(object sender, RoutedEventArgs e)
{
    AutomaticListView lvData = sender as AutomaticListView;
    lvData.ProcessSortRequest(e);
}
The reason I prefer to handle the event in the parent container is because there may be times I want to do some additional processing before or after the sort happens.
The ColCellTemplate Attribute
There may be times when you may want to style a certain column due to a given set of requirements. In my particular case, I wanted to make one column use a non-proportional font because the data was always six alphanumeric characters wide, and seeing it displayed with a proportional font drew the eye away from the data and actually made it harder to scan the column. My first run at this was to simply allow the font family and size to be changed, but it dawned on me that "while I was here", I could add some more reasonable styling capabilities without too much effort:
public class VMSampleItem : Notifiable
{
    [ColVisible]
    public int    Identity { get; set; }
    [ColVisible][DisplayName("2nd Identity")]
    public int    Ident2   { get; set; }
    [ColVisible][ColWidth(200)]
    public string Name     { get; set; }
    [ColVisible][ColWidth(200)]
    public string Address  { get; set; }
    [ColVisible][ColWidth(325)][ColSort(false)]
    [ColCellTemplate("Consolas", "18", "Italic", "Black", "Red", "Yellow", "Right", null)]
    public string Info     { get; set; }
    public string MoreInfo { get; set; }
}
You can specify the font family, size, style, and weight, as well as the foreground and background colors, and the horizontal and vertical alignments.
One More Styling Option - Sort Arrow Colors
This one is so optional it's almost funny. I wanted the sort arrows to be something less borinng than black, so I came up with a way to easily change the individual up/down arrow colors. All you have to do is add the following resources in either your App.xaml, or an appropriate resource dictionary. If the code doesn't find them, the arrows will be black (pay attention to the key name - those are the resource names the code looks for - and they are case sensitive
<!-- Brush defintions for the sort adorner arrows - if you don't specify
these, the arrows default to Black. -->
<SolidColorBrush x:Key="SortArrowUpColor" Color="Red" />
<SolidColorBrush x:Key="SortArrowDownColor" Color="Blue" />
The Code
The most interesting code is, as you might guess, in the DLL, where the AutromaticListView, the sort adorner, and the attributes are implemented.
The Attributes
The following attributes are generally uninteresting, and are included in the interest of completeness.
[AttributeUsage(AttributeTargets.Property, AllowMultiple=false, Inherited=true)]
public class ColSortAttribute : Attribute
{
public bool Sort { get; set; }
public ColSortAttribute()
{
Sort = true;
}
public ColSortAttribute(bool sort)
{
Sort = sort;
}
}
[AttributeUsage(AttributeTargets.Property, AllowMultiple=false, Inherited=true)]
public class ColVisibleAttribute : Attribute
{
public bool Visible { get; set; }
public ColVisibleAttribute()
{
this.Visible = true;
}
public ColVisibleAttribute(bool visible)
{
this.Visible = visible;
}
}
[AttributeUsage(AttributeTargets.Property, AllowMultiple=false, Inherited=true)]
public class ColWidthAttribute : Attribute
{
public double Width { get; set; }
public ColWidthAttribute()
{
this.Width = 150;
}
public ColWidthAttribute(double width)
{
this.Width = Math.Max(0, width);
}
}
The AutomaticListView also recognizes the DataAnnotations.DisplayName attribute, so that you can change the header text of a displayed column. I toyed with writing my own attribute class so that a) all of the attribute class names followed the same naming convention, and b) I wouldn't have to reference yet another .Net assembly, but I got lazy and bored, and, well, there you have it.
The big kahuna is the ColCellTemplateAttribute class. Due to the number and type of properties it has, and even more importantly, because some programmers simply don't use common sense when they're writing code, I felt like validation was rewuired to prevent stuff from going sideways.
First, I wanted to define some enumerators to make writing the validation code easier:
private enum FieldID              { Name, Size, Style, Weight, Foreground,
                                    Background, HorzAlign, VertAlign}
private enum AttribHorzAlignments { Center, Left, Right, Stretch }
private enum AttribVertAlignments { Bottom, Center, Stretch, Top }
private enum AttribFontWeights    { Black, Bold, DemiBold,
                                    ExtraBlack, ExtraBold, ExtraLight,
                                    Heavy, Light, Medium, Normal,
                                    Regular, SemiBold, Thin,
                                    UltraBlack, UltraBold, UltraLight }
private enum AttribFontStyles     { Italic, Normal, Oblique }
Next, I wanted to ctreate a collection of installed fonts. It's a static field because I didn't want to have to allocate space for every instance of this attribute.
private static List<string> installedFonts = null;
To make things easier (less typing) in the validation code, I created a string constant to serve as a basis for use when using string.Format() calls
private const string _DEFAULT_FORMAT_ = "{{Binding RelativeSource={{RelativeSource FindAncestor,AncestorType=ListViewItem}}, Path={0}}}";
And then the properties. I defined everything as a string so it could be easily used in the AutomaticListView class.:
public string  FontName   { get; set; }
public string  FontSize   { get; set; }
public string  FontStyle  { get; set; }
public string  FontWeight { get; set; }
public string  Foreground { get; set; }
public string  Background { get; set; }
public string  HorzAlign  { get; set; }
public string  VertAlign  { get; set; }
All of the other attributes provide a default constructor that doesn't accept any parameters. This lets you use anonymous properties to set values. You can also use the standard constructor that accepts the value to set for the attribute. For the ColCellTemplate attribute, that wasn't really practical because I wanted to make sure the programmer didn't do something stupid.
public ColCellTemplateAttribute(string name, string size, string style, string weight,
                                string fore, string back, string horz,  string vert)
{
    this.FontName   = (!string.IsNullOrEmpty(name))   ? this.Validate(FieldID.Name,       name  )
                                                      : string.Format(_DEFAULT_FORMAT_, "FontFamily");
    this.FontSize   = (!string.IsNullOrEmpty(size))   ? this.Validate(FieldID.Size,       size  )
                                                      : string.Format(_DEFAULT_FORMAT_, "FontSize");
    this.FontStyle  = (!string.IsNullOrEmpty(style))  ? this.Validate(FieldID.Style,      style )
                                                      : string.Format(_DEFAULT_FORMAT_, "FontStyle");
    this.FontWeight = (!string.IsNullOrEmpty(weight)) ? this.Validate(FieldID.Weight,     weight)
                                                      : string.Format(_DEFAULT_FORMAT_, "FontWeight");
    this.Foreground = (!string.IsNullOrEmpty(fore))   ? this.Validate(FieldID.Foreground, fore  )
                                                      : string.Format(_DEFAULT_FORMAT_, "Foreground");
    this.Background = (!string.IsNullOrEmpty(back))   ? this.Validate(FieldID.Background, back  )
                                                      : string.Format(_DEFAULT_FORMAT_, "Background");
    this.HorzAlign  = (!string.IsNullOrEmpty(horz))   ? this.Validate(FieldID.HorzAlign,  horz  )
                                                      : "Left";
    this.VertAlign  = (!string.IsNullOrEmpty(vert))   ? this.Validate(FieldID.VertAlign,  vert  )
                                                      : "Center";
}
The validation method uses a case statement to decide what it's validating. Essentially, the method tries to make sense of what the programmer specified, and if things go to hell in a handbasket, the default setting is used. This means that there is no outward indication of failure that would interrupt the use of the ListView, other than the visual appearance of the specified column not being what you thought you were going to get.
private string Validate (FieldID id, string value)
{
    string result = value;
    switch (id)
    {
        case FieldID.Background :
            {
                try
                {
                    Color color = (Color)(ColorConverter.ConvertFromString(value));
                    result = value;
                }
                catch(Exception)
                {
                    result = string.Format(_DEFAULT_FORMAT_, "Background");
                }
            }
            break;
        case FieldID.Foreground :
            {
                try
                {
                    Color color = (Color)(System.Windows.Media.ColorConverter.ConvertFromString(value));
                    result = value;
                }
                catch(Exception)
                {
                    result = string.Format(_DEFAULT_FORMAT_, "Foreground");
                }
            }
            break;
        case FieldID.HorzAlign :
            {
                AttribHorzAlignments align;
                if (!Enum.TryParse(value, out align))
                {
                    result = AttribHorzAlignments.Left.ToString();
                }
            }
            break;
        case FieldID.Name :
            {
                if (installedFonts == null)
                {
                    using (InstalledFontCollection fontsCollection = new InstalledFontCollection())
                    {
                        installedFonts = (from x in fontsCollection.Families select x.Name).ToList();
                    }
                }
                if (!installedFonts.Contains(value))
                {
                    result = string.Format(_DEFAULT_FORMAT_, "FontFamily");
                }
            }
            break;
        case FieldID.Size :
            {
                double dbl;
                if (!double.TryParse(value, out dbl))
                {
                    result = string.Format(_DEFAULT_FORMAT_, "FontSize");
                }
            }
            break;
        case FieldID.Style :
            {
                AttribFontWeights enumVal;
                if (!Enum.TryParse(value, out enumVal))
                {
                    result = string.Format(_DEFAULT_FORMAT_, "FontStyle");
                }
            }
            break;
        case FieldID.VertAlign :
            {
                AttribVertAlignments align;
                if (!Enum.TryParse(value, out align))
                {
                    result = AttribVertAlignments.Center.ToString();
                }
            }
            break;
        case FieldID.Weight :
            {
                AttribFontWeights weight;
                if (!Enum.TryParse(value, out weight))
                {
                    result = string.Format(_DEFAULT_FORMAT_, "FontWeight");
                }
            }
            break;
    }
    return result;
}
The Sort Adorner
The SortAdorner class is responsible for drawing the appropriate arrow to indicate the sort direction. The only configurable part of it is the color of the arrows. By default, both the up- and down-arrow are black, but if the expected brush resources are found, the colors reflect those set in the discovered resources. The properties are static so we don't have to set them with every instance of the class, and we look for the rersources when the arrow is actually rendered. Once again, take note of the (case-sensitive) names of the resources.
public class SortAdorner : Adorner
{
private static SolidColorBrush UpArrowColor { get; set; }
private static SolidColorBrush DownArrowColor { get; set; }
...
protected override void OnRender(DrawingContext drawingContext)
{
if (UpArrowColor == null)
{
SolidColorBrush up = (SolidColorBrush)TryFindResource("SortArrowUpColor");
UpArrowColor = (up != null) ? up : Brushes.Black;
SolidColorBrush down = (SolidColorBrush)TryFindResource("SortArrowDownColor");
DownArrowColor = (down != null) ? down : Brushes.Black;
}
...
}
}
The AutomaticListView - Rendering Columns
This class renders the visible colmns and provides sorting functionality. Rendering the columns involves the RenderColumns method, as well as some helper methods. Instead of providing code and narrative, I figured I'd provide the code with comments.
protected void CreateColumns(AutomaticListView lv)
{
Type dataType = lv.ItemsSource.GetType().GetMethod("get_Item").ReturnType;
GridView gridView = new GridView()
{
AllowsColumnReorder = true
};
PropertyInfo[] properties = dataType.GetProperties()
.Where(x=>x.GetCustomAttributes(true)
.FirstOrDefault(y=>y is ColVisibleAttribute) != null)
.ToArray();
foreach(PropertyInfo info in properties)
{
DisplayNameAttribute dna = (DisplayNameAttribute)(info.GetCustomAttributes(true).FirstOrDefault(x=>x is DisplayNameAttribute));
string displayName = (dna == null) ? info.Name : dna.DisplayName;
DataTemplate cellTemplate = this.BuildCellTemplateFromAttribute(info);
double width = this.GetWidthFromAttribute(info, displayName);
Binding binding = (cellTemplate != null) ? null : new Binding() { Path = new PropertyPath(info.Name), Mode = BindingMode.OneWay };
GridViewColumn column = new GridViewColumn()
{
Header = displayName,
DisplayMemberBinding = binding,
CellTemplate = cellTemplate,
Width = width,
};
gridView.Columns.Add(column);
}
lv.View = gridView;
}
The helper methods (created to keep the amount of code in the main method to a dull roar):
private double GetWidthFromAttribute(PropertyInfo property, string displayName)
{
ColWidthAttribute widthAttrib = (ColWidthAttribute)(property.GetCustomAttributes(true).FirstOrDefault(x=>x is ColWidthAttribute));
double width = (widthAttrib != null) ? widthAttrib.Width : 0d;
width = Math.Max(this.CalcTextWidth(this, displayName, this.FontFamily, this.FontSize)+35, width);
return width;
}
private readonly string _CELL_TEMPLATE_ = string.Concat( "<DataTemplate xmlns=\"http://schemas.microsoft.com/winfx/2006/xaml/presentation\" ",
"xmlns:x=\"http://schemas.microsoft.com/winfx/2006/xaml\" ",
"x:Key=\"nonPropTemplate\">",
"<Grid>",
"<Rectangle Fill=\"{6}\" Opacity=\"0.6\"/>",
"<TextBlock ",
"FontFamily=\"{1}\" ",
"FontSize=\"{2}\" ",
"FontWeight=\"{3}\" ",
"FontStyle=\"{4}\" ",
"Foreground=\"{5}\" ",
"HorizontalAlignment=\"{7}\" ",
"VerticalAlignment=\"{8}\" ",
">",
"<TextBlock.Text><Binding Path=\"{0}\" Mode=\"OneWay\" /></TextBlock.Text> ",
"</TextBlock>",
"</Grid>",
"</DataTemplate>");
private DataTemplate BuildCellTemplateFromAttribute(PropertyInfo property)
{
DataTemplate cellTemplate = null;
ColCellTemplateAttribute cell = (ColCellTemplateAttribute)(property.GetCustomAttributes(true).FirstOrDefault(x=>x is ColCellTemplateAttribute));
if (cell != null)
{
string xaml = string.Format(_CELL_TEMPLATE_, property.Name,
cell.FontName, cell.FontSize, cell.FontWeight, cell.FontStyle,
cell.Foreground, cell.Background,
cell.HorzAlign, cell.VertAlign);
cellTemplate = (DataTemplate)this.XamlReaderLoad(xaml);
}
return cellTemplate;
}
private double CalcTextWidth(FrameworkElement fe, string text, FontFamily family, double fontSize)
{
FormattedText formattedText = new FormattedText(text,
CultureInfo.CurrentUICulture,
FlowDirection.LeftToRight,
new Typeface(family.Source),
fontSize,
Brushes.Black,
VisualTreeHelper.GetDpi(fe).PixelsPerDip);
return formattedText.WidthIncludingTrailingWhitespace;
}
private object XamlReaderLoad(string xaml)
{
var xamlObj = XamlReader.Load(new MemoryStream(Encoding.ASCII.GetBytes(xaml)));
return xamlObj;
}
The AutomaticListView - Sorting Columns
The act of sorting is completely self-contained within the AutomaticListView class. There are two major considerations to be handled when sorting, and these considerations are handled in the DetermineSortCriteria method. Once again, I will provide commented source code instead of the sourcecode with a separate narrative.
private void DetermineSortCriteria(ref string sortBy, ref bool canSort)
{
Type collectionType = this.GetBoundCollectionItemType();
Type[] genericArgs = collectionType.GetGenericArguments();
if (genericArgs != null && genericArgs.Count() > 0)
{
Type itemType = genericArgs.First();
PropertyInfo property = itemType.GetProperty(sortBy);
if (property == null)
{
PropertyInfo[] properties = itemType.GetProperties()
.Where(x=>x.GetCustomAttributes(true)
.FirstOrDefault(y=>y is ColVisibleAttribute) != null)
.ToArray();
foreach(PropertyInfo prop in properties)
{
var dna = (DisplayNameAttribute)(prop.GetCustomAttributes(true).FirstOrDefault(x=>x is DisplayNameAttribute));
if (dna != null)
{
sortBy = (dna.DisplayName == sortBy) ? prop.Name : sortBy;
property = itemType.GetProperty(sortBy);
}
}
}
if (property != null)
{
var csa = (ColSortAttribute)(property.GetCustomAttributes(true).FirstOrDefault(x=>x is ColSortAttribute));
canSort = (csa == null || csa.Sort);
}
else
{
canSort = false;
}
}
}
Points of Interest
For the .Net Core version, I had to add a nuget package - Microsoft.Windows.Compatibility - in order to gain access to the installed fonts on the system. When I compiled the code, I ended up with 642 files, 52 folders, and 170mb of disk space consumed. This is utterly ridiculous. There's no way to cherry-pick what assemblies you want to include in your compiled app - you simply get them ALL.
So, I uninstalled that package, and installed System.Drawing.Common, and everything compiles fine, and we don't get a crapload of files in the deal. This still makes the DLL Windows-specific, but at least you don't get the monster footprint as a free gift from Microsoft.
If you intend to re-compile for cross-platform use, you have to give up the font family validation in the ColCellTemplateAttribute class, but it's easy to do. Simply open the solution in Visual Studio, edit the properties of the AutoGenListView.NetCore project, delete the __WINDOWS_TARGET__ compiler definition (on the "Build" tab), and rebuild the solution. If you want to see the changes made when you do that, look in the AutoGenListView.NetCore/Attributes/ColCellTemplateAttribute.cs file.
Closing Statement
Overall, this has been a pretty useful side project for me. I've had to go back a number of times to the entities and move things around, resize columns, or add/remove columns from the list view. I'm really not a fan of monkeying around in the XAML, and will go to almost heroic measures to avoid it. In the process of writing this code, I was reminded of how weird WPF can be, as well as how stringent it is in terms of binding and resources. Of course, the downside is that at my advanced age, I'll probably have to re-learn this crap all over again for my next project.
History
- 2021.02.19 - Fixed some spelling and markup weirdness.
- 2021.02.18 - Initial publication. The article is probably rife with spelling errors, but it's pretty late in the day, and I'll edit it later in necessary.
I've been paid as a programmer since 1982 with experience in Pascal, and C++ (both self-taught), and began writing Windows programs in 1991 using Visual C++ and MFC. In the 2nd half of 2007, I started writing C# Windows Forms and ASP.Net applications, and have since done WPF, Silverlight, WCF, web services, and Windows services.
My weakest point is that my moments of clarity are too brief to hold a meaningful conversation that requires more than 30 seconds to complete. Thankfully, grunts of agreement are all that is required to conduct most discussions without committing to any particular belief system.


 General
  News
News  Suggestion
  Question
  Bug
Bug  Answer
  Joke
Joke  Praise
  Rant
Rant  Admin
Admin 


