Here we’ll discuss the dataset to be used for training ResNet50, in addition to installing TensorFlow and other libraries required to start the network training.
In this series of articles, we’ll apply a Deep Learning (DL) network, ResNet50, to diagnose Covid-19 in chest X-ray images. We’ll use Python’s TensorFlow library to train the neural network on a Jupyter Notebook.
The tools and libraries you’ll need for this project are:
IDE:
Libraries:
We are assuming that you are familiar with deep learning with Python and Jupyter notebooks. If you're new to Python, start with this tutorial. And if you aren't yet familiar with Jupyter, start here.
In the previous article, we introduced transfer learning and ResNet50. In this article, we’ll discuss the dataset to be used for training ResNet50, in addition to installing TensorFlow and other libraries required to start the network training.
Installing TensorFlow and Other Libraries
In this project, we’ll use Python 3.7 on a Jupyter Notebook. We’ll build our model using TensorFlow 2.0 as a DL library. To install TensorFlow, open Anaconda and run the following GPU CUDA commands :
conda create -n tf-gpu-cuda8 tensorflow-gpu cudatoolkit=10.0
conda activate tf-gpu-cuda8
To check if TensorFlow is installed properly, open Jupyter Notebook and type:
Import Tensorflow as tf
If you receive no errors, TensorFlow is installed correctly.
Now we need to install some basic libraries, such as NumPy and Matplotlib. Open Anaconda and type the following:
conda install numpy
conda install -c conda-forge matplotlib
Open your Jupyter Notebook, add these two commands, and make sure they produce no errors.
Import numpy as np
Import matplotlib.pyplot as plt
Once we’ve installed all the required libraries, we import them along with some additional packages we’ll use in this project:
import tensorflow as tf
import numpy as np
import matplotlib.pyplot as plt
import random
from keras.applications.imagenet_utils import preprocess_input
from tensorflow.compat.v1 import ConfigProto
from tensorflow.compat.v1 import InteractiveSession
config = ConfigProto()
config.gpu_options.allow_growth = True
session = InteractiveSession(config=config)
from keras.models import Model
from keras.applications import ResNet50
from keras.preprocessing.image import ImageDataGenerator
Dataset
Before starting our network coding, we'll need a set of images to train and test the network. In this project, we’ll use a public dataset of Covid-19 chest X-rays images. This dataset contains images of three classes: Covid-19, Normal, and Pneumonia. We’ll aim to classify Covid-19 "positive" and "negative" images; for that we need only the Covid-19 and Normal classes. Thus, after downloading the dataset, we removed the Pneumonia class from it. The dataset contains 1,143 COVID-19-positive images and 1,341 Normal images, Coronavirus-negative.
Images should be downloaded and preprocessed to fit por network’s input format – resized to 224x224x3. You can load and resize images using TensorFlow’s ImageDataGenerator.
Loading Pretrained ResNet50 Model
First, we need to load the pretrained model and freeze its weights. In our project, we’ll use ResNet50 as the pre-defined network architecture from Keras' built-in neural network models which include ResNet, Inception, GoogleNet, and others.
Since we want to use transfer learning instead of starting from scratch, we ask Keras to load a copy of ResNet 50 that has already been trained on ImageNet images. The option include_top=False allows feature extraction by removing the last dense layers. This helps us control the output and input of the model.
model = tf.keras.applications.ResNet50(weights='imagenet')
base_model = tf.keras.applications.ResNet50(weights='imagenet', include_top = False)
print(base_model.summary())
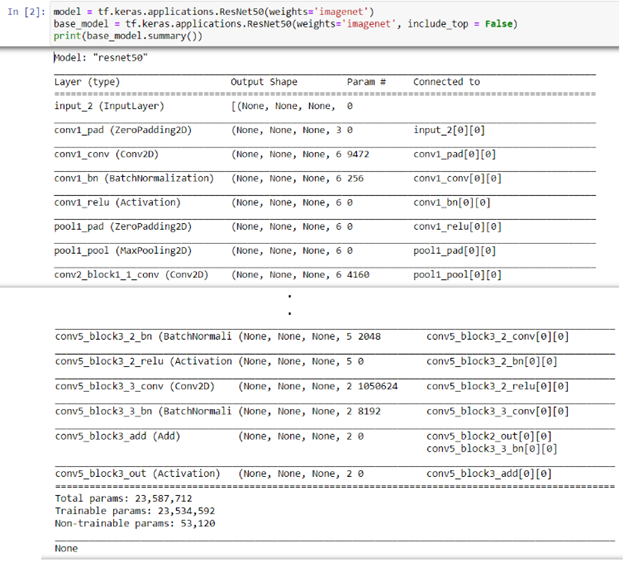
Figure 3: A snapshot of the ResNet50 base model
We can then show the names and numbers of the networks layers, so that they can be easily set as trainable in later stages.
for i, layer in enumerate(base_model.layers):
  print(i, layer.name)
Loading Data Using ImageDataGenerator
TensorFlow and Keras offer an easy way to load data using ImageDataGenerator. This function allows you to preprocess your data – resize, rescale, and shuffle it – all in one operation.
First, we call the preprocessing function from our pretrained ResNet50 model.
train_datagen = tf.keras.preprocessing.image.ImageDataGenerator(preprocessing_function=tf.keras.applications.resnet50.preprocess_input)
Next, we are going to collect the training and testing images from our project directory in batches, and store them separately in the train_datagen and test_datagen directories.
train_datagen = ImageDataGenerator(preprocessing_function = preprocess_input)
test_datagen = ImageDataGenerator(preprocessing_function = preprocess_input)
train_generator = train_datagen.flow_from_directory(r'C:\Users\abdul\Desktop\Research\Covid=19\COVDATA\train',
                                                   target_size = (224, 224),
                                                   color_mode = 'rgb',
                                                   batch_size = 3,
                                                   class_mode = 'binary',
                                                   shuffle = True)
test_generator = test_datagen.flow_from_directory(r'C:\Users\abdul\Desktop\Research\Covid=19\COVDATA\test',
                                                   target_size = (224, 224),
                                                   color_mode = 'rgb',
                                                   batch_size = 3,
                                                   class_mode = 'binary',
                                                   shuffle = True)
Note that the above function contains the One-hot encoding, which is used to label the two categories we have in this project: Covid-19 and Normal. To check the label of the images, type:
train_datagen.label
As you can see in the code, we resized the images to 224x224x3 to fit the ResNet50’s input format. We used a binary class mode as our classification task is a binary task; it handles only two classes.
We can then visualize some of our data images that will be used for training the network. We can use OpenCV to show images one by one as in this example:
imageformat=".png"
path=r'C:\Users\abdul\Desktop\ContentLab\ContentLab[Abdulkader_Helwan]\test2\COVID-19'
imfilelist=[os.path.join(path,f) for f in os.listdir(path) if f.endswith(imageformat)]
for el in imfilelist:
print(el)
image = cv2.imread(el, cv2.IMREAD_COLOR)
cv2.imshow('Image', image)
cv2.waitKey(1000)
This will show images successively, as in figure 4:

Figure 4: Reading and displaying all images using cv2
Next Step
In the next article, we’ll work on restructuring ResNet50 to perform the new classification task. Stay tuned!
Dr. Helwan is a machine learning and medical image analysis enthusiast.
His research interests include but not limited to Machine and deep learning in medicine, Medical computational intelligence, Biomedical image processing, and Biomedical engineering and systems.


