Here, I develop an Android app that uses native C++ code to perform signal processing. I showhow easily you can combine Java with native code to perform computation-intensive work.
Single instruction, multiple data (SIMD) architectures allow you to parallelize code execution. SIMD allows you to perform the same operation on an entire sequence or vector of data during the course of one instruction. You can thus use SIMD to improve the performance of your Android mobile or IoT apps significantly.
To make SIMD optimizations easily accessible by developers, processor manufacturers provide dedicated developer tools. For instance, Arm Neon intrinsics are built-in functions that you can access from the high-level code. The compiler replaces these functions with nearly 1-1 mapped assembly instructions. So, as I'll demonstrate in this article, with just a few changes you can easily vectorize your code.
Getting Started
In my recent article, I showed how to set up Android Studio to use Arm Neon intrinsics for Android applications. You start with the native C++ project template that requires the Android Native Development Kit (NDK). The project template creates a Java activity that references the native C++ library. The library has to include the arm_neon.h header, which contains declarations of Arm Neon intrinsics. Additionally, you need to enable build support for Arm Neon intrinsics.
Here, I use those steps as the starting point to show you that such an approach can be easily employed to write efficient code that can be useful for signal and image processing, neural networks, or game applications.
Specifically, I'll create an Android app that will use Neon intrinsics to process a 1D signal. The signal will be the sine wave with added random noise. I will show how to implement the truncate thresholding and convolution of that signal. Thresholding is usually the first step in various image processing algorithms, while convolution is the primary signal and image processing tool.
As before, I use Android Studio and test the code using a Samsung SM-J710F phone. The full source code is available from the GitHub repository.


The App Structure
I declare the UI of the application by modifying activity_main.xml, which is under app/src/main/res/layout. As shown below, I use one linear layout to align the controls vertically. The additional linear layout is used here to position the Truncate and Convolution buttons next to each other. The ScrollView wraps all controls, so the user can scroll down if the screen is too small to display everything at once.
="1.0"="utf-8"
<ScrollView xmlns:android="http://schemas.android.com/apk/res/android"
android:layout_width="match_parent"
android:layout_height="wrap_content">
<LinearLayout xmlns:android="http://schemas.android.com/apk/res/android"
xmlns:tools="http://schemas.android.com/tools"
android:layout_width="match_parent"
android:layout_height="match_parent"
android:orientation="vertical"
tools:context=".MainActivity">
<Button
android:id="@+id/buttonGenerateSignal"
android:layout_width="wrap_content"
android:layout_height="wrap_content"
android:layout_gravity="center_horizontal"
android:onClick="buttonGenerateSignalClicked"
android:text="Generate Signal"
android:layout_margin="5dp"/>
<CheckBox
android:id="@+id/checkboxUseNeon"
android:layout_width="wrap_content"
android:layout_height="wrap_content"
android:layout_gravity="center_horizontal"
android:text="Use Neon?" />
<LinearLayout
android:layout_width="wrap_content"
android:layout_height="wrap_content"
android:layout_gravity="center_horizontal">
<Button
android:id="@+id/buttonTruncate"
android:layout_width="wrap_content"
android:layout_height="wrap_content"
android:layout_gravity="center_horizontal"
android:onClick="buttonTruncateClicked"
android:text="Truncate"
android:layout_margin="5dp"/>
<Button
android:id="@+id/buttonConvolution"
android:layout_width="wrap_content"
android:layout_height="wrap_content"
android:layout_gravity="center_horizontal"
android:onClick="buttonConvolutionClicked"
android:text="Convolution"
android:layout_margin="5dp"/>
</LinearLayout>
<com.jjoe64.graphview.GraphView
android:id="@+id/graph"
android:layout_width="match_parent"
android:layout_height="350dp"
android:layout_margin="10dp"/>
<TextView
android:id="@+id/textViewProcessingTime"
android:layout_width="wrap_content"
android:layout_height="wrap_content"
android:layout_gravity="center_horizontal"
android:textSize="18sp" />
</LinearLayout>
</ScrollView>
To plot the signal before and after processing, I use the GraphView library. Install this library by including the following line under the dependencies node of your build.gradle:
implementation 'com.jjoe64:graphview:4.2.2'
Then, include the GraphView in the UI by using the <com.jjoe64.graphview.GraphView> attribute. Once this is done, you get a reference to the GraphView instance as with any other Android control.
I did so in the configureGraph method that I invoke under the onCreate activity method (see below). You can then use a reference to the GraphView to format the plot and add data series. In this article, I use a three-line series (instances of the LineGraphSeries from the GraphView library): one to display the input signal, one for the truncated signal, and the last one for convolution.
GraphView graph;
private LineGraphSeries<DataPoint> signalSeries = new LineGraphSeries<>();
private void configureGraph(){
graph = (GraphView) findViewById(R.id.graph);
graph.getViewport().setXAxisBoundsManual(true);
graph.getViewport().setMaxX(getSignalLength());
graph.getViewport().setYAxisBoundsManual(true);
graph.getViewport().setMinY(-150);
graph.getViewport().setMaxY(150);
int thickness = 4;
signalSeries.setTitle("Signal");
signalSeries.setThickness(thickness);
signalSeries.setColor(Color.BLUE);
graph.addSeries(signalSeries);
graph.getLegendRenderer().setVisible(true);
graph.getLegendRenderer().setAlign(LegendRenderer.LegendAlign.TOP);
}
After setting up the graph, I implement event handlers for buttons. The structure of each event handler is similar. They use the resetData method of the appropriate LineGraphSeries instance to display the data in the chart. For example, the following code displays input signal and data after convolution:
private LineGraphSeries<DataPoint> signalSeries = new LineGraphSeries<>();
private LineGraphSeries<DataPoint> signalAfterConvolutionSeries =
    new LineGraphSeries<>();

public void buttonGenerateSignalClicked(View v) {
    signalSeries.resetData(getDataPoints(generateSignal()));
}

public void buttonConvolutionClicked(View v) {
    signalAfterConvolutionSeries.resetData(getDataPoints(convolution(useNeon())));

    displayProcessingTime();
}
Note that event handlers related to truncation and convolution also take the information, whether the processing should be done using Neon intrinsics or native C++. To do so, I check the state of the Use neon checkbox provided in the application interface:
private boolean useNeon() {
    return checkBoxUseNeon.isChecked();
}
getDataPoints is the helper that converts the byte array (from native-lib) to a collection of DataPoints required by the GraphView for plotting (see details in the code repository).
Another helper, displayProcessingTime, is used to depict the code execution time in the label located below the chart. I use this to compare the processing performance between Neon and non-Neon code.
Invoking the Native Library
The signal, truncated, and convolved data are all coming from the native C++ library. To get data from the C++ library, you need to create a binding between the Java method and the native library function. I will show you how to do this using the generateSignal method.
First, declare the method in the Java class with an extra native modifier:
public native byte[] generateSignal();
Then, to automatically generate a binding, you put the cursor within the method name (here it is generateSignal). Press Alt+Enter to display the context help and, as shown below, choose the Create JNI function for… option.

Android Studio will supplement the native-lib.cpp with the empty declaration of the C exportable function that looks like this:
extern "C"
JNIEXPORT jbyteArray JNICALL
Java_com_example_neonintrinsicssamples_MainActivity_generateSignal(
JNIEnv *env, jobject ) {
}
Input Signal
After setting up the UI and the Java-to-native bindings, extend native-lib with the generateSignal method:
#define SIGNAL_LENGTH 1024
#define SIGNAL_AMPLITUDE 100
#define NOISE_AMPLITUDE 25

int8_t inputSignal[SIGNAL_LENGTH];

void generateSignal() {
    auto phaseStep = 2 * M_PI / SIGNAL_LENGTH;

    for (int i = 0; i < SIGNAL_LENGTH; i++) {
        auto phase = i * phaseStep;
        auto noise = rand() % NOISE_AMPLITUDE;

    	inputSignal[i] = static_cast<int8_t>(SIGNAL_AMPLITUDE * sin(phase) + noise);
    }
}
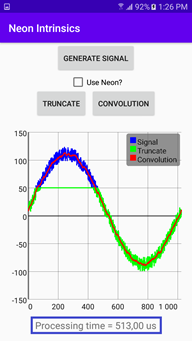
This method generates a noisy sine wave (see the blue curve in the image of the app UI shown earlier) and stores the result in the inputSignal global variable.
You control the signal length, its amplitude, and noise contribution using the SIGNAL_LENGTH, SIGNAL_AMPLITUDE, and NOISE_AMPLITUDE macros. Note, however, that inputSignal is of type int8_t. Setting too large amplitudes will result in integer overflow.
To pass the generated signal to the Java code for plotting, you need to invoke the generateSignal method in the exportable C function (that was previously made by Android Studio):
extern "C"
JNIEXPORT jbyteArray JNICALL
Java_com_example_neonintrinsicssamples_MainActivity_generateSignal(
JNIEnv *env, jobject ) {
generateSignal();
return nativeBufferToByteArray(env, inputSignal, SIGNAL_LENGTH);
}
There is a new thing here, nativeBufferToByteArray. This method takes the pointer to the native C++ array and copies array elements to the Java array (see this link for more information):
jbyteArray nativeBufferToByteArray(JNIEnv *env, int8_t* buffer, int length) {
    auto byteArray = env->NewByteArray(length);

    env->SetByteArrayRegion(byteArray, 0, length, buffer);

    return byteArray;
}
Truncation
Let's now move to the thresholding via truncation.
This algorithm works as follows: given an input array, it replaces all elements above the predefined threshold, T, with the T value. All items below the threshold are kept unchanged.
To implement such an algorithm, you can simply use a for loop. Then, at every iteration, you can invoke the std::min method to check whether the current array value is above the threshold:
#define THRESHOLD 50

int8_t inputSignalTruncate[SIGNAL_LENGTH];

void truncate() {
    for (int i = 0; i < SIGNAL_LENGTH; i++) {
        inputSignalTruncate[i] = std::min(inputSignal[i], (int8_t)THRESHOLD);
    }
}
In this example, the threshold was set through the corresponding macro to 50 and the truncated signal is stored in the inputSignalTruncate global variable.
Truncation with Neon
Since every iteration of the above algorithm is independent, you can straightforwardly apply Neon intrinsics. To do so, you just need to split the for loop into several segments. Each segment will process several input elements in parallel.
The number of items you can handle in parallel depends on the input data type. Here, the input signal is an array of int8_t elements, so it can process up to 16 items per iteration (see the TRANSFER_SIZE macro below).
The general pattern of using Neon intrinsics is to first load data from memory to registers, process the registers with Neon SIMD, and then store the results back to memory. Here is how to follow this approach in the case of truncation:
#define TRANSFER_SIZE 16
void truncateNeon() {
int8x16_t threshValueNeon = vdupq_n_s8(THRESHOLD);
for (int i = 0; i < SIGNAL_LENGTH; i += TRANSFER_SIZE) {
int8x16_t inputNeon = vld1q_s8(inputSignal + i);
uint8x16_t partialResult = vmin_s8(inputNeon, threshValueNeon);
vst1q_s8(inputSignalTruncate + i, partialResult);
}
}
You first split the loop into SIGNAL_LENGTH / TRANSFER_SIZE segments. Then, duplicate the threshold value to a vector named threshValueNeon using the vdupq_n_s8 Neon function (you can get the list of all available Neon functions here).
Afterward, you load the chunk of an input signal to the registers using the vld1q_s8 method, calculate the minimum between the threshold and the fragment of the input signal, and store the results back to the inputSignalTruncate array.
To compare the performance of the Neon and non-Neon approach, put the truncate and truncateNeon methods in the Java-bounded method:
double processingTime;

extern "C"
JNIEXPORT jbyteArray JNICALL
Java_com_example_neonintrinsicssamples_MainActivity_truncate(JNIEnv *env, jobject thiz, jboolean useNeon) {

    auto start = now();

#if HAVE_NEON
    if(useNeon)
        truncateNeon();
    else
#endif

    truncate();

    processingTime = usElapsedTime(start);

    return nativeBufferToByteArray(env, inputSignalTruncate, SIGNAL_LENGTH);
}
You can measure the processing time with the chrono library (see the companion code), and store the measured execution time within the processingTime global variable. It is passed to Java code using the following binding:
extern "C"
JNIEXPORT jdouble JNICALL
Java_com_example_neonintrinsicssamples_MainActivity_getProcessingTime(
    JNIEnv *env, jobject thiz) {

    return processingTime;
The results are presented below.


To get them, run the app on your device and click the Generate Signal button. It plots the blue curve. Then, tap the Truncate button. A green line appears.
Finally, check the Use Neon checkbox and tap the Truncate button again. As shown, with Neon intrinsics, I shortened the processing time from 100 to 6 microseconds, which yields approximately 16 times faster execution! I achieved this without any significant code changes — just slight modifications of the single loop with Neon Intrinsics.
Convolution
Finally, let's look at how to implement a 1D convolution with Neon intrinsics.
You can find the formal definition of the convolution here. However, simply speaking, to calculate the convolution, you need to have your input signal. Additionally, you define the so-called kernel. This kernel is typically much shorter than the input signal and varies between applications. People use different kernels for smoothing or filtering the noisy signals or detecting edges.
A 2D convolution is also used in convolutional neural networks to find image features.
Here, I have a 16-element kernel, where each element has the same value of 1. I slide this kernel along my input signal and, at each position, multiply the input element by all kernel values, then sum up the resulting products. After normalization, my kernel will work as the moving average.
Here is the C++ implementation of this algorithm:
#define KERNEL_LENGTH 16
int8_t kernel[KERNEL_LENGTH] = {1, 1, 1, 1, 1, 1, 1, 1, 1, 1, 1, 1, 1, 1, 1, 1};
void convolution() {
auto offset = -KERNEL_LENGTH / 2;
auto kernelSum = getSum(kernel, KERNEL_LENGTH);
for (int i = 0; i < SIGNAL_LENGTH; i++) {
int convSum = 0;
for (int j = 0; j < KERNEL_LENGTH; j++) {
convSum += kernel[j] * inputSignal[i + offset + j];
}
inputSignalConvolution[i] = (uint8_t)(convSum / kernelSum);
}
}
As you can see, this code uses two for loops — one over the input signal elements and the other over the kernel. To improve the performance, I could employ manual loop unrolling, and replace the nested for loop with the hardcoded indexes, like so:
convSum += kernel[0] * inputSignal[i + offset + 1];
convSum += kernel[1] * inputSignal[i + offset + 2];
…
convSum += kernel[15] * inputSignal[i + offset + 15];
However, as the kernel length is the same as the number of items I can transfer to the CPU registers, I can employ Neon intrinsics and completely unroll the second loop:
void convolutionNeon() {
auto offset = -KERNEL_LENGTH / 2;
auto kernelSum = getSum(kernel, KERNEL_LENGTH);
int8x16_t kernelNeon = vld1q_s8(kernel);
int8_t *mulResult = new int8_t[TRANSFER_SIZE];
for (int i = 0; i < SIGNAL_LENGTH; i++) {
int8x16_t inputNeon = vld1q_s8(inputSignal + i + offset);
int8x16_t mulResultNeon = vmulq_s8(inputNeon, kernelNeon);
vst1q_s8(mulResult, mulResultNeon);
auto convSum = getSum(mulResult, TRANSFER_SIZE);
inputSignalConvolution[i] = (uint8_t) (convSum / kernelSum);
}
delete mulResult;
}
Again, I first load the data to the CPU registers (from kernel and input signal). I process it with Neon SIMD, and store the results back to memory (here, that is the inputSignalConvolution array).
The above code is compatible with ARM v7 and above. However, on AARCH64, it can be further improved by utilizing the vaddvq_s8 function that sums elements across the vector. I could use it to sum values under the kernel (see comments in the code).
To test the code, I use another Java-to-native binding:
extern "C"
JNIEXPORT jbyteArray JNICALL
Java_com_example_neonintrinsicssamples_MainActivity_convolution(
    JNIEnv *env, jobject thiz, jboolean useNeon) {

    auto start = now();

#if HAVE_NEON

    if(useNeon)
        convolutionNeon();
    else

#endif

    convolution();

    processingTime = usElapsedTime(start);

    return nativeBufferToByteArray(env, inputSignalConvolution, SIGNAL_LENGTH);
}
Then, after rerunning the app, I achieve the same results but with only half of the processing time using Neon Intrinsics optimizations (see the bottom label in the Figure below - processing times are outlined in blue below the graph).

Wrapping Up
In this article, I developed an Android app that uses native C++ code to perform signal processing. I showed how easily you can combine Java with native code to perform computation-intensive work. The performance of the native part was further enhanced with Arm Neon intrinsics. You saw that Neon intrinsics can shorten the processing time significantly. Especially for the thresholding with truncation, the processing time was reduced down to about 6% of the original processing time.
You will find Arm Neon intrinsics useful whenever your iterative code is independent, meaning when subsequent iterations do not depend on previous results. Popular open-source libraries like OpenCV already use Neon intrinsics to improve performance. For instance, the Carotene repository includes code based on Neon intrinsics that implements many image processing algorithms. You can use this repository to gain more insights into how Neon intrinsics can be helpful for your projects.
References and Useful Links
Dawid Borycki is a software engineer and biomedical researcher with extensive experience in Microsoft technologies. He has completed a broad range of challenging projects involving the development of software for device prototypes (mostly medical equipment), embedded device interfacing, and desktop and mobile programming. Borycki is an author of two Microsoft Press books: “Programming for Mixed Reality (2018)” and “Programming for the Internet of Things (2017).”


