Introduction
An IoT data acquisition system consists of a network of sensors that send your data to one or more central units that, in turn, process and store that data, allowing you to monitor and control devices located locally or remotely.
In this article, I will describe the architecture of the receptor module.
Background
The purpose of the receiver module is to allow the storage of data sent by a network of microcontrollers distributed locally or remotely.
- Each microcontroller device has a set of sensors whose measurements are sent to the central receiver through different communication protocols.
- The data is received by a concentrator similar to a broker or gateway.
- This data is then stored in a memory cache extremely quickly, being available for processing by the supervisory application.
To better understand, see the diagram below:
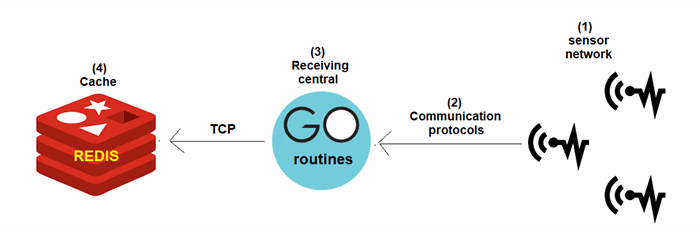
- Sensor network → The sensors are connected to the microcontroller devices that send the data to the concentrator. There are no restrictions on the board models used, which may be Arduino, ESP8266, ESP32, PIC, etc.
The boards, in fact, must be chosen according to the desired form of communication.
However, there are operating and software standards that must be followed before the device can be connected to the system.
- Communication forms and protocols → The following standards are provided for communication between the devices and the concentrator:
- Wi-fi / Ethernet (Websocket / HTTP / REST)
- RF / LORA
- Serial / Bluetooth communication
- GSM / GPRS
- Receiving Routine → Routine in GO that receives the data from the sensors, processes it and sends it to the REDIS cache. There is a specific routine for each communication protocol described in item 2.
-
REDIS Cache → Stores sensor data temporarily or permanently. If necessary, the cache can be mirrored (replicated).
It is also possible to create a message publishing and subscription scheme similar to the MQQT protocol, but this will not be covered here.
Comments
- Depending on the form of communication and the distance between the components, there may be additional layers of hardware / software for interconnection. This introduction is a generic and simplified description of the architecture;
- The distribution of servers for each layer is not a decision defined by the architecture, but the ideal is to have a dedicated LINUX server for REDIS.
- We are describing only the data acquisition module here. The control module will be detailed in another opportunity.
Technologies
We will now list the main software technologies used in the concentrator module:
- REDIS is an in-memory data storage system with excellent performance that can be used as a NOSQL database, Cache or Message Broker.
REDIS uses key-value data structures, such as linked lists, Strings, Sets, etc. In addition, data can be configured to be temporary or persisted in a variety of ways.
I also highlight the support for the following features:
- Replications
- Stored Procedures
- Partitioning;
- Etc.
- GO or Golang is a programming language created by Google and released in open source in November 2009. It is a statically typed language, compiled and focused on productivity and concurrent programming (Wikipedia).
Go was designed for the multi-core reality of today's computers. Therefore, due to its robustness, it is widely used for programming on large-scale network servers and distributed systems.
Development Environment
We will now see how to prepare the development environment for the Linux OS.
Installing REDIS
To install REDIS on Linux, use apt:
sudo apt update
sudo apt install redis
To start the REDIS server as a service:
sudo systemctl start redis-server
To check the status of the server or stop the service:
sudo systemctl status redis
sudo systemctl stop redis
The REDIS package comes with a client application, redis-cli, which can be used for maintenance and testing. To see if everything is working, run the commands:
redis-cli
set hello world
get hello
If the system answered “world”, it means that everything is ok and you have just created a String data structure with the key “hello” and value “world”.
To exit the client, type: quit
Optionally, you can also install a client with more features and ease of use: Redis Desktop Manager
To learn more about REDIS:
GO Language Installation
The first step is to download the installation package from the official website:
https://golang.org/dl/
Then unzip the file with the following command:
sudo tar -C /usr/local -xzf package_name
Where package_name is the name of the file you downloaded.
Example: go1.13.5.linux-amd64.tar.gz
The next step is to set up the environment.
I don't know if this is good or bad, but here among us, the GO language is authoritative in several aspects and you realize this already in the preparation of the development environment.
Before installing, you must already plan how your Workspace will be, that is, where your source code files will be. There is a pattern for this. It is not a rule, but it is better to obey • ᴗ •
Let's assume that your workspace will be in the /home/user/gocode folder. Then under that folder, 3 subfolders of the same level must be created:
- pkg → Folder where the packages and libraries are that you downloaded or created to reference in your programs
- src → Your source code files
- bin → Here are the executable files that you created and installed from the src folder. It is like a folder to deploy.
It is also necessary to create three environment variables:
GOPATH → Path to your workspace. There can be more than one, in which case, separate by:GOROOT → Path where the GO was installed. Typically: /usr/local/goGOBIN → Folder where GO should generate executables. It may be the workspace bin folder. But it is up to you.
In addition, it is highly recommended to change the PATH variable to point to the GO binaries, usually: /usr/local/go/bin.
To create these environment variables, we use the export command. To do this, edit the ~/.profile file (sudo gedit ~/.profile) and place the export commands at the end of it.
In my case, it looked like this:
export PATH=$PATH:/usr/local/go/bin
export GOROOT=/usr/local/go
export GOPATH=/home/josecintra/code/go
export GOBIN=/home/josecintra/code/go/bin
Another thing: Golang emphasizes the use of version control systems, such as GIT. You will need one to install third party library packages.
If you have not installed one on your Linux system, see the installation instructions at this link.
Ready! Now we just need to choose an IDE.
IDEs for the GO Language
This is a personal matter. I like Geany a lot. It is already configured to edit, compile and run GO programs.
To install, use the following commands:
sudo add-apt-repository ppa:geany-dev/ppa
sudo apt-get update
sudo apt-get install geany geany-plugins-common
f you don't want to use Geany, here's an extensive list of IDEs with support for the GO language:
To learn more about the GO language:
Data Modeling
Let's talk now about REDIS and how it will be used in this project module.
REDIS will function as an auxiliary database for the main DBMS of the supervisory system. The main function of REDIS will be to store the data from the sensor network to be displayed (and processed) in (almost) real time.
Due to its excellent performance, REDIS is ideal for this type of application and this will also save the system's main database.
In the supervisory system module, REDIS will have other functions not covered here.
The Scenario
The scenario we want to model is as follows: Several sensors arranged locally or remotely will periodically send their measurement data to a server. The collecting routine (GOLANG) will store the data in REDIS so that the supervisory application can process and present the information on a dashboard.
What we want to store from the sensors is just the following information:
- Identification of the sensor that is sending the information
- The date and time of sending
- The measurement value
Other information such as the type of sensor, location, unit of measure and others are NOT REDIS responsibility. This will be the responsibility of the supervisory WEB application.
The function of REDIS in this module is only to speed up the reception of data, leaving complexity to the supervision system.
Sensor identification: This is the sensor ID which is a String composed of 3 letters and a numerical sequence joined by the pipe separator (“|”).
For example:
- A temperature sensor, no matter which standard or model, may have the ID “TMP | 1”
- A humidity sensor can have the ID “HMD | 100” and so on.
Obviously, the IDs are not repeated, that is, there cannot be two sensors with the same identification, as in a primary key!
For REDIS, the sensor ID is just a dumb key and it doesn't know anything about it, unless it is possibly unique.
Date and time of sending: For reasons of agility, the date will be stored in the Unix Time Stamp format.
Measurement value: This is a String storing a numeric value. Similarly, REDIS does not know anything about this value, or where it comes from.
Note: The sensor ID and its measurement are provided by the microcontroller board to which the sensor is connected (Arduino family). The sending date is the responsibility of the receiving application developed in the GO language. This is for reasons of standardization and economy (the boards do not need to have an RTC module).
Data Structures
For those who work with relational databases, it may be strange how data is stored and accessed in REDIS. About this, we have already indicated several tutorials in the previous articles, so let's get straight to the point ...
Among the data structures made available by REDIS, we chose linked lists because the insertion and removal operations at the end of the list are extremely fast, which is what we need.
Let's see, as an example, what the operations of inserting and removing the list would look like.
Supposing that, on “2020/01/01” at “01:00:05” hours, the code sensor “TMP | 5” sent the value “25.25”.
The key to our list will simply be the sensor ID. Therefore, we will have a list for each sensor.
Converting the date to Unix, we have: “1577840405”. So the command to store this data at the end of the list would be this:
RPUSH TMP|5 1577840405|25.25
To obtain the last value sent by the “TMP | 5” sensor, we use the following command:
RPOP TMP|5
Note: Alternatively, for reasons of readability, we could represent the values in JSON format, a very common procedure in the REDIS world that has support for this technique.
Developing a Test Application
We will develop a test application (P.O.C.) for sending and receiving sensor data with GOLANG and REDIS.
For this particular test, we will use a NodeMCU board programmed in the Arduino IDE. This board will send, via WebSockets, the data from an NTC temperature sensor every 30 seconds.
The receiving application in Golang will receive the data, parse and store it in REDIS, making it available for the WEB application.
We will start by describing the application of NodeMCU.
Issuer Station nodemcu
Prototype

Components
- NodeMCU card. In fact, it can be any ESP *. * Family board compatible with the Arduino IDE (ESP8266, NodeMCU, Wemos, ESP32, etc.)
- 10K NTC thermistor type temperature sensor
- Jumper wires and, optionally, a protoboard
Required Software
- To create the websocket server, we will need to install the ArduinoWebsockets which can be installed by the Arduino IDE itself through a library manager.
- The temperature data from the sensor will be sent every 3 minutes to the WEB server. To simplify our code, let's count the time with millis using the NeoTimer, library, which is also available in the manager.
- The temperature reading and calculation will be done through the following routine available on the Internet: Thermistor Interfacing with NodeMCU
Sketch
#include <arduinowebsockets.h>
#include <esp8266wifi.h>
#include <neotimer.h>
const char* ssid = "x"; const char* password = "y"; const char* websockets_server_host = "192.168.0.0"; const uint16_t websockets_server_port = 8080;
Neotimer mytimer = Neotimer(10000); String tempString;
String sensor = "TMP|5";
using namespace websockets;
WebsocketsClient client;
void setup() {
Serial.begin(9600);
WiFi.begin(ssid, password);
for(int i = 0; i < 10 && WiFi.status() != WL_CONNECTED; i++) {
Serial.print(".");
delay(1000);
}
if(WiFi.status() != WL_CONNECTED) {
Serial.println("No Wifi!");
return;
}
Serial.println("Connected to Wifi, Connecting to server.");
bool connected = client.connect(websockets_server_host, websockets_server_port, "/");
if(connected) {
Serial.println("Connecetd!");
} else {
Serial.println("Not Connected!");
}
client.onMessage([&](WebsocketsMessage message) {
Serial.print("Got Message: ");
Serial.println(message.data());
});
}
void loop() {
if(client.available()) {
client.poll();
}
if (mytimer.repeat()) {
tempString = readTemperature();
Serial.println(tempString);
client.send(sensor + "@" +tempString);
}
}
double readTemperature() {
const double VCC = 3.3; const double R2 = 10000; const double adc_resolution = 1023; const double A = 0.001129148; const double B = 0.000234125;
const double C = 0.0000000876741;
double Vout, Rth, temperature, adc_value;
adc_value = analogRead(A0);
Vout = (adc_value * VCC) / adc_resolution;
Rth = (VCC * R2 / Vout) - R2;
temperature = (1 / (A + (B * log(Rth)) + (C * pow((log(Rth)), 3)))); temperature = temperature - 273.15; delay(500);
return (temperature);
}
Golang Receiving Station
Required Software
We have previously shown how to install REDIS and the GO language. However, to establish a connection with REDIS and accept Node's websockets connections, we will need to install some library packages:
- GORILLA → Web Toolkit for the GO language
- REDIGO → Go Client forREDIS
To install the packages, enter the following commands on the virtual terminal:
go get github.com/gorilla/websocket
go get github.com/gomodule/redigo/redis
Let’s GO!
package main
import (
"fmt"
"strconv"
"strings"
"time"
"log"
"github.com/gomodule/redigo/redis"
"github.com/gorilla/websocket"
"net/http"
)
var upgrader = websocket.Upgrader{
ReadBufferSize: 1024,
WriteBufferSize: 1024,
CheckOrigin: func(r *http.Request) bool { return true },
}
func main() {
http.HandleFunc("/", handler)
http.ListenAndServe(":8080", nil)
}
func handler(writer http.ResponseWriter, request *http.Request) {
socket, err := upgrader.Upgrade(writer, request, nil)
if err != nil {
fmt.Println(err)
}
for {
msgType, msg, err := socket.ReadMessage()
if err != nil {
fmt.Println(err)
return
}
var msg_split []string = strings.Split(string(msg), "@")
currentTime := strconv.FormatInt(time.Now().Unix(), 10)
key := msg_split[0]
value := currentTime + "|" + msg_split[1]
conn, err := redis.Dial("tcp", "localhost:6379")
if err != nil {
log.Fatal(err)
}
defer conn.Close()
_, err = conn.Do("RPUSH", key, value)
if err != nil {
log.Fatal(err)
}
err = socket.WriteMessage(msgType, msg)
if err != nil {
fmt.Println(err)
return
}
}
}
Conclusion
The combination of the GO language and the REDIS database allows you to write robust and scalable applications with excellent performance, making them ideal for the IoT world.
The sample code shown here is didactic in nature. This application can be improved in several aspects:
- Encryption and security features
- Concurrency through GO routines
- Modularity
- etc.
At the next opportunity, we will show here how to develop the WEB application for control and monitoring.
Until then!
References
History
- 2020-02-01 - Initial release


 General
  News
News  Suggestion
  Question
  Bug
Bug  Answer
  Joke
Joke  Praise
  Rant
Rant  Admin
Admin 


