Data files - Download data files off my GoogleDrive and expand onto C:\ root directory
Update: 2019/10/12 - Source code - buggy Editor somewhat better
P.T.M.C.
The P.T.M.C. is part of the 360° game series Descent which puts you inside a PyroGX ship loaded with armaments ready to spin you along any of the three axes of rotation. It's a rockin’ righteous game ... but I’ve often considered many ‘what ifs?’ about that game. Specifically, what if the Descent game-world consisted of the solar system that you could choose to explore at your own will. Fly from mine to mine, moon to moon, planet to asteroid? What if it were a massive-multiplayer universe? What if you had to build and defend your resources like in the Age of Empires games while still having the option to take control of any unit on the board in a 1st person shooter mode at any time? Buy, sell, trade or steal? Play the role of a merchant, mercenary, pirate or warlord?
Well, you may ask, is that what is on offer here?
No... unfortunately. That would be much too big a project for the likes of me.
P.T.M.C. is a re-make of a previous project I published but never completed almost ten years ago called Mars Mission. Have a look at those articles because they are still pretty cool. The Mars Mission concept is pretty simple, build a 2D mock-up of the solar-system and let the player explore it at will. It has resources in the form of atmospheric compounds that must be harvested and converted into fuels. All the known planets and moons are there to explore with randomly generated single path tunnels. You control astronauts who walk around, perform EVAs and fly your ship. I had plans for mineral resources, satellite communications and ultimately a fighter game against malicious robots, but I was taken away from my computer for some seven years before I could complete it and when I got back to it I decided a complete rewrite was in order.
The novelty of exploring the solar system is fun but soon wears off as there is no specific goal, no real challenge for the player beyond avoiding a crash or running out of fuel.
This time around, it's a fighter game first...
So here we are...
Background
I started working on P.T.M.C. back in April, right after washing my hands of the Latin Crossword Puzzle. Worked on it for a few months, then took some time to scrape Merriam-Webster's Dictionary and publish that project. So, at this point in P.T.M.C. I feel I've done so much already and there's still so much more to do, I'm at a crossroad where I can stop and tell you (in summary) all that I've done so far before I move on to the next phase of game development.
I waited a long time before publishing this ... it's still a work in progress but there is so much to talk about that I won't be able to fit it all in one article and will not try to explain everything in as great a detail as some may like. If you want me to clarify or expand on anything, just leave me a comment at the bottom and I'll see what I can do.
Let's get started ...
Landscape
The 'landscape' is the gameworld where the player is flying around within a planet or moon's surface area, as opposed to orbiting around a planet or flying from a planet to one of its moons. In keeping with the game Descent, the player's ship is not affected by forces of gravity. This allows the player more manoeuvrability and can be explained away as the benefit of advanced automated ship's controls that give the player the luxury of not worrying about dropping altitude while in a dog fight. There are plans for multiple ship types, like in Mars Mission, where some ships will have more vulnerabilities than others as a trade off for other capabilities which the current version does not yet explore.
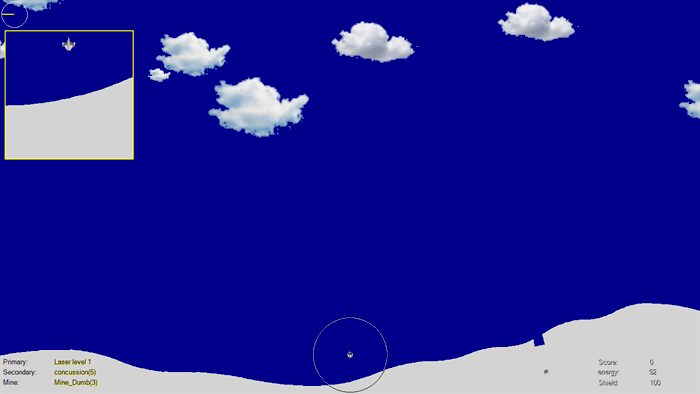
You can look at the image above and get a general idea of what the earth's surface looks like in the game. The square framed region near the top left is one of your alt-screens called Left_HUD that here shows the ship's rear-view. You can get a better look at your ship at the bottom center of this image so you have plenty of room to look in front of you. The clouds are examples of landmarks which are animated sprites that are drawn either before or after the play/robot ships making them either foreground or background. The enumerated type listed below gives you an idea:
public enum enuLandmarkType
   {
       CautionRadiation,
       Clouds00,
       Clouds01,
       DangerLookOut,
       ElectricalHazardSign,
       FanBlack,
       GrillEnd,
       Lava,
       LavaEnd,
       WaterFlow,
       ConveyorBelt_Rocks,
       BiohazardSymbol,
       _num
   };
These are just the ones I've included so far. They're sprites, so they rely on the classSprite which you can see in my SpriteEditor article. All the ships are sprites, as well as explosions, UI flashes and missiles.
This is a work in progress, so it still has issues like drawing things that are below the surface that shouldn't be drawn while the player is above the surface, like the Robot Incubator drawn in the image above below the cave opening just to the left of the player's Energy HUD display, but it's stable enough to play and edit maps with. The reason why I kept putting off the writing of this article is because there was always something else to do ... as there likely always will be. So you'll just have to put up with the mess for now.
When you launch the game, you start in the bottom of the mine and need to fight your way out. The Terran underground is not overly complicated and can be played on its own, as a preview of the final product. Your ship will remain at the bottom of the screen as you fly around. By default, the Mouse is the primary interface and the ring around the ship is there to help you move around by sliding the ship in the direction of the mouse at a velocity proportionate to the distance between the mouse and the ship's center (the smaller inner ring being zero-velocity). Use the wheel to rotate and mouse button to fire.
Many options are available with the context menu, yours to explore.
You can toggle off the Mouse Controls and use the keyboard (my preference) where:

The rest of the keyboard controls can be seen in the formPTMC's textbox event handler. (A & Z to zoom in/out)
private void TxtInput_KeyDown(object sender, KeyEventArgs e)
{
    switch (e.KeyCode)
    {
        #region thrusters
        case Keys.NumPad7:
            eKeyLastPressed = enuKeyStrokes.Turn_Left_Hard;
            break;

        case Keys.NumPad9:
            eKeyLastPressed = enuKeyStrokes.Turn_Right_Hard;
            break;

        case Keys.NumPad4:
            eKeyLastPressed = enuKeyStrokes.Turn_Left;
            break;
The txtInput textbox is given focus at the start of the picMain's keyUp event handler and can occasionally lose focus rendering the keyboard useless until the screen is clicked with the mouse. This will happen when the user uses the mouse or alt-tabs his way to a different form and then click the game but not the screen. I'm working on it.
The rolling hills are defined in a way very similar to that which I used in the Mars Mission project mentioned above. There are 'cells', or posts really, equi-distant apart on the X-axis that determine how high the ground reaches at that point. The collection of them together make up the landscape. Each planet or moon has its own landscape which is defined in the classLandscape.
Collision Detection
Collision detection is always of primary concern when making video games. The similarities between Mars Mission collision detection and P.T.M.C. collision detection are remarkable.
They're essentially very similar:
- measure the range of cells over which the object is moving
- compare the AABB (axis-aligned bounding box) of each of those cells (space between posts) to the box that bounds the ship's motion(new to P.T.M.C.)
- when these two AABBs collide, a closer text is made using logic that is similar to Mars Mission:
- the line of the landscape being tested for collision is rotated about the ship's start location so as to perform the mathematical test for collision with the ship's motion along the positive X-axis
- form a rectangle that represents the region where the ship will travel (width = distance travelled & height = the diameter of the ship 'ball' shaped test region)
- test to see if the detection-line penetrates the rectangle of the ship's motion
- when it does - calculate the ship's deflection & projected resultant end-location
- it then uses the current collision point as a new start & the new end-location and runs that data through the algorithm again bouncing off walls as long as it has energy and giving you a final-final end point & velocity
because the algorithm needs to test all the walls before it can decide which wall (if any) the ship will hit first, it makes a list of all collision, reorders them according to the distance travelled and then runs it through the algorithm again.
The collision detection is central to the entire project and took about two months to get right on the surface. Most of that code was transferable to the same concept inside the caves. Since everything that moves needs to be tested for collisions, the collision detection is performed in the classObject which holds the location and velocity variables of virtually everything on the screen. Pressing the escape-key will put the game in collision detection test-mode (I have yet to remove this debugging tool). Here, you can see the tunnel-segment ID numbers as well as the ship's resultant position, were it to fly in one step from its current location to the mouse cursor. You can see in this short video how it snakes along through the tunnels. There are instances when the collision detection system fails to detect a collision when it should have during testing and this could be improved but the step size during game time is never as large as any but the shortest tests in the demonstration so those incidences where there is failure are caught by subsequent tests that push the ship back into play. As a result, playing the game does not result in catastrophic CD failures. Clicking the screen while testing the CD places the ship wherever you clicked regardless of any collisions being detected and since the CD debugging tool only tests a new collision when the MouseMove Event is triggered, changing the zoom or rotating the map will not cause a CD test to be performed and appear to fail to detect a collision. Just move the mouse slightly and the test will be performed.
public bool DetectCollision(ref List<classMoveData> lstMoveData)
When the player approaches a PowerUp or a missile hits a target, different approaches are used.
To detect whether a missile hits a target or not is done in the classMissile.
The classLandscape has a classQuadTree_PTMC that I adapted from a quadtree I wrote for an earlier project. It keeps track of where everything is by refreshing its content at the start of every clock cycle. This could definitely be improved. It works for now because the player is only on one planetary surface at a time but when satellites allow the player to keep track of alt-ships on different moons, the time consumed unnecessarily rebuilding entire QuadTrees for every planet or moon in play may become considerable... that's for later.
So when a missile is in flight, it needs to test for collision other than the walls of the caves or the surface of the planet. To do this, it looks at the QuadTree and tests whether each object is in the same region both in the Cartesian (x, y) realm and the tunnels (because the network of tunnels overlap but don't necessarily share the same game-space).
This is done in the classMissile's functions:
public classObject Detect_Collisions_Objects(ref PointF ptfCollision)
{
...
}
bool DetectCollision_Object_FineTest(ref classObject cObjAlt, ref PointF ptfCollision)
{
...
}
The game timer call the following function in formPTMC.
void detectMissileCollisions()
{
    for (int intMissileCounter = 0;
    intMissileCounter < cLandscape.lstMissiles.Count; intMissileCounter++)
    {
        classMissile cMissile = cLandscape.lstMissiles[intMissileCounter];
        PointF ptfCollision = new PointF();
        classObject cObjectCollidedWith =
                    cMissile.Detect_Collisions_Objects(ref ptfCollision);
        if (cObjectCollidedWith != null)
        {
            classMath3.classRadialCoordinate cRadMissileMotion
                        = new classMath3.classRadialCoordinate
                          (cMissile.cObj.ptfLocation_Old, cMissile.cObj.ptfLocation);
            cObjectCollidedWith.Impact(ptfCollision,
                                       cRadMissileMotion,
                                       cRadMissileMotion.Magnitude *
                                       cMissile.cObj.dblMass / cObjectCollidedWith.dblMass);

            classMath3.classMinMax cMM = new classMath3.classMinMax(10, 25);
            classImpactAnimation.Launch(ref cLandscape,
                                        ref cMissile.cObj.cTS_New,
                                        cMissile.cObj.ptfLocation,
                                        cMath.AddTwoPointFs(cObjectCollidedWith.ptfVelocity,
                                                            cRND.Get_Point(cMM, cMM)));
            cMissile.Die();
        }
    }
}
It scans through all the current landscape's missiles and tests for collision.
When a missile collides with something, it returns a pointer to the object it hit, and sets the point of collision to the reference variable it receives as a parameter. With this information, two things happen.
- The object that was struck is jolted by the collision in the
cObjectCollideWith.Impact() call - An 'impact' animation is put on the screen at the point of collision
You can see in the code below how the point of impact & the missile's motion information are used to jolt the object that was struck.
public void Impact(PointF ptfContact, classMath3.classRadialCoordinate cRadMissileMotion,
double dblForce)
{
classMath3.classRadialCoordinate cRadContact =
new classMath3.classRadialCoordinate(ptfLocation, ptfContact);
cRadContact.Radians -= cRadMissileMotion.Radians;
PointF ptfContactRotated = cRadContact.toPointF();
double dblSum_XY =1+Math.Abs( ptfContactRotated.X) +Math.Abs( ptfContactRotated.Y);
double dblPC_Move = Math.Abs(ptfContactRotated.X / dblSum_XY);
double dblPC_Rotate = Math.Abs(ptfContactRotated.Y / dblSum_XY);
int intSignRotate = 1;
if (ptfContactRotated.Y < 0)
{
intSignRotate = 1;
}
else
{
intSignRotate = -1;
}
classMath3.classRadialCoordinate cRadUnitVectorMissileVelocity =
new classMath3.classRadialCoordinate(cRadMissileMotion.Radians, 1);
PointF ptfUnitVectorMissileVelocity = cRadUnitVectorMissileVelocity.toPointF();
ptfVelocity.X += (float)(ptfUnitVectorMissileVelocity.X * dblForce * dblPC_Move);
ptfVelocity.Y += (float)(ptfUnitVectorMissileVelocity.Y * dblForce * dblPC_Move);
dblAngle += (float)(intSignRotate * (Math.PI / 8.0) * dblPC_Rotate);
}
It looks at the point of impact relative to the center of the object.
Then it sums the absolute value of the X & Y components of that vector. This sum is then used to evaluate the push (force acting on the object to move it after impact) as well as the amount of rotation imparted on that object. By rotating the point of impact to align with the direction of the missile's motion, the sign of the Y-component of the rotated system's point of impact determines the sign of the angle of the resultant rotation.
Tunnels
Let's get to it then.
The tunnels in Mars Mission were simple one ended tunnels that opened on the surface and had no branches. They twisted and wound around but had one opening and one end, little else. Here, what you have is a network of tunnels. Much better.
Here's a screen capture of the Map-Editor of the game space seen in the video PTMC_Terra_Start.mp4 at the top of this article.
You can see the areas inside the orange circles where two tunnels share the same Cartesian space but are two separate and distinct locations in the game.
The map editor allows you to create new maps for the game (since some twenty new moons were recently discovered around Saturn looks like I'll never catch up designing game maps for all the planets and moons in our Sol system). The way to do that is to link together disparate Tunnel Segments in what I call the backbone design. Drop Backbone Tunnel Segments here and there then connect them together and you have a back bone. The Editor automatically fills in the gaps between them following the connecting lines between the initial tunnel segments that you added. In the screen capture below, you can see the same map area's backbone.
You can watch a brief 5 minute video that shows you how quick it is to create a new map on YouTube. The editor is mostly stable. And by that, I mean save often or you may wish you did.
The Editor itself is an on-going effort and I imagine I'll continue working on it as I develop the maps for the 201 planets and moons currently known to be in our solar system... so that means I have to design as many maps (except the gas giants Saturn & Jupiter). That's the grunt work that needs to be done.
Turrets
Since there's so much to talk about and I don't think I'll even try to cover everything, I'll just finish by telling you about the latest thing I've added: the Turret. The game Descent has no turrets but it does have a 'Gun Boy' which is described as "A portable laser turret. When dropped, it targets nearby enemies and fires upon them." This portable turret is carried in your ship's cargo and only put to use when it is dropped somewhere in the tunnels. The turrets in P.T.M.C. are considerably more refined.
- There are multiple types.
- Each has its own armour
- Munitions/Energy can be transferred between the player's ship & the turret
- Player can set what kind of weapon the turret will fire
- Turrets can be picked up and mounted onto the ship's dorsal plating
- Turrets have Allegiances which can be turned (so do robots) using crewman computer hacking proficiencies (crewmen are not yet implemented).
- The turret's point of view can be displayed on to the player's screen.
This YouTube gives a brief demonstration on how to use the Turrets. Most controls are in the context menu UI and are fairly straight forward. The sniper controls are quite basic as well: point and click. You select the Sniper option from the context menu put your gun sight close to where you want to aim and click the screen. When you've done this, you will get a zoomed-in view of your target which you can use to aim more precisely. If you think you have a shot, pressing your mouse button again will fire the turret.
Heads Up Display: HUD
The screen has several HUDs which you can use to look at different sources including a turret point of view. To set your HUDs, you go through the HUD option in your context menu and set the left/right HUDs to display your choice of perspectives. The dimensions of each HUD are defined in the classLandscape. The classLandscape is responsible for drawing the screen to a bitmap given a location, zoom and angle via the Draw() function. Since the alt-HUDs have to be drawn over top of the main screen HUD, they are drawn recursively when the Draw() is asked to draw the main HUD. That function spits-up the left-HUD image give the parameters appropriate for that view and then the leftHUD image is drawn over top of the main HUD before it returns the final image that goes to the screen.
There are two functions that are essential to putting the game world to the screen:
The first gets a point from the game-world and calculates its location on the screen.
public PointF Get_PointFInGameWorld
       (PointF ptfScreen, ref classLandscapeDrawParameters cDrawParameters)
{
    classMath3.classRadialCoordinate cRad_RelToCenter =
         new classMath3.classRadialCoordinate(cDrawParameters.ptOutputCenter, ptfScreen);
    cRad_RelToCenter.Radians += cDrawParameters.dblFocusAngle + Math.PI / 2;

    PointF ptRelToFocus = cRad_RelToCenter.toPointF();

    PointF ptRetVal = new PointF((cDrawParameters.ptfCenterScreenInGameWorld.X
                                    + intX_MaxGameWorld
                      + (int)(ptRelToFocus.X / cDrawParameters.dblGameToScreen_Ratio)) %
                        intX_MaxGameWorld, cDrawParameters.ptfCenterScreenInGameWorld.Y
                      + (int)(ptRelToFocus.Y / cDrawParameters.dblGameToScreen_Ratio));

    return ptRetVal;
}
and the other gets a point from the screen and finds its equivalent game-world location.
public PointF _Get_PointFOnScreen
(PointF ptGameWorld, ref classLandscapeDrawParameters cDrawParameters)
{
double dblDrawRotation = -cDrawParameters.dblFocusAngle - Math.PI / 2;
int intCenterTunnelSegment = (int)Math.Floor((double)
cDrawParameters.ptfCenterScreenInGameWorld.X / (double)conSurfaceCellWidth);
int intThisTunnelSegment = (int)Math.Floor((double)ptGameWorld.X /
(double)conSurfaceCellWidth);
int intDifference = (int)Math.Abs(intCenterTunnelSegment - intThisTunnelSegment);
if (intDifference > (lstSurface.Count / 2))
{
if (intCenterTunnelSegment > intThisTunnelSegment)
{
PointF ptUnrotated = new PointF((int)((intX_MaxGameWorld -
cDrawParameters.ptfCenterScreenInGameWorld.X + ptGameWorld.X) *
cDrawParameters.dblGameToScreen_Ratio),
(int)((ptGameWorld.Y - cDrawParameters.ptfCenterScreenInGameWorld.Y) *
cDrawParameters.dblGameToScreen_Ratio));
classMath3.classRadialCoordinate cRad =
new classMath3.classRadialCoordinate(ptUnrotated);
cRad.Radians += dblDrawRotation;
PointF ptRetVal = cMath.AddTwoPointFs
(cDrawParameters.ptOutputCenter, cRad.toPointF());
return ptRetVal;
}
else
{
PointF ptUnrotated = new PointF(-(int)
((cDrawParameters.ptfCenterScreenInGameWorld.X + intX_MaxGameWorld -
ptGameWorld.X) * cDrawParameters.dblGameToScreen_Ratio),
(int)((ptGameWorld.Y - cDrawParameters.ptfCenterScreenInGameWorld.Y) *
cDrawParameters.dblGameToScreen_Ratio));
classMath3.classRadialCoordinate cRad =
new classMath3.classRadialCoordinate(ptUnrotated);
cRad.Radians += dblDrawRotation;
PointF ptRetVal = cMath.AddTwoPointFs
(cDrawParameters.ptOutputCenter, cRad.toPointF());
return ptRetVal;
}
}
else if (intDifference == lstSurface.Count / 2)
{
int intX_MaxGameWorld = conSurfaceCellWidth * lstSurface.Count;
PointF ptUnrotated = new PointF((int)(((cDrawParameters.ptfCenterScreenInGameWorld.X >
ptGameWorld.X
? -intX_MaxGameWorld
: 0)
+ cDrawParameters.ptfCenterScreenInGameWorld.X - ptGameWorld.X) *
cDrawParameters.dblGameToScreen_Ratio),
(int)((ptGameWorld.Y -
cDrawParameters.ptfCenterScreenInGameWorld.Y) *
cDrawParameters.dblGameToScreen_Ratio));
classMath3.classRadialCoordinate cRad =
new classMath3.classRadialCoordinate(ptUnrotated);
cRad.Radians += dblDrawRotation;
PointF ptRetVal = cMath.AddTwoPointFs
(cDrawParameters.ptOutputCenter, cRad.toPointF());
return ptRetVal;
}
else
{
PointF ptUnrotated =
new PointF((int)(-(cDrawParameters.ptfCenterScreenInGameWorld.X -
ptGameWorld.X) * cDrawParameters.dblGameToScreen_Ratio),
(int)((ptGameWorld.Y - cDrawParameters.ptfCenterScreenInGameWorld.Y) *
cDrawParameters.dblGameToScreen_Ratio));
classMath3.classRadialCoordinate cRad =
new classMath3.classRadialCoordinate(ptUnrotated);
cRad.Radians += dblDrawRotation;
PointF ptRetVal =
cMath.AddTwoPointFs(cDrawParameters.ptOutputCenter, cRad.toPointF());
return ptRetVal;
}
}
Since the gameworld is much bigger than what can be displayed on the screen, the corners of the screen are used to calculate the corners of the game world that is visible. But the player rotates the ship to any angle which means that the rectangle of the screen will only rarely ever align in the horizontal rectangular gameworld. So the screen's diagonal is taken as a base measure and a square gameworld region slightly bigger than the screen's diagonal is used to search the quadtree. Since the surface of every planet or moon goes around that body, the data that defines it needs to meet it head to its tail. The lower end of the data (index zero) is adjacent to the high end of the data (index = size of array), but the quad tree is only defined as a simple rectangle. So whenever the 'seam' between the two ends of the map has to be drawn, the quadtree is asked to return the results of two searches that together comprise the data found on both sides of the seam located at opposite ends of the quadtree's rectangular space.
The drawing algorithm itself has to consider each point and
- collate these objects together
- get their positions relative to the
Draw() function's focus point - convert that Cartesian vector to a radial one
- rotate the radial coordinate to the required output angle
- resize its magnitude to reflect the output zoom factor
- convert it back to Cartesian
- add it to the focus point's screen location
- select the sprite angle and size appropriate for the zoom & angle
- center it about the screen location determined in step #7 and we're good...
You can watch a brief demonstration on YouTube how to set the HUD displays.
Static
Since communication is something I plan to make the player work for, I've implemented an easy way to add static over the HUD images to reflect the quality of that image's reception. There are seven static masks in the game's resources. These masks were generated by using a generic image of static, I downloaded off some web site. Then all the RBG values of each pixel were adjusted towards zero by a common value. Those values that were negative after this change were set to zero. Then all these values were increased by 16. Each mask had its RGB values initially altered by a value progressively larger than the previous so that more of the lesser dark pixels were forced to zero before then being set to 16. Before these masks are used, the color (16, 16, 16) is made transparent. The result is seven static masks with progressively more transparent holes that display the original image. Static 0 has the least holes and impairs vision the worst while static7 has nothing but holes and impairs vision the least. To make certain that it looks more like static than just a 'static' (I must be tired) unchanging screen, the static-masks are sampled at random locations before being drawn over the image they are distorting which gives it an animated feel.
For the moment, static is just something the user can set but communications and hacking skills will soon come into play making the distorted vision an integral part of the game.
Final Words
No, this is not the last of it. We're just getting started ...
History
- 11th October, 2019: Initial version
Christ Kennedy grew up in the suburbs of Montreal and is a bilingual Quebecois with a bachelor’s degree in computer engineering from McGill University. He is unemployable and currently living in Moncton, N.B. writing his next novel.


