Introduction
The Rodney Robot project is a hobbyist robotic project to design and build an autonomous house-bot using ROS (Robot Operating System). This article is the eighth in the series describing the project.
Background
In part 1, to help define the requirements for our robot, we selected our first mission and split it down into a number of Design Goals to make it more manageable.
The mission was taken from the article, Let's build a robot! and was: Take a message to... - Since the robot will [have] the ability to recognize family members, how about the ability to make it the 'message taker and reminder'. I could say 'Robot, remind (PersonName) to pick me up from the station at 6pm'. Then, even if that household member had their phone turned on silent, or was listening to loud music or (insert reason to NOT pick me up at the station), the robot could wander through the house, find the person, and give them the message.
The design goals for this mission were:
- Design Goal 1: To be able to look around using the camera, search for faces, attempt to identify any people seen and display a message for any identified
- Design Goal 2: Facial expressions and speech synthesis. Rodney will need to be able to deliver the message
- Design Goal 3: Locomotion controlled by a remote keyboard and/or joystick
- Design Goal 4: Addition of a laser ranger finder or similar ranging sensor used to aid navigation
- Design Goal 5: Autonomous locomotion
- Design Goal 6: Task assignment and completion notification
In the last part, we added the ROS Navigation Stack to give Rodney autonomous locomotion. The goals we gave the robot to navigate to were set using the visualisation tool rviz. In this part, we will add the mission code to navigate to different parts of the house and at each location to search for the known person to deliver the message to. The locations to visit will be loaded from a yaml file.
We will be updating the rodney and rodney_missions packages and adding a new package which enables us to add a LED and pushbuttons to the Raspberry Pi GPIO (General Purpose Input Output).
Smach Revisted
In part 4, we looked at the smach ROS package which is used to create state machines. We created a hierarchical state machine where we added a lower level state machine for the greeting mission (Mission 2). We wrote the code in such a way that it should be relatively simple to add new missions by adding lower level state machine for any new mission. In this part, we will add two new missions as lower level state machines. The first, Mission 1, will carry out our "Take a message to.." mission and the second, Mission 4, will be a "Go Home" mission which will be executed to send the robot back to a home location.
Before we get to that, we will look at adding a bi-coloured LED, two pushbuttons and updating the rodney package to send the new mission data to the state machine.
GPIO
Although we have the touch screen, I want to add two pushbuttons to input commands to Rodney. Since the screen is the robot head, and can move, it means that it may not be in a suitable position for a user to interact with the robot. For this reason, we will add two pushbuttons to the robot hardware. Each button will have two functions, the function executed will depend on whether the robot is currently running a mission or not.
The first button identified as the black button will carry out the following functions. If no mission is running and the button is pressed, the robots head will move to a position which is suitable for a user input/output at the screen. If a mission is running and the button is pressed, a command will be sent to cancel the current mission.
The second button identified as the yellow button will carry out the following functions. If no mission is running and the button is pressed, a command will be issued to run the "Go Home" mission. This mission will navigate the robot to a known home location. Some missions will have a state which requires a user to acknowledge the robot. For example, when a verbal message is delivered by the robot, the user should acknowledge the receipt of the message. This acknowledgement will be the second function of the yellow pushbutton. If it is pressed when a mission is running, an acknowledge message will be sent to the state machine.
Along with the two pushbuttons, we will add a bi-coloured LED to the robot hardware. When the robot is not running a live mission, the LED will light green and when the robot is running a mission, it will light red.

We could add the GPIO code required to the rodney package but in the interest of code reuse, we will add a new package to the project to handle the GPIO. Remember that you can write ROS code in a number of different languages and as we will make use of an existing Python library for accessing the Raspberry Pi GPIO, we will code this new node using Python.
Our ROS package for the node is called pi_io and is available in the pi_io folder. In this package, we are going to create a ROS service to change the state of the GPIO output lines. Although we haven't coded our own ROS service in any of the previous articles we have made use of an existing service to enable/disable the LIDAR. We will also create a new user defined message which will be published when one of the pushbuttons changes state.
The package contains all the usual ROS files and folders.
The msg folder contains the gpio_input.msg file which contains the definition of our user define ROS message.
uint8 index   # GPIO index starting at 0
bool value    # GPIO value
The message contains two parameters. The first is an index for which GPIO the message refers. The code will map this index to a GPIO pin. The second parameter is the current state of that pin.
The srv folder contains the gpio_output.srv file which contains the definition for our user defined ROS service. Services can be looked at as a remote procedure call, unlike ROS actions which we have covered in previous articles, services should return quickly as they are blocking.
uint8 index   # GPIO index starting at 0
bool value    # GPIO value
---
bool success
The message contains three parameters. The first is an index indicating which GPIO the value refers to. The code will map this index to a GPIO pin. The second parameter is the value to set that pin to. Our service will return a boolean success value. With the Raspberry Pi, we can't tell if the GPIO pin is set so we will always return true. With a board which allows you to read feedback for an output pin, we could return true only if the pin was set to the correct value. It is possible to set the return value of a service to empty by not entering anything after the "---" line.
The src folder contains the Python code for the node in the pi_io_node.py file. I'll now briefly describe the code.
The main function registers our node with ROS and creates an instance of the PiGpioNode class.
def main(args):
    rospy.init_node('pi_io_node', anonymous=False)
    rospy.loginfo("Rapberry Pi GPIO node started")
    piio = PiGpioNode()

    try:
        rospy.spin()
    except KeyboardInterrupt:
        print('Shutting down')

if __name__ == '__main__':
    main(sys.argv)
The class constructor for the PiGpioNode maps the actual GPIO pins we will use to the index values used in the message and service. It then makes calls to the Pi GPIO Python library to state that we are referencing the GPIO by the GPIO pin number and not the physical pin numbering of the connector on the Pi. It sets which GPIO pins are outputs and which are inputs. For the inputs, it also states that the pin should be pulled down. When our pushbutton is pressed, it will pull the line high.
The input pins are also attached to an event which will result in the functions Input0HighCallback and Input1HighCallback being called when the respective input goes high.
The constructor then registers the service and the message topic with ROS. We also create two timers which will be used to debounce the pushbuttons.
class PiGpioNode:
def __init__(self):
self.__output0 = 23
self.__output1 = 24
self.__input0 = 27
self.__input1 = 22
GPIO.setwarnings(False)
GPIO.setmode(GPIO.BCM)
GPIO.setup(self.__output0, GPIO.OUT)
GPIO.setup(self.__output1, GPIO.OUT)
GPIO.setup(self.__input0, GPIO.IN, pull_up_down=GPIO.PUD_DOWN)
GPIO.setup(self.__input1, GPIO.IN, pull_up_down=GPIO.PUD_DOWN)
GPIO.add_event_detect(self.__input0, GPIO.RISING, callback=self.Input0HighCallback)
GPIO.add_event_detect(self.__input1, GPIO.RISING, callback=self.Input1HighCallback)
self.__service = rospy.Service('gpio/output_cmd', gpio_output, self.OutputCommand)
self.__gpi_pub = rospy.Publisher('gpio/input_cmd', gpio_input, queue_size=3)
self.__input0_time = rospy.Time.now()
self.__input1_time = rospy.Time.now()
The remainder of the class consists of the callback functions.
The first relates to the ROS service. When a call to the service is received on the gpio/output_cmd service, this callback will be called. From the index contained in the service call, it sets the GPIO output to the given value and returns True.
def OutputCommand(self, request):
    if(request.index == 0):
        gpo = self.__output0
    elif(request.index == 1):
        gpo = self.__output1

    GPIO.output(gpo, request.value)

    return True
The remaining callbacks are similar to each other and are called when one of the pushbuttons is pressed which causes the GPIO input pin in question to go high. If the pushbutton was not pressed in the last 200ms a message is created for the gpio/input_cmd topic, containing the index for the GPIO and a True value as in our case the callback will only be called when the input pin goes high. If your project is interested when the button is released, you could add a callback for this operation which sets the value in the message to false. The message is then published on the topic.
def Input0HighCallback(self, channel):
current_time = rospy.Time.now()
delta_time = (current_time - self.__input0_time).to_sec()
if delta_time > 0.200:
input_cmd = gpio_input()
input_cmd.index = 0
input_cmd.value = True
self.__gpi_pub.publish(input_cmd)
self.__input0_time = current_time
def Input1HighCallback(self, channel):
current_time = rospy.Time.now()
delta_time = (current_time - self.__input1_time).to_sec()
if delta_time > 0.200:
input_cmd = gpio_input()
input_cmd.index = 1
input_cmd.value = True
self.__gpi_pub.publish(input_cmd)
self.__input1_time = current_time
Below is an updated circuit diagram for Rodney which includes how the bi-coloured LED and pushbuttons are connected to the Raspberry Pi GPIO. A full size image of the circuit diagram is available in the drawings zip file.
Note that I have made another change to the circuit since the last article. The Teensy is no longer powered from the Raspberry Pi. There is a track on the underside of the Teensy which can be cut to separate VIN from VUSB.
Updates to the Rodney Package
The rodney node will be responsible for setting the state of the LED and for monitoring the topic that publishes the state change of the pushbuttons. We also need to update it so that it can provide the mission data for the two new missions.
The first change will be to the rodney.launch file in the launch folder. This file configures and launches all the ROS nodes that make up the system.
We need to add the new pi_io node to the launch file so that the new code runs when we launch the robot code.
<node pkg="pi_io" type="pi_io_node.py" name="pi_io_node"/>
So that the robot can navigate to various locations in the house, we are going to provide it with a list of waypoints that will be stored in a yaml file. We are going to modify the rodney node so that the name of the file is passed to it at launch. To help us identify which waypoint file goes with which map, the waypoint file will have the same name as the map file with _patrol postfixed to the name. For example, the map my system loads by default is called second_floor, the file containing the waypoints that goes with this map is called second_floor_patrol.yaml. We will modify the lines of the launch file that launches the rodney node so that the file name is passed as an argument. The file name will follow the flag "-m".
<node pkg="rodney" type="rodney_node" name="rodney"
 args="-m $(find rodney)/maps/$(arg map_file)_patrol.yaml" output="screen">
  <rosparam command="load" file="$(find rodney)/config/config.yaml"/>
</node>
As you can see from the launch file snippet, the file containing the waypoints is stored in the map folder. Each waypoint in the file contains an x and y location and a direction the robot should face when it reaches the goal. This direction or orientation is a quaternion. In the "Using the Code" section, I'll show a handy way of working out what the position and orientation values are for any location on the map.
The waypoints should start at "w1", you can have as many waypoints as you like as long as they are consecutive. When searching for the person to deliver the message to, the robot will visit each waypoint in turn in the ascending and then the descending order. The file should also contain a home waypoint which the robot will navigate to when instructed to "Go Home".
An example of a waypoints file:
# Waypoints must start at w1 and be consecutive
# Also have an home location
w1:
  position:
    x: -0.328835725784
    y: -0.529747009277
  orientation:
    x: 0.0
    y: 0.0
    z: 0.273852223218
    w: 0.961771781577
w2:
  position:
    x: 1.31689155102
    y: -0.944578707218
  orientation:
    x: 0.0
    y: 0.0
    z: 0.732759099845
    w: 0.680488134793
w3:
  position:
    x: 3.66307258606
    y: -0.040109038353
  orientation:
    x: 0.0
    y: 0.0
    z: 0.413215093458
    w: 0.910633453448
w4:
  position:
    x: 6.55329608917
    y: 1.04117441177
  orientation:
    x: 0.0
    y: 0.0
    z: 0.914737463209
    w: -0.404048726519
home:
  position:
    x: 0.0451934337616
    y: 0.0451934337616
  orientation:
    x: 0.0
    y: 0.0
    z: 0.224733375634
    w: 0.974420294265
Now for the changes to the rodney_node.cpp file.
The main function now handles the parsing of the argument that contains the waypoint yaml file. This file name is passed to the constructor of the rodney_node class.
int main(int argc, char **argv)
{
ros::init(argc, argv, "rodney");
ros::NodeHandle nh;
ros::NodeHandle nh_private("~");
std::string waypoints_filename;
int opt;
while((opt = getopt(argc, argv, ":m:")) != -1)
{
switch(opt)
{
case 'm':
waypoints_filename = std::string(optarg);
break;
}
}
RodneyNode rodney_node(nh, nh_private, waypoints_filename);
std::string node_name = ros::this_node::getName();
ROS_INFO("%s started", node_name.c_str());
ros::Rate r(20);
while(ros::ok())
{
rodney_node.sendTwist();
rodney_node.checkTimers();
ros::spinOnce();
r.sleep();
}
return 0;
}
There are a few minor changes to the constructor itself. It takes the waypoint filename and stores it in the member variable waypoints_filename_.
The constructor also subscribes to the new topic from the GPIO node gpio/input_cmd, registering the callback function to be called when a message is received on the topic.
gpio_sub_ = nh_.subscribe("gpio/input_cmd", 5, &RodneyNode::gpioCallBack, this);
The final change in the constructor is to wait until the gpio/output_cmd service is available and then calls a new function missionNotRunning which sets the GPIO output to light the green part of the LED. Waiting for the service to become available stops us from calling the service before the pi_io node creates the service.
ros::service::waitForService("gpio/output_cmd");
missionNotRunning();
The missionNotRunning and missionRunning functions are called when we switch between running a mission and not running a mission. They set the state mission_running_ member variable and set the required state of the bi-coloured LED using the service.
void RodneyNode::missionNotRunning(void)
{
mission_running_ = false;
ros::ServiceClient client = nh_.serviceClient<pi_io::gpio_output>("gpio/output_cmd");
pi_io::gpio_output srv;
srv.request.index = 0;
srv.request.value = true;
client.call(srv);
srv.request.index = 1;
srv.request.value = false;
client.call(srv);
}
void RodneyNode::missionRunning(void)
{
mission_running_ = true;
ros::ServiceClient client = nh_.serviceClient<pi_io::gpio_output>("gpio/output_cmd");
pi_io::gpio_output srv;
srv.request.index = 0;
srv.request.value = false;
client.call(srv);
srv.request.index = 1;
srv.request.value = true;
client.call(srv);
}
The gpioCallBack function is called when a message is received on the gpio/input_cmd topic. It checks to see which GPIO signal went high and hence which button was pressed.
If the black button was pressed and a mission is running, it publishes the message to cancel the mission. If no mission is running, it publishes a message requesting that the head be moved to the user input position.
If the yellow button is pressed and a mission is running, it publishes the message to acknowledge a mission state. If no mission is running, it publishes a message requesting that mission 4, the Go Home mission, be conducted. Included in the message is the waypoint filename.
void RodneyNode::gpioCallBack(const pi_io::gpio_input::ConstPtr& msg)
{
switch(msg->index)
{
case 0:
if((mission_running_ == true) && (msg->value == true))
{
std_msgs::Empty empty_msg;
cancel_pub_.publish(empty_msg);
}
else if((mission_running_ == false) && (msg->value == true))
{
std_msgs::String mission_msg;
mission_msg.data = "J3^i^-";
mission_pub_.publish(mission_msg);
}
break;
case 1:
if((mission_running_ == true) && (msg->value == true))
{
std_msgs::Empty empty_msg;
ack_pub_.publish(empty_msg);
}
else if((mission_running_ == false) && (msg->value == true))
{
std_msgs::String mission_msg;
mission_msg.data = "M4^"+ waypoints_filename_;
mission_pub_.publish(mission_msg);
missionRunning();
manual_locomotion_mode_ = false;
}
break;
default:
break;
}
last_interaction_time_ = ros::Time::now();
}
There is a change to the keyboardCallBack function. We currently use a keyboard on a remote machine when testing the robot to indicate that a mission should be conducted. If key '1' is pressed, we form a mission request message for mission 1 and publish the message. For this mission, the mission data consists of the waypoint filename, the ID of the person to deliver the message to and the text of the message to deliver. If key '4' is pressed, we create a mission 4 request similar to when the yellow button is pressed with no mission running.
std_msgs::String mission_msg;
mission_msg.data = "M" + std::to_string(msg->code-keyboard::Key::KEY_0);
switch(msg->code)
{
case keyboard::Key::KEY_1:
mission_msg.data += "^" + waypoints_filename_ + "|1|Please walk Bonnie";
break;
case keyboard::Key::KEY_4:
mission_msg.data += "^" + waypoints_filename_;
break;
default:
break;
}
mission_pub_.publish(mission_msg);
missionRunning();
There is one more change to the launch file which I have reluctantly made. I have noticed occasionally that when the Raspberry Pi is busy, for example calculating a navigational route, the LIDAR code stops producing the message with the laser scan data. Once it enters this state, it never recovers and keeps returning a timeout. Although the code is from a third party, we do have the source but I was keen to complete this part of the project and don't fancy spending the time looking into someone else's code at the moment. I have made a simple change to the code by forking the GitHub repository and changing the file node.cpp. The change results in raising a ROS Error message in the log and calling ros::shutdown() to kill the node. The changed code is available in the source zip file.
So that the node gets restarted under this error condition, I have added the respawn="true" to the rplidar_ros tag in the rodney.launch file.
<node pkg="rplidar_ros" type="rplidarNode" name="rplidar_node" respawn="true" output="screen">
<param name="serial_port" type="string" value="/dev/rplidar"/>
<param name="serial_baudrate" type="int" value="115200"/>
<param name="frame_id" type="string" value="laser"/>
<remap from="scan" to="scan_filter_input"/>
</node>
It's not great, it's a bit of a hack, but since adding it the robot has always recovered on the odd occasion that it occurs. It could be that we are just asking too much of the Raspberry Pi. Rodney was always going to be a proto type and for my next robotic project, I may need to look at a more powerful single board computer.
Updates to the rodney_missions Package
We originally designed the rodney_missions node so that it would be easy to add new missions. We will make some minor changes to the rodney_missions_node.py file to accommodate these new missions and add new files take_message_to.py and go_home.py which will contain the lower level state machines.
Let's take a look at these two new state machines.
Mission 1 - "Take a message to.."
This mission is what all the articles have been working towards. All of the code for this state machine is in the take_message_to.py file.
We enter this lower level state machine via the PREPARE_MISSION state. The mission data passed to this state contains the waypoint filename, the ID of the person to search for and the message to deliver. These parameters are separated by the '|' character so the first thing this state does is to spilt the data into the three components. It then loads the waypoint file and as we are going to navigate autonomously, it ensues that the LIDAR is enabled. If it successfully opened the file and read the waypoints, then it transits to the PREPARE_FOR_HEAD_MOVE state, otherwise if an error occurred, it aborts the mission and transits back to the higher state machine which we will call the root state machine.
The code for the PREPARE_MISSION state is held in the PrepareMission1 class.
class PrepareMission1(State):
def __init__(self, helper_obj):
State.__init__(self, outcomes=['ready','error'],
input_keys=['mission_data'],
output_keys=['person_id','message','waypoints',
'current_waypoint','waypoint_direction','mission_status','start'])
self.__helper_obj = helper_obj
def execute(self, userdata):
parameters = userdata.mission_data.split("|")
userdata.person_id = parameters[1]
userdata.message = parameters[2]
try:
with open(parameters[0], 'r') as stream:
try:
userdata.waypoints = yaml.load(stream)
userdata.current_waypoint = 0
userdata.waypoint_direction = True
userdata.mission_status = 'void'
next_outcome = 'ready'
except:
rospy.logerr('Bad waypoint file')
userdata.mission_status = 'Bad waypoint file'
next_outcome = 'error'
except:
rospy.logerr("Can't open waypoint file")
userdata.mission_status = "Can't open waypoint file"
next_outcome = 'error'
self.__helper_obj.LidarEnable()
userdata.start = True
return next_outcome
The PREPARE_FOR_HEAD_MOVE state is responsible for calculating the next head position as the head/camera is moved to scan the robots field of view. If there are still head positions to scan, it will transit to the MOVE_HEAD state, otherwise it will transit to the DEFAULT_HEAD_POSITION state.
The code for the PREPARE_FOR_HEAD_MOVE state is held in the PrepareToMoveHead class.
class PrepareToMoveHead(State):
def __init__(self, helper_obj):
State.__init__(self, outcomes=['scan_complete','move_head'],
input_keys=['start_in'],
output_keys=['start_out','user_data_absolute',
'user_data_pan','user_data_tilt'])
self.__helper_obj = helper_obj
def execute(self, userdata):
if userdata.start_in == True:
userdata.start_out = False
scan_complete = False
position_request_pan, position_request_tilt = self.__helper_obj.CameraToStartPos()
else:
scan_complete, position_request_pan, position_request_tilt =
self.__helper_obj.CameraToNextPos()
userdata.user_data_absolute = True
userdata.user_data_pan = position_request_pan
userdata.user_data_tilt = position_request_tilt
if scan_complete == True:
next_outcome = 'scan_complete'
else:
next_outcome = 'move_head'
return next_outcome
The MOVE_HEAD state is a special type of state called a SimpleActionState. We covered these type of states in part 4 of the article. This action conducted is to move the head to the position set by the PREPARE_FOR_HEAD_MOVE state. On completion of the action, the state machine will transit to the SCAN_FOR FACES state. The action can also be cancelled or aborted which would result in a transit back to the root state machine.
The SCAN_FOR_FACES state is again a SimpleActionState. This time, the action called is part of the face recognition package and will check the next image from the camera for known subjects. On completion of the action, the state machine will transit to the CHECK_FOR_SUBJECT state. The action can also be cancelled or aborted which would result in a transit back to the root state machine.
The CHECK_FOR_SUBJECT state checks the results from the previous state to see if the ID of the person the robot is searching for matches anyone in the results. If the subject was seen, then the message is delivered by creating and publishing a ROS topic to the speech and animated head nodes. The state machine will then transit to the WAIT_FOR_USER state. If the subject in question was not seen, then it will transit back to PREPARE_FOR_HEAD_MOVE.
The code for the CHECK_FOR_SUBJECT state is held in the CheckForSubject class.
class CheckForSubject(State):
def __init__(self, helper_obj):
State.__init__(self, outcomes=['seen','not_seen'],
input_keys=['person_id','message','seen_ids','seen_names'])
self.__helper_obj = helper_obj
def execute(self, userdata):
next_outcome = 'not_seen'
if len(userdata.seen_ids) > 0:
for idx, val in enumerate(userdata.seen_ids):
if str(val) == userdata.person_id:
next_outcome = 'seen'
rospy.loginfo("I have found %s, delivering message",
userdata.seen_names[idx])
greeting = 'Hello ' + userdata.seen_names[idx] +
' I have a message for you'
self.__helper_obj.Speak(greeting, greeting)
rospy.sleep(2.0)
self.__helper_obj.Speak(userdata.message, userdata.message)
return next_outcome
The WAIT_FOR_USER state waits in this state until an acknowledge message is received indicating that the user acknowledges the receipt of the spoken message or until a period of 60 seconds elapses. If the acknowledge is received, then the state machine will transit to the root state machine. If the 60 seconds elapse, then the state machine will transit back to the SCAN_FOR_FACES state. The state can also be pre-empted which would result in the transit back to the root state machine.
The code for the WAIT_FOR_USER state is held in the WaitForMsg class.
class WaitForMsg(State):
def __init__(self, helper_obj):
State.__init__(self, outcomes=['ack','timeout','preempted'],
output_keys=['mission_status'])
self.__helper_obj = helper_obj
self.__mutex = threading.Lock()
self.__msg = None
self.__subscriber = rospy.Subscriber('/missions/acknowledge',
Empty, self.callBack, queue_size=1)
def callBack(self, msg):
self.__mutex.acquire()
self.__msg = msg
self.__mutex.release()
def execute(self, userdata):
self.__mutex.acquire()
self.__msg = None
self.__mutex.release()
timeout = rospy.Time.now() + rospy.Duration.from_sec(60.0)
message_arrived = False
preempted = False
while rospy.Time.now() < timeout and message_arrived == False and preempted == False:
self.__mutex.acquire()
if self.__msg is not None:
message_arrived = True
self.__mutex.release()
if self.preempt_requested():
self.service.preempt()
preempted = True
if preempted == True:
message = 'Mission one cancelled'
self.__helper_obj.Speak(message, message)
userdata.mission_status = 'Take a message mission cancelled'
next_outcome = 'preempted'
elif message_arrived == True:
userdata.mission_status = 'Take a message mission complete'
next_outcome = 'ack'
else:
next_outcome = 'timeout'
return next_outcome
The DEFAULT_HEAD_POSITION state is again a SimpleActionState. It will call an action to move the head/camera to the default position. When the robot moves, we want the head to face forward. Once the head move is complete, it will transit to the PREPARE_TO_MOVE state. The action can also be cancelled or aborted which would result in a transit back to the root state machine.
The PREPARE_TO_MOVE state is responsible for extracting the next waypoint form the list of waypoints. If it reaches the end of the list, it will start traversing the list in the opposite direction. From the waypoint data, it constructs the nav goal ready for the next state, MOVE.
The code for the PREPARE_TO_MOVE state is held in the PrepareToMove class.
class PrepareToMove(State):
def __init__(self):
State.__init__(self, outcomes=['done'],
input_keys=['waypoints','current_waypoint_in','waypoint_direction_in'],
output_keys=['current_waypoint_out',
'destination','waypoint_direction_out','start'])
def execute(self, userdata):
if userdata.waypoint_direction_in == True:
next_waypoint = userdata.current_waypoint_in + 1
waypoint_id = 'w' + str(next_waypoint)
if not waypoint_id in userdata.waypoints:
next_waypoint = userdata.current_waypoint_in - 1
userdata.waypoint_direction_out = False
if next_waypoint == 0:
next_waypoint = 1
waypoint_id = 'w' + str(next_waypoint)
else:
next_waypoint = userdata.current_waypoint_in - 1
if next_waypoint == 0:
next_waypoint = 1
userdata.waypoint_direction_out = True
waypoint_id = 'w' + str(next_waypoint)
waypoint = userdata.waypoints[waypoint_id]
target_pose = PoseStamped()
target_pose.header.frame_id = 'map'
target_pose.pose.position.x = waypoint['position']['x']
target_pose.pose.position.y = waypoint['position']['y']
target_pose.pose.position.z = 0.0
target_pose.pose.orientation.x = waypoint['orientation']['x']
target_pose.pose.orientation.y = waypoint['orientation']['y']
target_pose.pose.orientation.z = waypoint['orientation']['z']
target_pose.pose.orientation.w = waypoint['orientation']['w']
userdata.destination = target_pose
userdata.current_waypoint_out = next_waypoint
userdata.start = True
return 'done'
The MOVE state is again a SimpleActionState. This time, the action conducted is to navigate to the pose set from the waypoint data. On completion of the action, the state machine will transit to the PREPARE_FOR_HEAD_MOVE state. The action can also be cancelled or aborted which would result in a transit back to the root state machine.
The remaining code for this state machine is contained in the Mission1StateMachine class. It constructs the state machine from the previously described classes. There are also a number of functions that are called on completion of the Simple Action States. These are mostly concerned with reporting if the action was cancelled or aborted.
class Mission1StateMachine(StateMachine):
def __init__(self, helper_obj):
StateMachine.__init__(self, outcomes=['complete','preempted','aborted'],
input_keys=['mission_data'], output_keys=['mission_status'])
self.__helper_obj = helper_obj
with self:
StateMachine.add('PREPARE_MISSION',
PrepareMission1(self.__helper_obj),
transitions={'ready':'PREPARE_FOR_HEAD_MOVE','error':'aborted'})
default_position_pan, default_position_tilt = self.__helper_obj.CameraDefaultPos()
head_goal = point_headGoal()
head_goal.absolute = True
head_goal.pan = default_position_pan
head_goal.tilt = default_position_tilt
StateMachine.add('DEFAULT_HEAD_POSITION',
SimpleActionState('head_control_node',
point_headAction,
goal = head_goal,
result_cb = self.defaultHeadPositionComplete,
output_keys=['mission_status']),
transitions={'succeeded':'PREPARE_TO_MOVE',
'preempted':'preempted','aborted':'aborted'})
StateMachine.add('PREPARE_TO_MOVE',
PrepareToMove(),
transitions={'done':'MOVE'},
remapping={'current_waypoint_in':'current_waypoint',
'current_waypoint_out':'current_waypoint',
'waypoint_direction_in':'waypoint_direction',
'waypoint_direction_out':'waypoint_direction'})
StateMachine.add('MOVE',
SimpleActionState('move_base',
MoveBaseAction,
goal_slots=['target_pose'],
result_cb = self.moveComplete,
output_keys=['mission_status']),
transitions={'succeeded':'PREPARE_FOR_HEAD_MOVE',
'preempted':'preempted', 'aborted':'aborted'},
remapping={'target_pose':'destination'})
StateMachine.add('PREPARE_FOR_HEAD_MOVE',
PrepareToMoveHead(self.__helper_obj),
transitions={'scan_complete':'DEFAULT_HEAD_POSITION',
'move_head':'MOVE_HEAD'},
remapping={'start_in':'start','start_out':'start'})
StateMachine.add('MOVE_HEAD',
SimpleActionState('head_control_node',
point_headAction,
goal_slots=['absolute','pan','tilt'],
result_cb = self.moveHeadComplete,
output_keys=['mission_status']),
transitions={'succeeded':'SCAN_FOR_FACES',
'preempted':'preempted','aborted':'aborted'},
remapping={'absolute':'user_data_absolute',
'pan':'user_data_pan','tilt':'user_data_tilt'})
StateMachine.add('SCAN_FOR_FACES',
SimpleActionState('face_recognition',
scan_for_facesAction,
result_slots=['ids_detected','names_detected'],
result_cb = self.scanForFaceComplete,
output_keys=['mission_status']),
transitions={'succeeded':'CHECK_FOR_SUBJECT',
'preempted':'preempted','aborted':'aborted'},
remapping={'ids_detected':'seen_ids',
'names_detected':'seen_names'})
StateMachine.add('CHECK_FOR_SUBJECT',
CheckForSubject(self.__helper_obj),
transitions={'seen':'WAIT_FOR_USER',
'not_seen':'PREPARE_FOR_HEAD_MOVE'})
StateMachine.add('WAIT_FOR_USER',
WaitForMsg(self.__helper_obj),
transitions={'ack':'complete','timeout':'SCAN_FOR_FACES',
'preempted':'preempted'})
def defaultHeadPositionComplete(self, userdata, status, result):
self.__helper_obj.CameraAtDefaultPos(userdata, status, result)
if status == GoalStatus.PREEMPTED:
message = 'Mission number 1 cancelled'
self.__helper_obj.Speak(message, message)
userdata.mission_status = 'Take a message mission cancelled'
elif status == GoalStatus.ABORTED:
message = 'Warning mission number 1 aborted'
self.__helper_obj.Speak(message, message + ':(')
userdata.mission_status = 'Take a message mission failed during move head action'
def moveComplete(self, userdata, status, result):
if status == GoalStatus.PREEMPTED:
message = 'Mission number 1 cancelled'
self.__helper_obj.Speak(message, message)
userdata.mission_status = 'Take a message mission cancelled'
elif status == GoalStatus.ABORTED:
message = 'Warning mission number 1 aborted'
self.__helper_obj.Speak(message, message + ':(')
userdata.mission_status = 'Take a message mission failed during base move action'
def moveHeadComplete(self, userdata, status, result):
if status == GoalStatus.PREEMPTED:
message = 'Mission number 1 cancelled'
self.__helper_obj.Speak(message, message)
userdata.mission_status = 'Take a message mission cancelled'
elif status == GoalStatus.ABORTED:
message = 'Warning mission one aborted'
self.__helper_obj.Speak(message, message + ':(')
userdata.mission_status = 'Take a message mission failed during head move'
def scanForFaceComplete(self, userdata, status, result):
if status == GoalStatus.PREEMPTED:
message = 'Mission number 1 cancelled'
self.__helper_obj.Speak(message, message)
userdata.mission_status = 'Take a message mission cancelled'
elif status == GoalStatus.ABORTED:
message = 'Warning mission one aborted'
self.__helper_obj.Speak(message, message + ':(')
userdata.mission_status = 'Take a message mission failed during face scan'
For more information on ROS state machines, see part 4 of the article and the documentation for the smach ROS package
Mission 4 - "Go Home"
All of the code for this state machine is in the go_home.py file.
We enter this lower level state machine via the PREPARE_MISSION state. The mission data passed to this state contains the waypoint filename. It loads the waypoint file, constructs the nav goal for the home waypoint and as we are going to navigate autonomously, it ensures that the LIDAR is enabled. If it read the file and found a home waypoint in the file, it then transits to the DEFAULT_HEAD_POSITION state, otherwise if an error occurred, it transits back to the root state machine.
The code for the PREPARE_MISSION state is held in the PrepareMission4 class.
class PrepareMission4(State):
def __init__(self, helper_obj):
State.__init__(self, outcomes=['ready','error'],
input_keys=['mission_data'],
output_keys=['destination','mission_status'])
self.__helper_obj = helper_obj
def execute(self, userdata):
self.__helper_obj.LidarEnable()
try:
with open(userdata.mission_data, 'r') as stream:
try:
waypoints = yaml.load(stream)
next_outcome = 'ready'
except:
rospy.logerr('Bad waypoint file')
userdata.mission_status = 'Bad waypoint file'
next_outcome = 'error'
except:
rospy.logerr("Can't open waypoint file")
userdata.mission_status = "Can't open waypoint file"
next_outcome = 'error'
if next_outcome == 'ready':
if 'home' in waypoints:
waypoint = waypoints['home']
target_pose = PoseStamped()
target_pose.header.frame_id = 'map'
target_pose.pose.position.x = waypoint['position']['x']
target_pose.pose.position.y = waypoint['position']['y']
target_pose.pose.position.z = 0.0
target_pose.pose.orientation.x = waypoint['orientation']['x']
target_pose.pose.orientation.y = waypoint['orientation']['y']
target_pose.pose.orientation.z = waypoint['orientation']['z']
target_pose.pose.orientation.w = waypoint['orientation']['w']
userdata.destination = target_pose
else:
rospy.logerr('No home waypoint in file')
userdata.mission_status = 'No home waypoint in file'
next_outcome = 'error'
return next_outcome
The DEFAULT_HEAD_POSITION state is a SimpleActionState. It will call an action to move the head/camera to the default position. Again, when the robot moves, we want the head to face forward. Once the head move is complete, it will transit to the MOVE state. The action can also be cancelled or aborted which would result in a transit back to the root state machine.
The MOVE state is again a SimpleActionState. This time, the action conducted is to navigate to the home pose set from the waypoint data. On completion of the action, the state machine will transit back to the root state machine. The action can also be cancelled or aborted which would result in a transit back to the root state machine.
The remaining code for this state machine is contained in the Mission4StateMachine class. It constructs the state machine from the previously described classes. There are also a number of functions that are called on completion of the Simple Action States. These are mostly concerned with reporting if the action was cancelled or aborted.
class Mission4StateMachine(StateMachine):
def __init__(self, helper_obj):
StateMachine.__init__(self, outcomes=['complete','preempted','aborted'],
input_keys=['mission_data'], output_keys=['mission_status'])
self.__helper_obj = helper_obj
with self:
StateMachine.add('PREPARE_MISSION',
PrepareMission4(self.__helper_obj),
transitions={'ready':'DEFAULT_HEAD_POSITION','error':'complete'})
default_position_pan, default_position_tilt = self.__helper_obj.CameraDefaultPos()
head_goal = point_headGoal()
head_goal.absolute = True
head_goal.pan = default_position_pan
head_goal.tilt = default_position_tilt
StateMachine.add('DEFAULT_HEAD_POSITION',
SimpleActionState('head_control_node',
point_headAction,
goal = head_goal,
result_cb = self.defaultHeadPositionComplete,
output_keys=['mission_status']),
transitions={'succeeded':'MOVE',
'preempted':'preempted','aborted':'aborted'})
StateMachine.add('MOVE',
SimpleActionState('move_base',
MoveBaseAction,
goal_slots=['target_pose'],
result_cb = self.moveComplete,
output_keys=['mission_status']),
transitions={'succeeded':'complete',
'preempted':'preempted', 'aborted':'aborted'},
remapping={'target_pose':'destination'})
def defaultHeadPositionComplete(self, userdata, status, result):
self.__helper_obj.CameraAtDefaultPos(userdata, status, result)
if status == GoalStatus.PREEMPTED:
message = 'Mission number 4 cancelled'
self.__helper_obj.Speak(message, message)
userdata.mission_status = 'Go home mission cancelled'
elif status == GoalStatus.ABORTED:
message = 'Warning mission 4 aborted'
self.__helper_obj.Speak(message, message + ':(')
userdata.mission_status = 'Go home mission failed during move head action'
def moveComplete(self, userdata, status, result):
if status == GoalStatus.PREEMPTED:
message = 'Mission number 4 cancelled'
self.__helper_obj.Speak(message, message)
userdata.mission_status = 'Go home mission cancelled'
elif status == GoalStatus.ABORTED:
message = 'Warning mission 4 aborted'
self.__helper_obj.Speak(message, message + ':(')
userdata.mission_status = 'Go home mission failed during base move action'
elif status == GoalStatus.SUCCEEDED:
userdata.mission_status = 'Go home mission complete'
Changes to the Root State Machine
All that's left is to make some changes to the rodney_missions_node.py file. This contains the root state machine which now needs to include the lower state machines each as a state.
We already had code to return the default head position but since we have also added a job to set the head to the user input angle, we need to define this position. This means we need to add some minor changes to the rodney_missions_node.py file for this functionality.
The MissionsHelper class constructor now includes code to read the angle used for user input position from the parameter server. Remember that ROS uses radians for angle values.
self.__user_input_position_pan = rospy.get_param("~head/user_position/pan", 0.0)
self.__user_input_position_tilt = rospy.get_param("~head/user_position/tilt", -0.5)
The class also includes a new function to return these values.
def UserInputPosition(self):
    return self.__user_input_position_pan, self.__user_input_position_tilt
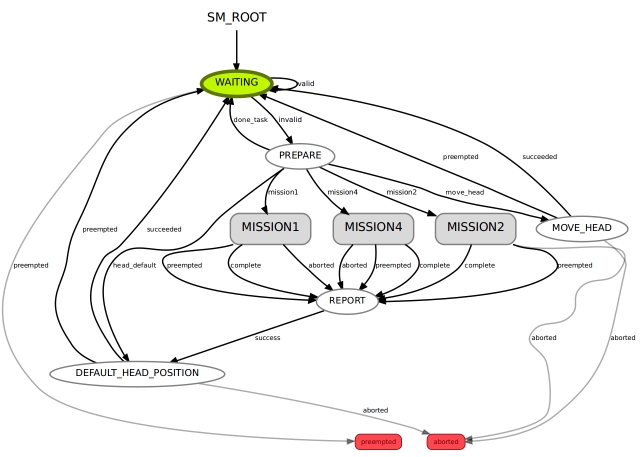
The PREPARE state of the root state machine now needs to include the code not only to set the user input angle when requested but to transit to the new lower level state machines if requested. The complete code for the PREPARE state now looks like this.
class Prepare(State):
def __init__(self, helper_obj):
State.__init__(self, outcomes=['mission1','mission2',
'mission4','done_task','head_default','move_head'],
input_keys=['mission'],
output_keys=['mission_data','start','user_data_absolute',
'user_data_pan','user_data_tilt'])
self.__helper_obj = helper_obj
def execute(self, userdata):
retVal = 'done_task';
parameters = userdata.mission.split("^")
if parameters[0] == 'M1':
userdata.mission_data = parameters[1]
retVal = 'mission1'
elif parameters[0] == 'M2':
userdata.start = True
retVal = 'mission2'
elif parameters[0] == 'M4':
userdata.mission_data = parameters[1]
retVal = 'mission4'
elif parameters[0] == 'J1':
self.__helper_obj.Wav(parameters[1], parameters[2])
elif parameters[0] == 'J2':
self.__helper_obj.Speak(parameters[1], parameters[2])
elif parameters[0] == 'J3':
if 'c' in parameters[1]:
retVal = 'head_default'
elif 'i' in parameters[1]:
pan_position, tilt_position = self.__helper_obj.UserInputPosition()
userdata.user_data_absolute = True
userdata.user_data_pan = pan_position
userdata.user_data_tilt = tilt_position
retVal = 'move_head'
else:
relative_request_pan, relative_request_tilt =
self.__helper_obj.CameraManualMove(parameters[1]+parameters[2])
userdata.user_data_absolute = False
userdata.user_data_pan = relative_request_pan
userdata.user_data_tilt = relative_request_tilt
retVal = 'move_head'
elif parameters[0] == 'J4':
self.__helper_obj.ToggleLidar()
return retVal
The remaining changes are to the RodneyMissionNode class simply add the new lower level state machines to the root state machine.
This is an example of adding a new state machine to the root:
self.__sm_mission1 = missions_lib.Mission1StateMachine(self.__missions_helper)
StateMachine.add('MISSION1',
self.__sm_mission1,
transitions={'complete':'REPORT','preempted':'REPORT','aborted':'REPORT'})
We must also make a call to pre-empt the lower level state machine as it is running when a message to cancel a mission is received. The CancelCallback function now looks like this:
def CancelCallback(self, data):
if self.__sm_mission1.is_running():
self.__sm_mission1.request_preempt()
elif self.__sm_mission2.is_running():
self.__sm_mission2.request_preempt()
elif self.__sm_mission4.is_running():
self.__sm_mission4.request_preempt()
Robot Hardware
A full size image of the current circuit diagram is available in the diagrams zip folder along with a full size copy of the image from rqt_graph showing all the nodes and topics.
A complete bill of material for the project so far is available here.
In part 1 of the article, I referenced the Ubiquity Robot Image which I use on the Raspberry Pi. Instructions on how to install the image, install extra software and configure it for the project are available here.
Using the Code
As usual, I'll run the code on the robot hardware and run the test tools and manual control nodes on a Linux PC. I'll refer to this PC as the workstation in the details below.
Building the ROS Packages on the Pi (Robot Hardware)
If not already done, create a catkin workspace on the Raspberry Pi and initialize it with the following commands:
$ mkdir -p ~/rodney_ws/src
$ cd ~/rodney_ws/
$ catkin_make
Copy the packages face_recognition, face_recognition_msgs, head_control, imu_calib, pan_tilt, pi_io, rodney, rodney_missions, ros-keyboard, rplidar-ros, servo_msgs, speech, tacho_msgs and thunderborg into the ~/rodney_ws/src folder.
Build the code with the following commands:
$ cd ~/rodney_ws/
$ catkin_make
Check that the build completes without any errors.
You will also need to compile and download the sketch to the Teensy 3.5.
Building the ROS Packages on the Workstation
On the workstation, we want to run the keyboard, joystick and heartbeat nodes so that we can control the actual robot hardware remotely.
Create a workspace with the following commands:
$ mkdir -p ~/test_ws/src
$ cd ~/test_ws/
$ catkin_make
Copy the packages rodney, joystick, and ros-keyboard into the ~/test_ws/src folder, and then build the code with the following commands:
$ cd ~/test_ws/
$ catkin_make
Check that the build completes without any errors.
Tips
When running ROS code and tools on a workstation and the Raspberry Pi, there can be a lot of repeat typing of commands at a number of terminals. In the next sections, I have included the full commands to type but here are a few tips that can save you all that typing.
On the Raspberry Pi, to save typing "source devel/setup.bash", I have added it to the .bashrc file for the Raspberry Pi.
$ cd ~/
$ nano .bashrc
Then add "source /home/ubuntu/rodney_ws/devel/setup.bash" to the end of the file, save and exit.
When running test code and tools on the workstation, it also needs to know where the ROS master is so I have added the following to the .bashrc file for the workstation.
alias rodney='source ~/test_ws/devel/setup.bash; \
export ROS_MASTER_URI=http://ubiquityrobot:11311'
Then, by just typing "rodney" at a terminal, the two commands are run and a lot of typing is saved.
You can also save some typing as some ROS tools support TAB completion. For example, type rosrun rosserial_ and then press the tab key to auto complete rosrun rosserial_python.
Waypoints
How's your knowledge of quaternions? Are you happy to set the orientation values of each waypoint to match the direction you want the robot to face when it reaches the waypoint? If you answered "brilliant" and "yes" to those questions, then go ahead and create your waypoint file. If on the other hand, like me, you would like some help, then follow this next bit.
We are going to start the robot code and rviz and use the navigation tools in rviz to set a nav goal just like we did in the last article in this series.
On the robot hardware, run the following commands to start all the current nodes in the system. I'm going to use my default map but you can set the map by adding "map_file:=my_map_filename" to the end of the roslaunch command.
$ source rodney_ws/devel/setup.bash
$ roslaunch rodney rodney.launch
On the workstation, run the following commands to start the remote control node:
$ source test_ws/devel/setup.bash
$ export ROS_MASTER_URI=http://ubiquityrobot:11311
$ roslaunch rodney remote.launch
A small window whose title is "ROS keyboard input" should be running. When entering keyboard strokes, ensure the small window has the focus.
Give this window the focus and press 'm' on the keyboard to set the robot to manual mode so that is does not move in the steps below.
On the workstation, run the following commands in another terminal to start rviz:
$ source test_ws/devel/setup.bash
$ export ROS_MASTER_URI=http://ubiquityrobot:11311
$ roslaunch rodney rviz.launch
On the workstation, run the following commands in another terminal:
$ rostopic echo /move_base/goal
Now select a waypoint position by clicking the "2D Nav Goal" button, click/drag the large green arrow on the map just like setting a goal.
The goal values will be displayed by the rostopic echo terminal. Copy the values to your waypoint file. Repeat for each waypoint you want to add to your file. Don't forget to set a home waypoint in the file.
Shutdown the robot and workstation code.
Testing
Test Setup
On the robot hardware, run the following commands to start all the current nodes in the system. I'm going to use my default map but you can set the map by adding "map_file:=my_map_filename" to the end of the roslaunch command. This time, your waypoint file should also get loaded.
$ source rodney_ws/devel/setup.bash
$ roslaunch rodney rodney.launch
On the workstation, run the following commands to start the remote control node:
$ source test_ws/devel/setup.bash
$ export ROS_MASTER_URI=http://ubiquityrobot:11311
$ roslaunch rodney remote.launch
A small window whose title is "ROS keyboard input" should be running. When entering keyboard strokes, ensure the small window has the focus.
On the workstation, run the following commands in another terminal to start rviz:
$ source test_ws/devel/setup.bash
$ export ROS_MASTER_URI=http://ubiquityrobot:11311
$ roslaunch rodney rviz.launch
User Input Position
Check that the bi-coloured LED illuminates green as the robot is not running a mission.
Press the black pushbutton, the head should move to the user input position.
Localise the Robot
Before we can let the robot loose, we still need to manually localise the robot like we did in the last article. I hope to add some self localising in the future but for now, configure rviz to display the robot model or base_link axis, the laser scan, map and pose estimates. Also ensure that the map is the fixed frame.
We can see from the display that the laser scan does not match the map, the pose estimates are spread around. So before we give the robot a navigational goal, we need to improve its localisation.
The first operation we will carry out is to give the robot an improved localisation using rviz. Click the "2D Pose Estimate" button, estimate the real location and pose of the robot and click/drag the large green arrow on the map to set the initial pose. You can keep doing this until you get the laser scan close to matching the map.
We now have a good initial pose but the pose estimates are still out. We can improve these by driving the robot around in manual mode. Spinning on the spot is a good manoeuvre to conduct. Whilst moving the robot, you should see the pose estimates converging on the robots position in rviz.
Go Home
From the previous steps, the robot will still be in manual mode so teleop the robot so it is in a different location to the home waypoint.
Now press the yellow pushbutton. The bi-coloured LED illuminates red and the robot should navigate itself to the home location.
Cancel a Mission
Put the robot in manual mode and teleop away from the home position. Again press the yellow pushbutton but this time before the robot reaches the home location, press the black button to cancel the mission. The robot should stop moving and the bi-coloured LED should illuminate green.
Take a Message to
Well here, we are just about to test every bit of code we have written for our robot!
The test code in the rodney package for this mission is going to result in the robot searching for the person who is ID number '1' in your face recognition subjects. That was set back way in part 2 of these articles. The message delivered is also going to ask that person to take our family dog for a walk. I guess you may have spotted that and changed the ID and or message by now if building your own robot.
Give the ROS keyboard input window the focus and pressing the "1" key (not on the numeric keypad). The robot should visit each waypoint in turn and at each waypoint, move its head searching for the person who is ID number '1'.
When the subject is found, the message will be delivered. Sixty seconds after the message is delivered, if no action is taken, the robot will resume the search by first checking to see if the subject it still in the current camera image. Once the message is delivered for a second time, press the yellow button to acknowledge the message.
Points of Interest
We have now almost completed our initial idea for this robotics project. In this next part which I also expect to be the last part, I'll look at:
- Assigning the mission and mission data from a web browser, which will complete Design Goal 6
- Run mission 2, the greeting mission, on power up
- See if we can get the robot to do a self localisation manoeuvre
Whilst I include the current version of all the code under development in the source zip file, the code is also available at my GitHub Site. Each package is in its own repository. Please feel free to Fork the repositories for your own projects make updates and if you feel any changes will be helpful to myself or others, then create a Pull Request.
History
- 2019/05/03: Initial release
Having spent the last 40 years as an engineer, 19 years as a test and commissioning engineer and 21 years as a software engineer, I have now retired to walk the Cumbrian fells and paddle the coast and lakes. When the weather is inclement I keep my hand in with robotic software and hardware. Over the years I have used Code Project to help me solve some programming issues so now with time on my hands it’s time to put something back into the Code Project.


 General
  News
News  Suggestion
  Question
  Bug
Bug  Answer
  Joke
Joke  Praise
  Rant
Rant  Admin
Admin 


