Introduction
In part I of this article, we successfully set up our Vista programming machine as an SVN server, created an SVN repository, and added an existing Visual Studio 2008 project into the SVN repository.
In part II, we’ll start using our SVN setup to maintain and manage copies of our source code as a backup facility, if you will.
Background
While there are many articles about how to set up and use a source code control system, I found many were limited, dated, or incomplete; or, they dealt with a much larger team approach to coding. This article attempts to translate my lengthy research among this mire into a helpful article suited to those entering the year 2009.
Getting started with apologies for part I? (What I’ve since learned…)
In the midst of preparing part II, I again learned facts which had dispelled my earlier research. And, in some cases, it seemed like I had landed in a minefield. Programmers are passionate about their “development tools”. I did not intend to set off an AnkhSVN vs. VisualSVN vs. TortoiseSVN debate. I make no attempt to persuade anyone that the tools integrated inside Visual Studio 2008 are better than those used in Windows Explorer. Nor am I trying to say one utility or one approach is better than others.
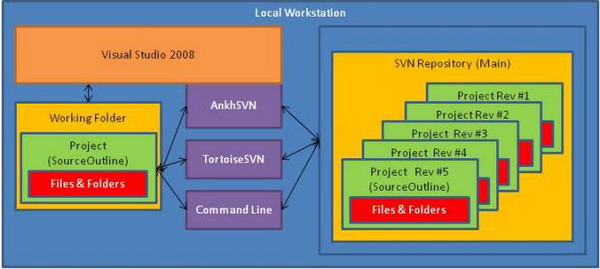
Steve King graciously pointed out I was also mistaken on the need to adjust the setting in TortoiseSVN. This should’ve been obvious in my diagram, that the “_svn” settings change is only required for VS.NET 2003.
Allow me to reiterate the purposes of this set of articles:
- We are focusing on the lone (hobby?) programmer using Visual Studio
- We are learning to use SVN as a manageable source code backup facility
- We are bridging the gap to (easily?) move into a team programming model
- And, since this is late fall of 2008, we’re not concerned about which utility was a better solution six months ago. We live for today!
So, in the spirit of “one step forward, two steps back…”, I’ll first provide an alternative approach to the steps covered in part I.
Setting up SVN locally, without an SVN Server
I still haven’t convinced you we need an SVN server for this type of setup? In fact, I’m no longer convinced. Though many articles on the web imply you’ll need to install an SVN server, they seem to follow the same myth. If you’re a lone programmer, you probably have no need to run an SVN server since you’ll access your SVN repository as a local or network file system, and you won’t be sharing your code outside your Windows network.
An SVN repository can be acted on by any Subversion program. Since VisualSVN Server, AnkhSVN, and TortoiseSVN all include Subversion, no server is needed as long as we connect to the repository locally or on a Windows network.
If you wish to simply continue this article after having already completed the steps in part I, you may skip this section. Otherwise, you’ll either need to go back and complete the steps outlined in part I, or use these alternate steps:
- Do not install and configure VisualSVN Server, it’s not needed.
- Install TortoiseSVN, it’s needed to create the repository. It’s also useful when interacting with the working project folder using Windows Explorer. Disregard the warning about installing in Vista.
- Install AnkhSVN, it’s the main utility we’ll use to interact with the SVN repository.
- Check to see if AnkhSVN is set to work with VS2008. Launch VS2008, and select "Tools", "Options", then the "Source Control" settings. The Current source control plug-in should be AnkhSVN. If not, drop-down the list and select it.
- Create an SVN repository using TortoiseSVN.
- Choose a folder location on a separate drive or partition from your working project folder. For our purposes, we’ll choose the D:\ drive root directory.
- Create a new empty folder there; naming it something like “SVNRepository”.
- Right-click on or in this new empty folder D:\SVNRepository, selecting the “TortoiseSVN”, “Create Repository here” item.
- Check our work by browsing the new SVNRepository.
- Right-click in any Windows Explorer window or the desktop, and select the “TortoiseSVN”, “Rep-browser” item.
- Enter a URL of file:///D:/SVNRepository which should show us the repository and an empty folder.
- As a side note, a repository created by the VisualSVN Server doesn’t allow us to drill down to this root repository level.
- To create our “Main” project repository folder,
- Inside the Rep-browser, right-click on the repository in the left pane, and select the “Create Folder…” item. Enter “Main” and hit the OK button. You may then close the SVN browser.
- Open a source code project from our normal working folder using Visual Studio 2008.
- Set up the project for source control, and import it into the SVN repository.
- In the Solution Explorer, right-click on the solution name, and select "Add Solution to subversion...". Use a URL of file:///D:/SVNrepository, and check off "Add trunk folder for project".
- After clicking "OK", we'll be asked for a log message, I'd suggest "Initial import into repository".
- In Solution Explorer, right-click on the solution name and select "Add Selected Projects to subversion...".
- Open the "Pending Changes" window at the bottom.
- Click the "Commit" button to import the project into the repository.
We are now set-up in an environment similar to that we had after completing part I, less the SVN Server.
Back to Getting Started
For the purposes of this article, I'll assume we have a working source code project set up for source control and it's already imported into the “Main” SVN repository. My examples will use the SourceOutliner powertoy source project available at codeplex.com. The repository structure should look like:
- SVNRepository/Main
- SourceOutliner
- trunk
- SourceOutlinerControl
- SourceOutlinerPackage
Note: if you created your repository with TortoiseSVN, “Main” may be listed as a subfolder instead of as the top repository.
Of course, there are many files inside the deepest folders, and if you imported a different project, it might look a little different than above.
SVN source control concepts – Part II
For me, it’s easiest to think of the SVN repository (folder) as a “database file”. To prove my point, go to your D:\ drive and open the “SVNRepository” folder. Go ahead and work your way through the folders. In any case, you’ll not find your source code files. Do not fret! They are in the repository. To verify this fact, we’ll browse the repository using TortoiseSVN.
- Right-click in any Windows Explorer window or the desktop, and select the “TortoiseSVN”, “Rep-browser” item.
- Enter a URL of https://dad:8443/svn/Main (or your flavor) which should show us the repository, its folders and files.
Note: I have noticed various SVN utilities tend to create the repository data files differently. For example, some actually create a folder with the repository name, or put different record keeping and configuration files in different locations. We’ll not worry about such trivial matters since we take the GUI approach to doing our work.
Of interest to us, however, are additional ways SVN differs from other source control solutions. Perhaps, you’ve dealt with “CVS” by browsing through a code project online. Some things to note about SVN are:
- SVN doesn’t just backup changed files like CVS; it creates an entire snapshot of the whole project folder structure.
- Revision numbers, therefore, apply across the board to every file and folder within the snapshot. In CVS, revision numbers apply to individual files as they are changed.
SVN source control organization
A question on your mind might be, “Where did that ‘trunk’ folder in our project repository come from? It wasn’t in my working project folder.”
Much of the structure inside an SVN repository is left to private interpretation. In fact, SVN doesn’t really understand the organizational structure inside the repository very well. In a basic sense, it simply marks any “commits” by making a snapshot of the entire project tree, marking it with a “revision” number. This allows us to access any “revision” in the repository.
Now, imagine we have a single source code file in our project, and complete a 100 cycle routine of modifying a file, saving it, and then committing it to the repository; we’d have 100 revisions of the file numbered 1 to 100. For most people, remembering which revision number contained that “new feature we added” is nearly impossible. Likewise, it’d be difficult to remember at what revision the code had last worked or was released to the public. To complicate the situation even further, imagine multiple programmers working on the same project simultaneously. What a nightmare? Or, maybe, that’s the way you’ve been operating! Perhaps, now you understand the purpose of this article.
With a “nightmare” to motivate us, this is where the SVN folder structure comes in. A default SVN structure contains three folders in each project: “trunk”, “branches”, and “tags”.
- The trunk folder contains the main development branch.
- The branches folder contains subfolders with temporary copies of trunk for experimental development, release stabilization etc.
- And, the tags folder contains copies (subfolders) of the officially released versions. It should be treated as read-only.
Typically, and with my suggestion, let’s create these other folders inside our project:
- Right-click in any Windows Explorer window or the desktop, and select the “TortoiseSVN”, “Rep-browser” item.
- Enter a URL of https://dad:8443/svn/Main (or your flavor) which should show us the repository.
- Inside the Rep-browser, right-click on the project name in the left pane, and select the “Create Folder…” item. Enter “branches”, and hit the OK button.
- Once again, right-click on the project name in the left pane, and select the “Create Folder…” item. Enter “tags”, and hit the OK button.
Our repository structure should now look like:
- SVNRepository/Main
- SourceOutliner
- branches
- tags
- trunk
- SourceOutlinerControl
- SourceOutlinerPackage
SVN source control concepts – Part III
Before we get too much farther, we'll need to understand some other key SVN terms:
- “Head” refers to the most recent revision in the project repository.
- “Working Copy” refers to the project code that is continually worked on and lives on the programmer’s computer.
- “Checkout” refers to that initial instance we make a local “working copy” out of the repository. In AnkhSVN, this is done when we use the “Open from Subversion…” or similar commands.
- “Import”, though AnkhSVN doesn’t use this specific term, is what we did when we placed our project into the repository for the first time.
- “Commit” adds a snapshot of our local “working copy” into the repository as the next revision. It’s recommended you enter a “log message” in the “Pending Changes” window before you “commit” to annotate what all the changes are. Again, a revision is an entire snapshot of the project, not just a single changed file. We can always add or edit the log message for a revision later, if needed.
- “Update” attempts to update our local “working copy” to a revision from the repository. In a programming environment with a single programmer, I can’t think of a reason an “update” is needed since no one else is “committing” to the repository.
While every programmer working with a project would have their own working copy, there is only one “repository” for each code project. A working copy keeps track of its sole associated repository (which can be reassigned by the “Switch” command). However, the SVN repository doesn't keep records of any working copies checked out.
Organizing our project in the repository
Now that the preliminaries are finally out of the way, let’s get some work done. This first step won’t seem necessary, but it’ll prepare us for later. Obviously, when we imported an already working solution into the repository, it was marked as revision #1 (which isn’t necessarily true). So, if we needed to refer or revert back to the way things were on that fateful day, we could probably easily remember “revision #1”. Please allow me some latitude for a teaching opportunity. Let’s save a special snapshot with a special name. In most cases, we’ll do this whenever a project version or update is released.
We are going to create a “tag” snapshot or a copy. For the sake of argument, we’ll call it “release1.0”. Generally speaking, the code should both build and run before we make a “tag”. After all, it doesn’t do us much good to release a program we can’t build or run. Neither would it make sense to save a read-only, non-working copy of our project. So, go ahead and build the project, and also make sure it’s been committed to the repository (is the pending window empty?).
I’ll take a sidebar now to let you know that in addition to the commands available in the “Pending Changes” window and context menus, you can display and use the “Source Control – Subversion” toolbar.
Now, we’ll “tag” our project. Right-click on the solution name in the Solution Explorer. Select the “Subversion”, “Branch Solution…” item. For the sake of argument, this is basically the “copy” command used for both “tags” and “branches”. For our purposes as a lone programmer, we’d rarely, if ever, have a need for “branches,” but they are the same, just organized in a different folder for “human” understanding.
In the Create Branch/Tag dialog, we’ll need to create our “tag name”. Enter the correct “To URL” so it points to the “tags” folder and includes our tag name “release1.0”. Also, enter a log message before you click “OK” to create this “tag”.

Now, we have a special “tagged” “revision” in our repository. If someone reports a problem with v1.0, we can refer back to a specific snapshot of what our code was at that point.
Conclusion
We've come to the end of this installment. Though we haven’t done much practical work, we have covered a lot of ground to understand more about SVN repositories.
I’d encourage you to begin building a habit of “committing” your project to the repository on a regular basis. Not too often and not too seldom. Though the adage of “save early, save often” should always apply to our working copy, we don’t want to make our “backup” management overly complicated. Perhaps, a good suggestion would be immediately after every time you make a successful change to your code and before proceeding onto the next “change”. I’ll leave that up to you.
In summary, in this article:
- We learned a great deal more about SVN repositories.
- We created the basic default structure of an SVN project folder.
- We created a “tag” or a clearly identifiable snapshot of our project.
- We learned a reason, a motive, and a method to begin committing our projects to our repository.
In my next article, we’ll go down the dark “what if something breaks” path.
History
- Mar 15, 2009 - Added link to 3rd article.
- Nov 24, 2008 - Began working on this, my second article for CodeProject.
This member has not yet provided a Biography. Assume it's interesting and varied, and probably something to do with programming.


 General
  News
News  Suggestion
  Question
  Bug
Bug  Answer
  Joke
Joke  Praise
  Rant
Rant  Admin
Admin 


