Introduction
I have always enjoyed playing with non-rectangular skins and this article is just about having fun making skins in different ways. John O'Byrne wrote an article here on CodeProject back in 2003 entitled TaskbarNotifier, a skinnable MSN Messenger-like popup in C# that was a nice article on creating a non-rectangular TaskbarNotifier. I thought I would take his code as a starting point, fix some minor bugs, and add a number of additional features such as creating skins from web pages for really cool animations using jquery, adding a non-rectangular video player, and making non-rectangular skins resizable by loading the non-rectangualr regions from files or resources and scalling the regions using XFORM and Transform. And unlike his original project, I created a DLL that can be loaded and used by other applications which made more sense to me. I am not an artist so some of the edges of the skins are a little rough but I hope the reader understands that this article is about just having fun with regions and not about my artwork!
Features
The MSN messenger like popup includes:
- Skins created from the webbrowser control AND skins created from bitmaps
- Made all skins resizable using XFORM and Transform
- Using a web page as a skin for really cool-looking skins
- A skinnable 3-State close button for bitmap skins
- Clickable title text & Clickable content text
- Custom fonts and colors for the different states of the text (normal/hover)
- Animation speed parameters
- Playing video in a non-rectangular window in a skin
- Fast creation of a Region from bitmap using a tolerance factor
- Loading a region from a file & Resizing the Region Dynamically
- Saving a region to a file THE CORRECT WAY!
- Loading a region from an embedded resource
How the DLL and Demo Work
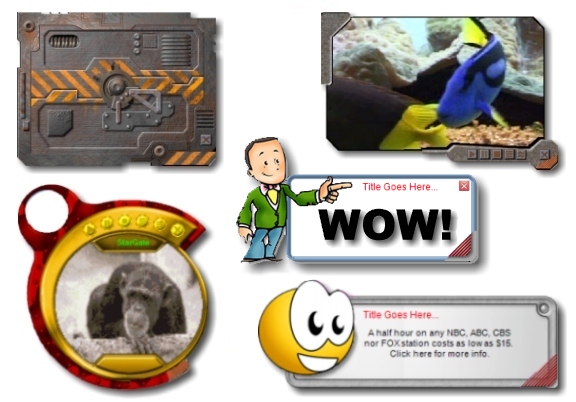
I included a separte project called "NotifierDemo" that loads the DLL "TaskNotifier.dll" to illustrate how to use this DLL. In addition, NotifierDemo also allows you to create and save regions to files so we can use the saved regions as files or embedded resources. There are two types of skins in this demo. The first are those that are just a skinned WinForm painted with a bitmap, i.e. the "Bmp Skin" buttons. The other type is a skinned WinForm with a WebBrowser Control and an instance of a media player, i.e., the "WebSkin" buttons in the NotifierDemo screen shown below are "Cargo Door," "Stone TV," and "Stargate." The bottom half of the screen below allows you to create a region from a bitmap including a tolerance factor. The button in the lower left of the screen below called "Create Form from Region File" will load the region frrom the region file you select and RESIZE the region to fit the dimensions you have typed into the Width and Height fields on the right of this button. I only set the code for an animated slide from the lower right-hand corner of the screen but the reader can easily modify the code to slide from any of the corners of the screen. It should be pointed out that some of the resources for these skins can be placed in the DLL as embedded resources or they can loose in any directory. In this demo to make things easier I put some skin resources in directories and others as embeddede resources to illustrate using both approaches.

Creating A Region from A Bitmap with Tolerance
You can find dozens of examples of creating a region from a bitmap. I used the approach below in C# that includes using a "Tolerance Factor" to help to smooth out the rough curves. Speed is not critical here because we will be using only the regions created in our skins and not dynamically creating the regions from a bitmap. When I first started this article I resized the skins by just first resizing the bitmap image and then creating the region again from the resized bitmap--that also works fine if you prefer that approach. My own preference is to create the region and resize the regions from a file or embedded region resource which seems a bit faster.
public Region getRegion(Bitmap inputBmp, Color transperancyKey, int tolerance)
{
GraphicsPath path = new GraphicsPath();
for (int x = 0; x < inputBmp.Width; x++)
{
for (int y = 0; y < inputBmp.Height; y++)
{
if (!colorsMatch(inputBmp.GetPixel(x, y), transperancyKey, tolerance))
path.AddRectangle(new Rectangle(x, y, 1, 1));
}
}
Region outputRegion = new Region(path);
path.Dispose();
return outputRegion;
}
private static bool colorsMatch(Color color1, Color color2, int tolerance)
{
if (tolerance < 0) tolerance = 0;
return Math.Abs(color1.R - color2.R) <= tolerance &&
Math.Abs(color1.G - color2.G) <= tolerance &&
Math.Abs(color1.B - color2.B) <= tolerance;
}
Saving A Region to A File
Saving a region file correctly is not so simple. What I doubt you will find anywhere is sample code in C# to save a region to a file correctly. Proably because to save a region to a file in C# is a bit tricky since the methods to get the combined region data AND region header all accept a pointer to the region structure. Since the skins in this project all load the regions from either a file or embedded resource we need to be able to save the region created from a bitmap to a file in C# as I do in Bmp2Rgn.cs. There are other ways to save or serialize a region to a file in C# without using unsafe pointers but this approach is just the way I prefer doing it.
using (Graphics g = this.CreateGraphics())
SaveRgn2File(myRegion.GetHrgn(g), sSaveRgnFile);
[SuppressUnmanagedCodeSecurity()]
public unsafe void SaveRgn2File(IntPtr hRgn, string sSaveRgnFile)
{
Win32.RECT[] regionRects = null;
IntPtr pBytes = IntPtr.Zero;
try
{
int regionDataSize = Win32.GetRegionData(new HandleRef(null, hRgn), 0, IntPtr.Zero);
if (regionDataSize != 0)
{
pBytes = Marshal.AllocCoTaskMem(regionDataSize);
int ret = Win32.GetRegionData(new HandleRef(null, hRgn), regionDataSize, pBytes);
if (ret == regionDataSize)
{
Win32.RGNDATAHEADER* pRgnDataHeader = (Win32.RGNDATAHEADER*)pBytes;
if (pRgnDataHeader->iType == 1)
{
using (FileStream writeStream = new FileStream(sSaveRgnFile, FileMode.Create, FileAccess.ReadWrite))
{
WriteToStream(writeStream, (void*)pBytes, (uint)ret);
writeStream.Close();
}
}
}
}
}
finally
{
if (pBytes != IntPtr.Zero)
{
Marshal.FreeCoTaskMem(pBytes);
}
}
}
[SuppressUnmanagedCodeSecurity()]
public unsafe static void WriteToStream(FileStream output, void* pvBuffer, uint length)
{
IntPtr hFile = output.SafeFileHandle.DangerousGetHandle();
WriteToStream(hFile, pvBuffer, length);
GC.KeepAlive(output);
}
[SuppressUnmanagedCodeSecurity()]
public unsafe static void WriteToStream(IntPtr hFile, void* pvBuffer, uint length)
{
if (hFile == NativeConstants.INVALID_HANDLE_VALUE)
throw new ArgumentException("output", "File is closed");
void* pvWrite = pvBuffer;
while (length > 0)
{
uint written;
bool result = SafeNativeMethods.WriteFile(hFile, pvWrite, length, out written, IntPtr.Zero);
if (!result)
return;
pvWrite = (void*)((byte*)pvWrite + written);
length -= written;
}
}
<h2loading>
My approach in creating skins is to let the user set the width and height of any skin dynamically by providing a "Grip Area" in the lower right corner of the skin that the user can drag to resize the skin. The method below converts a region file to a scaled region using XFORM & Transform & sets a region to object given it's handle. One issue I ran into was that I found I had to remove the AnchorStyles before calling "SetBounds" and setting the region for the Video Player and then I had to reset the AnchorStyles to "Top" and "Left" afterwards.
private void File2RgnStretch(System.IntPtr hWnd, string strRgnFile, int bmpWidth, int bmpHeight, int rgnWidth, int rgnHeight)
{
using (FileStream fs = new FileStream(strRgnFile, FileMode.Open, FileAccess.Read, FileShare.Read))
{
byte[] regionData = null;
BinaryReader reader = new BinaryReader(fs);
regionData = reader.ReadBytes((int)fs.Length);
using (Region region = Region.FromHrgn(ExtCreateRegion(0, regionData.Length, regionData)))
{
float xScale = (float)rgnWidth / (float)bmpWidth;
float yScale = (float)rgnHeight / (float)bmpHeight;
Win32.XFORM xForm;
xForm.eDx = 0;
xForm.eDy = 0;
xForm.eM11 = xScale;
xForm.eM12 = 0;
xForm.eM21 = 0;
xForm.eM22 = yScale;
region.Transform(xForm);
Graphics g = this.CreateGraphics();
IntPtr hRgn = region.GetHrgn(g);
if (this.Handle == hWnd)
{
RectangleF rect = region.GetBounds(g);
rectSkin.Width = Convert.ToInt32(rect.Width) + 30;
if((ZSkinName == "skin1") || (ZSkinName == "skin2") || (ZSkinName == "skin3"))
rectSkin.height = Convert.ToInt32(rect.Height);
else
rectSkin.height = Convert.ToInt32(rect.Height) + 10;
SetWindowRgn(hWnd, hRgn, false);
}
else if (dShowPlayer1.Handle == hWnd)
{
rectVideo = new Win32.RGNRECT();
rectVideo.x1 = 0;
rectVideo.y1 = 0;
rectVideo.Width = this.Width;
rectVideo.Height = this.Height;
dShowPlayer1.RectVideo = rectVideo;
dShowPlayer1.Visible = true;
dShowPlayer1.Anchor = AnchorStyles.None;
dShowPlayer1.Dock = DockStyle.None;
dShowPlayer1.SetBounds(rectVideo.x1, rectVideo.y1, rectVideo.Width, rectVideo.Height);
Win32.SetWindowRgn(dShowPlayer1.Handle, hRgn, true);
dShowPlayer1.Anchor = AnchorStyles.Top | AnchorStyles.Left;
}
else
SetWindowRgn(hWnd, hRgn, false);
region.ReleaseHrgn(hRgn);
g.Dispose();
}
}
}
global::System.Resources.ResourceManager rm =
new global::System.Resources.ResourceManager("TaskNotifier.Properties.Resources", typeof(Resources).Assembly);
regionData = (byte[])rm.GetObject(strRgnRes);
Basic Layout of WebBrowser Skins
Below is the basic structure and layout of the WebBrowser skin. It consists of a WinForm with a WebBrowser control docked on the form. We then set a region that is a "cookie cutter" for the overall shape of both the WinForm as illustrated below. The door below is just an ordinary web page in the wbbrowser control inside of a non-rectangualr region. In the case of the "Cargo Door" skin the door is an html file where the door itself is made up of a lot of little images that are animated using plain old Javascript.
There are two main ways to create the Grip Area on the skin in the WeBrowser skins. One technique is to place an image of the Grip Area in a separate layer in the web page for the skin and position it where you want it and to fire a callback in the C# code the same way we do for the dragging of the web skin. But I decided to use an approach that we could also use with the non-WebBrowser skins, namely to paint the Grip Area directly on the back of the WinForm and re-paint the Grip when the form is resized. In order for the user to be able to click on the painted Grip Area on the WinForm it is necessary toi leave an area cut out from the WeBrowsr's region so that the underlying Grip Area is visible as show below.
Scaling The Grip Image On Resize of Skin
When we first create the skin we calculate the sizeFactorX and sizeFactorY based on the form's size to the size of the bitmap we will use to paint the background of our form. We then apply these ratios to correctly resize the image of our Grip. The position of the Grip is also recalculated with these ratios as shown below:
sizeFactorX = (double)this.Size.Width / backBmap.Size.Width;
sizeFactorY = (double)this.Size.Height / backBmap.Size.Height;
public void SetGripBitmap(Image image, Color transparencyColor, Point position)
{
dGripBitmapW = (double)image.Width * (double)sizeFactorX;
dGripBitmapH = (double)image.Height * (double)sizeFactorY;
dGripBitmapX = (double)position.X * (double)sizeFactorX;
dGripBitmapY = (double)position.Y * (double)sizeFactorY;
GripBitmap = null;
GripBitmap = new Bitmap(Convert.ToInt32(dGripBitmapW), Convert.ToInt32(dGripBitmapH));
Graphics gr = Graphics.FromImage(GripBitmap);
gr.SmoothingMode = SmoothingMode.None;
gr.CompositingQuality = CompositingQuality.HighQuality;
gr.InterpolationMode = InterpolationMode.HighQualityBilinear;
gr.DrawImage(image, new Rectangle(0, 0, Convert.ToInt32(dGripBitmapW), Convert.ToInt32(dGripBitmapH)), new Rectangle(0, 0, image.Width, image.Height), GraphicsUnit.Pixel);
gr.Dispose();
GripBitmap.MakeTransparent(transparencyColor);
GripBitmapSize = new Size(GripBitmap.Width, GripBitmap.Height);
GripBitmapLocation = new Point(Convert.ToInt32(dGripBitmapX), Convert.ToInt32(dGripBitmapY));
}
Scaling/Zooming The WebBrowser Control That Displays The HTML Skin
Since the non-rectangular WebBrowser Control contains our HTML Skin when the user resizes the WinForm by dragging the the Grip Area we must also zoom the WebBrowser control proportionally to match the change in size of the WinForm so I added the necessary code for the WebBrowser Control accomplish this as follows:
[PermissionSet(SecurityAction.LinkDemand, Name = "FullTrust")]
public void Zoom(int zoomvalue)
{
if ((zoomvalue < 10) || (zoomvalue > 1000))
return;
try
{
this.axIWebBrowser2.ExecWB(NativeMethods.OLECMDID.OLECMDID_OPTICAL_ZOOM, NativeMethods.OLECMDEXECOPT.OLECMDEXECOPT_DONTPROMPTUSER, zoomvalue, System.IntPtr.Zero);
}
catch
{
}
}
In that case of simple bitmap skins we can proportionally change both the width and height to the new dimensions of the WinForm BUT, in the case of the WebBrowser skins, we are limited because of how the WebBrowser's zoom works so we resize the WebBrowser skins by the change in the x-coordinate as follows:
double dHeight = (double)(380 * (this.Width + dx)) / (double)372;
Win32.SetWindowPos(this.Handle, (System.IntPtr)Win32.HWND_TOPMOST, this.Location.X, this.Location.Y,
this.Width + dx, Convert.ToInt32(dHeight), Win32.SWP_SHOWWINDOW);
UpdateSkin();
double dZoom = 100 * (double)sizeFactorX;
extendedWebBrowser1.Zoom(Convert.ToInt32(dZoom));
SetGripBitmap((Bitmap)Resources.stargate_grip, Color.FromArgb(255, 0, 255), new Point(270, 320));
Playing Video Using DirectShowNet Wrapper
As I mentioned at the beginning of the article I included the C# wrapper for DirectShow, namely, DirectShowLib-2005.dll, to allow users to play video messages in a popup. You can remove this reference if you don't want to play video. There are two ways you can add video, I added an instance of a C# video player I created using the wrapperer. Shown below is a skinned WinForm consisting of a WebBrowser Control and an instance of media player that is just a wrapper for the DirectShowLib-2005.dll. You can download this dll with sourcecode at http://directshownet.sourceforge.net/.
The WebBrowser Control is docked to the parent WinForm that has no border. The actual skin you see isn't a bitmap painted on the WinForm as in the case of the skins "Bmp Skin 1", "Bmp Skin 2" and "Bmp Skin 3" which are skins that only use the WinForm. In the case of the WebSkins the skin is just an ordinary html web page inside of the WebBrowser Control docked on the parent WinForm. Below is an illustration of the layers on the WebBrowser skin. We could add additional zooming for the video but this articloe is just about having some fun with regions and that would be a little too much!
If the user right mouse clicks on the Video Player region I added a context menu that will appear that allows the user to play the video fullscreen so we need to subscribe to the "ToggleChange" event in the video player so we can handle when the user goes from fullscreen back to the normal size of the player. In this event we need to call "SetSkin()" to rebuild the skin as follows:
void dShowPlayer1_ToggleChange(object o, ZToggleEventArgs e)
{
if (!e.ZIsFullScreen)
{
dShowPlayer1.menuFileClose_Click(this, null);
SetSkin(ZSkinName, true);
}
}
Details for Simple Bmp Skins:
 SetBackgroundBitmap((Bitmap)Resources.skin1, Color.FromArgb(255, 0, 255));;0, 255));;
SetCloseBitmap((Bitmap)Resources.close1, Color.FromArgb(255, 0, 255), new Point(220, 8));
TitleRectangle = new Rectangle(60, 8, 70, 25);
ContentRectangle = new Rectangle(60, 8, 150, 140);
The first line sets the background bitmap skin and transparency color from the embedded resource bitmap, and the second line sets the optional 3-State close button with its transparency color and its location on the window. These two lines allow us to define the rectangles in which will be displayed, the title and content texts. You can set these properties for the simple bmp skins:
- Title, content fonts and colors
- Ability to click or not on the title/content/close button
- You can disable the focus rect
- Position the popup simple bmp skins where you want on the screen
void SetCloseBitmap(string strFilename, Color transparencyColor, Point position)
Sets the 3-State close button bitmap, its transparency color and its coordinates for our plain bitmap skins.
Parameters
strFilename: Path of the 3-state close button bitmap on the disk where the width must be a multiple of 3transparencyColor: Color of the bitmap which won't be visibleposition: Location of the close button on the popup
void SetCloseBitmap(Image image, Color transparencyColor, Point position)
Sets the 3-State close button bitmap, its transparency color and its coordinates.
Parameters
image: Image/Bitmap object which represents the 3-state close button bitmap (width must be a multiple of 3)transparencyColor: Color of the bitmap which won't be visibleposition: Location of the close button on the popup
Properties for All Skin Types
string TitleText (get/set)
string ContentText (get/set)
TaskbarStates TaskbarState (get)
Color NormalTitleColor (get/set)
Color HoverTitleColor (get/set)
Color NormalContentColor (get/set)
Color HoverContentColor (get/set)
Font NormalTitleFont (get/set)
Font HoverTitleFont (get/set)
Font NormalContentFont (get/set)
Font HoverContentFont (get/set)
Rectangle TitleRectangle (get/set)
Rectangle ContentRectangle (get/set)
bool TitleClickable (get/set) (default = false);
bool ContentClickable (get/set) (default = true);
bool CloseClickable (get/set) (default = true);
bool EnableSelectionRectangle (get/set) (default = true);
SkinDlg Class Documentation
Methods
public void Show(string strAction, string strTitle, string strContent, int nTimeToShow, int nTimeToStay, int nTimeToHide)
I added an "Action" parameter, i.e., strAction, to the original code to indicate what the popup should do when launched, and the other parameters set the Title, Content and amount of time to display the popup.
Parameterss
strAction: The string determines the action of the popup, i.e., screen position and slide and noslidestrTitlee: The string which will be shown as the title of the popupstrContent: The string which will be shown as the content of the popupnTimeToShow: Duration of the showing animation (in milliseconds)nTimeToStay: Duration of the visible state before collapsing (in milliseconds)nTimeToHide: Duration of the hiding animation (in milliseconds)
void Hide()
This Hides the popup.
Painting Background
The refresh() of the popup is done using double buffering technique from John O'Byrne's original article to avoid flickering with some minor changes:
protected override void OnPaintBackground(PaintEventArgs e)
{
if (m_alphaBitmap != null)
{
Graphics grfx = e.Graphics;
grfx.PageUnit = GraphicsUnit.Pixel;
Graphics offScreenGraphics;
Bitmap offscreenBitmap;
offscreenBitmap = new Bitmap(m_alphaBitmap.Width, m_alphaBitmap.Height);
offScreenGraphics = Graphics.FromImage(offscreenBitmap);
if (m_alphaBitmap != null)
offScreenGraphics.DrawImage(m_alphaBitmap, 0, 0, m_alphaBitmap.Width, m_alphaBitmap.Height);
DrawGrip(offScreenGraphics);
DrawCloseButton(offScreenGraphics);
DrawText(offScreenGraphics);
grfx.DrawImage(offscreenBitmap, 0, 0);
offScreenGraphics.Dispose();
offscreenBitmap.Dispose();
}
}
In addition to avoid flicking I added:
this.SetStyle(System.Windows.Forms.ControlStyles.DoubleBuffer, true);
this.SetStyle(System.Windows.Forms.ControlStyles.AllPaintingInWmPaint, false);
this.SetStyle(System.Windows.Forms.ControlStyles.ResizeRedraw, true);
this.SetStyle(System.Windows.Forms.ControlStyles.UserPaint, true);
this.UpdateStyles();
Creating A DropShadow
The reader can tweak the code and easily change how the popups work. For example, you can embed the html and images in the DLL and load them as embedded resources. You will notice the popup is shown using the Win32 function ShowWindow(SW_SHOWNOACTIVATE), to prevent the popup from stealing the focus.
To add a really nice dropshadow we need to create a bitmap with 32 bits per pixel with an alpha channel and add the droshadow to the bitmap itself as part of the image. But to add a slight dropshadow we can just add the code below.
private const int WS_THICKFRAME = 0x40000;
private const int WS_CAPTION = 0xC00000;
private const int CS_DROPSHADOW = 0x20000;
protected override CreateParams CreateParams
{
get
{
CreateParams cp = base.CreateParams;
cp.ClassStyle |= CS_DROPSHADOW;
cp.Style = cp.Style & ~WS_CAPTION;
cp.Style = cp.Style & ~WS_THICKFRAME;
return cp;
}
}
Dragging The Skins
There are a number of ways to drag a non-rectangular form without a tittle bar but I like to keep things simple so what I used was the code below. In the case of the simple bitmap skin we override OnMouseDown and just make sure that we are not over the painted Grip Area as shown below.
Win32.ReleaseCapture();
Win32.SendMessage(Handle, Win32.WM_NCLBUTTONDOWN, Win32.HT_CAPTION, 0);
protected override void OnMouseDown(MouseEventArgs e)
{
base.OnMouseDown(e);
bIsMouseDown = true;
if (e.Button == MouseButtons.Left)
{
if (bIsMouseOverClose)
{
Refresh();
}
else if (!bIsMouseOverGrip)
{
Win32.ReleaseCapture();
Win32.SendMessage(Handle, Win32.WM_NCLBUTTONDOWN, Win32.HT_CAPTION, 0);
}
else if (bIsMouseOverGrip)
{
nMouseStartX = e.X;
nMouseStartY = e.Y;
}
}
}
In the case of our WebBrowser skins there are two main methods I used in these skins and both work equally well. The first method is place a link in te javascript as follows so that when the user clicks on an image in html designated to be part of the frame images that users click on to drag the skin we Naviate to "EVENT:DRAG" and trap it in the C# "Navigating" event as follows:
<script language="javascript" type="text/jscript">
function dragimage(){window.location.href ="EVENT:DRAG";}
</script>
private void extendedWebBrowser1_Navigating(object sender, WebBrowserNavigatingEventArgs e)
{
string csTestUrl = string.Empty;
string csEvent = string.Empty;
string csAction = string.Empty;
string csData = string.Empty;
string csQuestionMark = string.Empty;
char[] delimiterChars = { ':' };
char[] delimiterChars2 = { '?' };
try {
csTestUrl = e.Url.ToString();
string[] words = csTestUrl.Split(delimiterChars, StringSplitOptions.None);
if (words.Length > 1) {
csEvent = words[0];
csAction = words[1];
}
if (words.Length > 2) csData = words[2];
string[] words2 = csTestUrl.Split(delimiterChars2, StringSplitOptions.None);
if (words2.Length > 1) csQuestionMark = words2[1];
}
catch { }
csEvent = csEvent.ToUpper();
if (csEvent != "EVENT") { }
else
{
try
{
csAction = csAction.ToUpper();
if (csAction == "DRAG")
{
e.Cancel = true;
Win32.ReleaseCapture();
Win32.SendMessage(Handle, Win32.WM_NCLBUTTONDOWN, Win32.HT_CAPTION, 0);
}
}
catch { e.Cancel = true; }
}
}
The other method which I also used in the sample project which works equally well is to use "window.external" in Javascript and to create an "External" Class that calls a method "SendDragData" in our skin as follows:
<script language="javascript" type="text/jscript">
function HandleDrag(a) { window.external.SendDragData("EVENT:DRAG"); }
</script>
[System.Runtime.InteropServices.ComVisibleAttribute(true)]
public class External
{
private static SkinDlg m_mainWindow = null;
public void SendDragData(string zdata)
{
m_mainWindow.SendDragData(zdata);
}
}
public void SendDragData(string zdata)
{
Win32.ReleaseCapture();
Win32.SendMessage(Handle, Win32.WM_NCLBUTTONDOWN, Win32.HT_CAPTION, 0);
}
Conclusion
Basically I set out to see how well resizing of the skins might look and the overall effect isn't bad. The purpose of this article is to just have some fun palying around with skins.
Bill SerGio is a highly accomplished individual, recognized in prestigious publications such as Marquis Who's Who in America and Who's Who in Advertising. With a background in software development and producing and directing famous celebrity infomercials, he has amassed a considerable fortune through television and licensing his software. Currently, he is deeply invested in developing anti-gravity technology using artificial intelligence, as well as utilizing AI for research into finding new cures for diseases such as cancer. In addition, he is also an investor in new movies, demonstrating a wide-ranging and diversified interest in various fields.


 General
  News
News  Suggestion
  Question
  Bug
Bug  Answer
  Joke
Joke  Praise
  Rant
Rant  Admin
Admin 


