Introduction
In my previous article "Creating a COM DLL with VS 2005, A Walk-Through", we walked-through creating a COM DLL with Visual Studio 2005, using Visual Basic .NET.
In this article, we are going to walk-through registering our COM DLL.
Background
If you are an experienced developer, and you've worked with DLLs before, you've probably already tried using RegSvr32, and have experienced some difficulties. If you're an experienced .NET developer, you may have tried using RegAsm, and have encountered some challenges there as well.
In this article, we are not going to look at the more complex approaches of registering a COM DLL. Instead, we are going to walk-through creating a VS 2005 Installer, which will both install and register our COM DLL for us, while providing a simple, professional tool to accomplish this task.
As a professional software developer, and an experienced COM DLL developer, I personally prefer using an Installer. Additionally, my clients appreciate it, because whenever they need to install a COM DLL, they are able to.
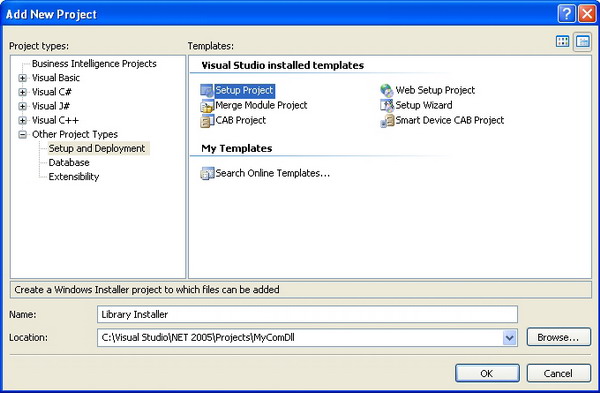
Creating the Setup Project
If you followed along with my previous article "Creating a COM DLL with VS 2005, A Walk-Through", then open that project now. If you did not follow my previous article, but have your own COM DLL that you have created, then open the project that contains that COM DLL now.
To begin with, let's add a new "Setup and Deployment" project to our solution:
- Click on the File menu | Add | New Project...
- In the Add New Project window, make the following selections:
- Under "Project types":
- Click the plus (+) sign next to "Other Project Types" to expand it.
- Click on "Setup and Deployment" to select it.
- Under "Templates":
- Click "Setup Project" to select it.
- Change the Name to "Library Installer".
- Click the OK button when finished.
The Add New Project window:
Now that the new "Library Installer" setup project has been added to the Solution, your Solution Explorer should look like the picture below. If Solution Explorer is not open, then open it by clicking on View menu | Solution Explorer.

Configure Installer Properties
Now that we have the installer added to the Solution, let's configure its properties.
- In Solution Explorer, left-click on the installer ("Library Installer") to select it.
- Now, go to the Properties window (F4 or View menu | Properties window).
- Set the following properties in the Properties window:
- Author: set this to your name.
- InstallAllUsers: set this to True.
- Manufacturer: set this to "Common Files".
- ProductName: set this to "My Libraries".
- Title: set this to "Library Installer".
Here's the Properties window:
Add Project Output to Installer
The next thing we need to do is add the files that we want to the installer to install, which in this case is our COM DLL. The installer will not only install our COM DLL, but it will take care of registering it for us as well!
First, make sure your "File System" tab is visible. If it's not, follow these steps:
- Go to Solution Explorer (View menu | Solution Explorer).
- Right-click on the installer project ("Library Installer") menu | View | File System.
Next, configure the file system:
- Add the "Program Files Folder": In the pane on the left, right-click on "File System on Target Machine" | Add Special Folder | Program Files Folder.
- Add a "Common Files" folder: Right-click on the "Program Files Folder" that we just added, select Add | Folder from the popup menu.
- Rename the folder to "Common Files".
- Add a "My Libraries" folder: Right-click on the "Common Files" folder we just created, select Add | Folder from the popup menu.
- Rename the folder to "My Libraries".
When you've added all of the folders, the file system should look like this:
Just a brief explanation: What we are doing is, we are telling the installer to install our COM DLL in the following location: C:\Program Files\Common Files\My Libraries.
- Add our COM DLL:
- Click on the "My Libraries" folder to select it.
- In the pane on the right, right-click to bring up the popup menu, select Add | Project Output.
- The "Add Project Output Group" window will open.
- Select Project: "MyComDll".
- Select "Primary Output".
- Select Configuration: "(Active)".
- Click the OK button when you are finished.
When you're finished, it should look like this:
Finally Save and Build both projects.
- View Solution Explorer (View menu | Solution Explorer).
- Right-click on the installer ("Library Installer").
- Select Build from the popup menu.
Run the Installer from Within Visual Studio
We have finished our installer! Now we are ready to test it out!
- In Solution Explorer, right-click on the installer ("Library Installer").
- Select "Install" from the popup menu.
When you run the Installer, observe the following:
- On the "Select Installation Folder" window:
- The installation path is: C:\Program Files\Common Files\My Libraries\
- "Everyone" is selected.
Using Our Registered COM DLL in VB6
We now have a registered COM DLL ready to be used in VB6. Let's go into VB6 and see how to use it.
Create a new VB6 Project:
- Start VB6.
- When the "New Project" window opens, select "Standard Exe".
- Click the "Open" button.
- Add a
Button to the Form, and double-click it to create the Click() event, and open the code window.
Add a reference to our COM DLL:
- Click the Project menu | References.
- Click the "Browse" button to open the "Add Reference" window.
- Navigate to the "My Libraries" folder ("C:\Program Files\Common Files\My Libraries").
- Select the "MyComDll.tlb" file (notice the ".tlb" - not ".dll").
- Click the "Open" button to close the "Add Reference" window.
- Click the "OK" button to close the "References" window and add our COM DLL as a reference.
Finally, in the Click() event for our Command Button, add code to utilize our COM DLL:
Private Sub Command1_Click()

    Dim mcc As New MyComClass
    mcc.DisplayMessage

End Sub
- Run the VB6 application (F8, or Debug menu | Step Into).
- Click the button on the form.
Here's the result of our test:
Conclusion
As you can see, creating a setup project to install and register your COM DLL is very easy with VS 2005! Additionally, it is very easy for anyone to use, and looks very professional!
I hope this article is helpful to you!


 General
  News
News  Suggestion
  Question
  Bug
Bug  Answer
  Joke
Joke  Praise
  Rant
Rant  Admin
Admin 


