Introduction
Compressing files is one of the most frequent operations when we want to share documents. The problem is that for most compression programs it takes ages just to organize the files that you want to compress, and then you have to spend ages to choose the compression options that you like best. This Windows Vista Sidebar gadget tries to solve these problems. From its characteristics , the most ones interesting are:
- Uses almost any command line archiver (probably you already have one, it came with your GUI archiver)
- Can compress in any format supported by the command line application (tested with WinZip, WinRar, WinAce)
- No settings required if the compression software was installed in the standard location
- Fully customizable for use with any compression software through sidebar Settings page
- Three profiles for easy and fast switching between compression formats, settings and backends
- Simple multithreading with progress indicator
From the users point of view
Please read the following text at least briefly so that you understand how the user interacts with the gadget.
What does this gadget do?
This gadget allows you to drag files and folders on its sidebar space and then drag the files out of it compressed. It does this by using the very archiver you use. It has been tested with WinAce, WinZip and WinRar and it should work with any other archiver that offers a command line utility (console application).
How do I install it?
Download the demo project zip. Then extract it and run the included Setup.msi file. You will need administrator privileges to correctly install the required libraries. Then you can run the other file called Zipper.gadget which will install that product.
How do I use it?
Setting up the profiles
The gadget offers 3 profiles for compressing files. Each profile can use a different archiving utility or the same utility with different parameters. To set up your own archiver, check out the producers site to find out if it comes with a console application. If it does, then you have to enter the path to this application in the Gadget settings. Then check out the documentation of that application to find suitable arguments for calling it and enter them in the Arguments textbox of the profile you entered the name of the application in.
The gadget has so far been tested with WinRar, WinZip and WinAce and offers default profiles for these applications.
I use WinRar
If you have installed in the default location, then no setting editing is need. Otherwise, enter this info in the Settings dialog of the gadget:
PATH : installation path (ex: C:\Program Files\WinRAR\rar.exe )
ARGS : a -ep1
EXTENSION : rar
Note: Check out the console application help to tune your compression level. For compatibility , the compression is left to the default level.
I use WinAce
For WinAce, the console application is a separate download. Extract the files in the package obtained from http://www.winace.com/ to c:\Downloads so that no setting are required. Otherwise, do this:
Note: Because you run on Windows Vista, the only application from those extracted that will work for you is ace32.exe.
PATH : path to ace32.exe
ARGS : a -r
EXTENSION : ace
Note: Check out the console application Help to tune your compression level. For compatibility, the compression is left to the default level.
I use WinZip
To use WinZip you have to use the Pro version (which costs money). Install it to the default path and you will not be required to edit any settings, but you will have to install the free add-on that provides console functionality from http://www.winzip.com/prodpagecl.htm
PATH : installation path of wzzip.exe
ARGS : -rp
EXTENSION : zip
Note: Because you run on Windows Vista and the help of the console application for WinZip is in .hlp format (no support for that in Vista), it will not work. Use this link if you want to further tweak your compression parameters.
- I use another archiver: I recommend you to use 7Zip command line utility, it is small and works well.
Compressing files
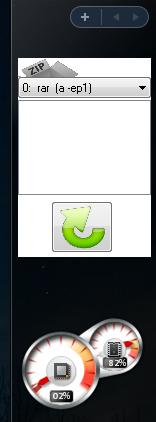
Drag and drop the desired files and folders from Explorer to the gadget window. To remove any file, just double click on it. When you are done click the big button with a green arrow on it. A progress bar should appear. if it doesn't , then check out the combo at the top of the Window. If it says "disabled" then you have not set up the archiver correctly.Try another profile. When the progressbar stops, a big image with a package should appear in its place. drag it to where you would like to put your compressed file.
Known limitations
Depending on your archiver, filenames with spaces in them might not be supported.
Developer Experiences
ActiveX versus XBAP
The gadget is developed around an ActiveX component developed in C# using Visual Studio 2005 and WinForms 2.0 . The decision not to use WPF and XBAP was taken because XBAP has no way to interact with the HTML and JavaScript in which it resides. Thus, using gadget Settings to customize the behavior of the gadget would be impossible. To the contrary, an ActiveX control is not only simple to build in C# but also allows for simple interaction
with JavaScript.
Creating an ActiveX control in C# requires two steps:
- Generate a
GUID - a unique identifier for your Usercontrol class and set it as an attribute, in front of the class definition, like this:
[Guid("1FAC78B4-B53D-11DB-A52E-328155D89593")]
[ComVisible(true)]
public partial class UserControl1 : UserControl
    {...
The simplest way to generate a GUID is using this web page.
Notice also the ComVisible attribute used to make the class visible to the COM world.
- Set the VS IDE to allow COM object building. Go to Project Settings -> Build and check "Register for COM Interop"
Built in compression versus command line integration
The decision to use third party compression tools came from the fact that, using this approach, the gadget can satisfy all users. Simple, not so knowledgeable users, will appreciate the default profiles and will not need to edit setting and experienced users will enjoy the benefits of tweaking the parameters so that they customize compression to their liking. Like this, no one is left out.
Using a command line tool from your C# application is described in my previous gadget article, the CommandPrompt. Get up to speed on how this is done from there. In this project, all the code required is encapsulated in the Process function. This function takes the file names and arguments and starts a process of the command line compression utility. This generates a file - the archive - in the temp folder of the current user. To move this file, we use Drag and Drop.
Drag and Drop
Drag and drop is very easily accomplished in C#, although it seems like a complicated task. To drag a file out of our program is the simplest, so we will start with that. I wanted an image to represent the result, so I used a ListView control with only one item in it, to which I had attached an image from an imageSource, like this:
ListViewItem it=new ListViewItem();
it.ImageIndex=0;
lstResult.View = View.LargeIcon;
lstResult.Scrollable = false;

lstResult.SmallImageList = imageList1;
lstResult.LargeImageList = imageList1;
lstResult.Items.Add(it);
Then, to perform the actual drag out of the listView we attach a handler to the ItemDrag event:
void lstResult_ItemDrag(object sender, ItemDragEventArgs e)
{
    string[] files = new String[1];
    files[0] =outFile;
    DoDragDrop(new DataObject(DataFormats.FileDrop, files),
                DragDropEffects.Copy | DragDropEffects.Move);
}
As you can see, the DoDragDrop is the only unknown function here.
To drag files from Explorer to our program , we have to handle two events: DragEnter and DragDrop. DragEnter is raised when the user drags a file on our object and is used to display the denied icon if we drag something other than a file or folder . DragDrop is used when the user lets go of the file on the object. The code is as simple as this:
void lstFiles_DragDrop(object sender, DragEventArgs e)
{
try
{
Array a = (Array)e.Data.GetData(DataFormats.FileDrop);
if (a != null)
{
string s = a.GetValue(0).ToString();
if (!lstFiles.Items.Contains(s))
{
string filename = System.IO.Path.GetFileName(s);
lstFiles.Items.Add(filename);
filePaths.Add(s);
}
}
changeState(0);
}
catch (Exception ex)
{...
and
void lstFiles_DragEnter(object sender, DragEventArgs e)
{
    if (e.Data.GetDataPresent(DataFormats.FileDrop))
        e.Effect = DragDropEffects.Copy;
    else
        e.Effect = DragDropEffects.None;
}
General business logic design
The gadget has been designed as a Finite State Machine (FSM) with three states:
- 0 - waiting for a user to add files
- 1 - processing (adding the files to the archive)
- 2 - waiting for the user to drag the result out of the gadget
Possible transitions between states appear when a file is deleted (x-> 0) when a file is added (x->0) when another profile is selected (x->0)
These states reflect in the interface, as there are some objects that appear only in some states, like the progressBar (only in state 2) or the archive image (only in state 3).
Adding Gadget Settings
For a UI consistent with the Windows Vista gadget guidelines, settings should be created using the gadget API. Thus, the settings that I have to remember are 9 in total, three for each profile (path, parameters and archive extension). What is interesting is that, the natural option when it comes to selecting fields from the local hard drive - an input="file" textBox, does not work under the gadget building circumstances, as it does not allow setting the value by script and it is exactly what should happen when we want to see settings already entered. I left this approach for another one: I attached this function to the Browse button located on the left of each path textBox.
function setPath1()
{
    var oItem = System.Shell.chooseFile(true, "All Files:*.*::", "", "");
    path1.value = oItem.path;
}
Note: Initial (default) settings are not visible in the settings page. They are built in the ActiveX control itself and overridden with those set in the settings page. If a file specified in the settings page is not found , the profile appears as "DISABLED". The default settings inclusion in the ActiveX offers a greater robustness (still working even if the settings.html file is gone or if there is a problem with JavaScript on the machine the program is running on) and more flexibility (can include the ActiveX in a stand-alone app without any modification)
Notes on vocabulary used
Some knowledgeable users might observe that in this article I use the words "compress" and "archive" interchangeably. Technically this is not correct.
"To archive" means to merge one or more files into a single entity. The classic example is the Linux utility Tar (originally "Tape ARchiver") . To archive does not necessarily mean that the resulting file is smaller in size than the sum of its components.
"Compressing" is the process of encoding information using fewer bits. The most widely used format for compression is ZIP.
In this article however, for the sake of variation, I decided to use the terms interchangeably.
References
Special Note
The two RAR and ZIP icons were used with permission from their author
Dragos is currently a student at the Polytechnic University of Bucharest. He likes keeping up to date with new and amazing technologies and he hopes he will one day master the mechanisms behind modern day programming languages so that he can write the best possible code from a performance and maintainability point of view.
He keeps track of the things he learns on a daily basis on his blog, at http://picobit.wordpress.com/ .


 General
  News
News  Suggestion
  Question
  Bug
Bug  Answer
  Joke
Joke  Praise
  Rant
Rant  Admin
Admin 


