Introduction
This article describes an easy approach to extending an existing ASP.NET control; in this example, the standard toolkit’s ImageButton control is extended to support roll-over effects. Given that the standard control already contains support for both server-side click events and client click events, the control is well furbished prior to the addition of the roll-over effect.
One possible use for this control may be to drop several of them into a Panel and use the Panel and collection of buttons as a toolbar. Naturally, the control would work just fine as a standalone control as well.
Getting Started
In order to get started, open up the Visual Studio 2005 IDE and start a new project. From the New Project dialog (Figure 1), under Project types, select the “Windows” node from beneath “Visual Basic”, then select the “Web Control Library” template in the right-hand pane. Key in a name for the project and then click “OK”.
Once the project has opened, right click on the solution and click on the “Add” menu option, and then select “New Item”. When the “Add New Item” dialog appears (Figure 2), select the “Web Custom Control” template. After selecting the template, key “EIB.vb” into the name field and then click “Add” to close the dialog. You may now delete the default web control that was created when the project was originally initialized from the template.
At this point, we should have an open web control library project with a single web control named “EIB.vb” in that project. One last step prior to writing the code for this project will be to add in one needed reference. To add this reference, double click on the “My Project” icon in the Solution Explorer to open “My Project”; from here, select the “References” tab, and then click the “Add” button. When the “Add Reference” dialog opens, select the .NET tab, and search down the list until you find the “System.Design” reference. Select this library and click on the “OK” button.

Figure 1: Visual Studio 2005 New Project Dialog
Figure 2: Add New Item Dialog
Navigate back to the “EIB.vb” file and, at the top of the file, add in the Imports statement highlighted below: (Note that the Bindable attribute has been added and set to True, but it is not necessary as I have not implementing any data binding in this example)
Imports System
Imports System.Collections.Generic
Imports System.ComponentModel
Imports System.Text
Imports System.Web
Imports System.Web.UI.Design
Imports System.Web.UI
Imports System.Web.UI.WebControls


<Bindable(True)> _
Public Class EIB
       Inherits System.Web.UI.WebControls.ImageButton
We are now ready to add the code necessary to make this control functional. The first thing to do is to set up a few of simple initialization settings; we can do that in the Public Sub New declaration and in the EIB load event (add a Methods region and key in the following; note that we have not yet defined the MouseOverImage and MouseOutImage properties, but we will shortly):
#Region "Methods"
     Public Sub New()

        Width = 24
        Height = 24
        MouseOverImage = ""
        MouseOutImage = ""
        PostBackUrl = ""

    End Sub

#End Region
Having completed that task, we will need to provide public properties to expose the control's properties to the control user; in order to accomplish these steps, create a “Properties” region and key in the following code: (note that all of the property values are held in view state rather than in local member variables)
#Region "Properties"
     <Category("Button Images")> _
    <Browsable(True)> _
    <Bindable(True)> _
    <Description("Set path to mouseover image file.")> _
    <Editor(GetType(System.Web.UI.Design.UrlEditor), _
    GetType(System.Drawing.Design.UITypeEditor))> _
    Public Property MouseOverImage() As String
        Get
            Dim s As String = _
                  Convert.ToString(ViewState("MouseOverImage"))
            If s Is Nothing Or s = "" Then
                Return String.Empty
            Else
                Dim tilde As Integer = -1
                tilde = s.IndexOf("~")
                If (tilde <> -1) Then
                    Return s.Substring((tilde + 2)).Trim()
                Else
                    Return s
                End If
            End If
        End Get
        Set(ByVal value As String)
            ViewState("MouseOverImage") = value
        End Set
    End Property


    <Category("Button Images")> _
    <Browsable(True)> _
    <Bindable(True)> _
    <Description("Set path to mouseout image file.")> _
    <Editor(GetType(System.Web.UI.Design.UrlEditor), _
    GetType(System.Drawing.Design.UITypeEditor))> _
    Public Property MouseOutImage() As String
        Get
            Dim s As String = _
                  Convert.ToString(ViewState("MouseOutImage"))
            If s Is Nothing Or s = "" Then
                Return String.Empty
            Else
                Dim tilde As Integer = -1
                tilde = s.IndexOf("~")
                If (tilde <> -1) Then
                    Return s.Substring((tilde + 2)).Trim()
                Else
                    Return s
                End If
            End If
        End Get
        Set(ByVal value As String)
            ViewState("MouseOutImage") = value
        End Set
    End Property

#End Region
Note that, in the attributes section above for each property declaration, the code specifies an editor, and further the editor specified is defined as the URL editor. Adding this attribute to the control specifies to the IDE how the property is to be edited; in this instance, when the control user sets the image file path properties for the control, the property grid will display a button with an ellipsis in it at the right-hand side of the text box. If the user clicks on the button, the IDE will open the URL editor and will permit the user to use that editor to navigate to the image file and set the image file path property through that editor’s dialog.
Properties set in this manner will be persisted within the control user’s project. Note that the URL editor will prefix the selected path with a tilde and a slash, neither of which is useful in this context. Given that the file path will not be found at run time with the tilde and slash added, this bit of code checks for those characters and removes them so that when these values are added to the rendered page, they will be in the form of a usable file path string:
Dim s As String = Convert.ToString(ViewState("MouseOutImage"))

If s Is Nothing Or s = "" Then
    Return String.Empty
Else
    Dim tilde As Integer = -1
    tilde = s.IndexOf("~")
    If (tilde <> -1) Then
        Return s.Substring((tilde + 2)).Trim()
    Else
        Return s
    End If
End If
The last thing to do is render the control. Add a “Rendering” region to your project and add the following code:
#Region "Rendering"
     Protected Overrides Sub OnPreRender(ByVal e As System.EventArgs)

        Me.ImageUrl = MouseOutImage.ToString()
        Me.Attributes.Add("onmouseover", "this.src='" & _
                           MouseOverImage.ToString() & "';")
        Me.Attributes.Add("onmouseout", "this.src='" & _
                           MouseOutImage.ToString() & "';")

        MyBase.OnPreRender(e)

    End Sub

#End Region
This seems pretty straightforward, but if you take a look at the code, you will note that first we are overriding the OnPreRender subroutine; the first line of code within the subroutine will match the ImageURL property to the MouseOutImage property’s value. Next, we are adding the two attributes that are the gist of this control extension. In the first, we add an “OnMouseOver” event and tell it to change the source of the image file to the path provided by our MouseOverImage property. The next attribute set performs a similar chore by setting up the OnMouseOut event with the image file specified in the MouseOutImage property. The last line, MyBase.OnPreRender(e), is there to make sure that the rest of the standard ImageButton’s properties and methods are carried forward into the new control.
The control is now complete. Prior to testing the control, rebuild the project. Once that has been completed and any errors encountered are repaired, it is time to test the control. To test the control, add a new web site project to the web control library project currently open. Once the test web site has been created, set the test project as the start up project by right clicking on the web site solution in the Solution Explorer and selecting the “Set as Start Up Project” menu option. Next, locate the Default.aspx page in the web site solution, right click on this page, and select the “Set as Start Page” menu option.
If you download the project, you can configure a virtual directory pointing at the example website and examine it instead of creating one from scratch. The example project contains two subordinate projects, one containing the web class library with the single custom web control (EIB), and a sample website with additional files needed to support the demonstration.
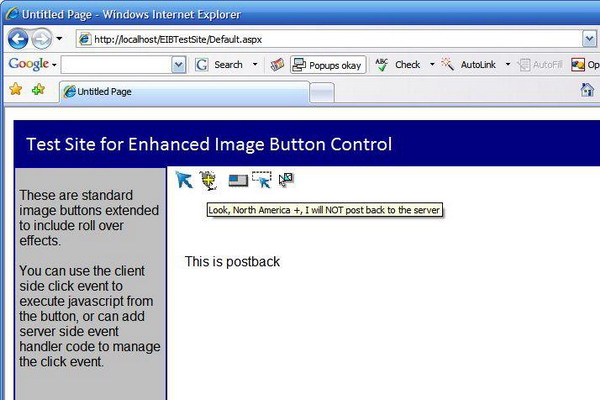
If you configure the sample project and start the default page, you will see a collection of EIB button controls arranged at the top of the page in a manner similar to a toolbar. The controls each have a mouse over effect which consists of an alternate version of the normal icon. Some of the buttons make JavaScript calls. Some are set to postback to the server, and some are set up only to execute a JavaScript command in response to the “on client click” event.
To prevent postbacks on the controls used only to execute a client-side script, you may use the following approach: In the “on client click” property, add in the JavaScript command you wish to execute, followed by a semi-colon and the term “return false”, in a manner similar to the following:
Figure 3: Configuring OnClientClick to Prevent Post backs
That is it, once the site is up and running, you should observe the following displayed in your browser window.
Figure 4: EIB Button Example in Internet Explorer
This member has not yet provided a Biography. Assume it's interesting and varied, and probably something to do with programming.


 General
  News
News  Suggestion
  Question
  Bug
Bug  Answer
  Joke
Joke  Praise
  Rant
Rant  Admin
Admin 


