Introduction
This time, we want to share how to intercept HTTP traffic in order to inject custom code into Windows HTML markup? In order to do this, let's look at two completely different approaches: one with Kernel mode, the other with User mode. For the sake of simplicity, we won’t cover HTTPS traffic.
This article is used as a detailed example with code illustrations for a broader topic of User mode vs Kernel mode implementation comparison.
Table of Contents
Before we start discussing different approaches, let’s look at the algorithm for injecting data into an HTTP response.
The algorithm includes the following data:
- initial HTTP response
- the body of the response (should not be empty)
All data is compressed by a qzip compression algorithm and located in a single archive. First, we need to analyze the header of the response and search for the following fields:
- Transfer-Encoding: chunked
- If this header is present, then we need to process the first chunk.
- If this header is not found, then we need to look for
Content-Length. The value of Content-Length header is necessary to confirm that all data has been received and to hook that data with new values.
- Content-Encoding: gzip – shows whether data has been archived
- “
\r\n\r\n” string – shows where the header ends and data begins
After our search for these fields is complete, we extract data. Next, we search for the <!DOCTYPE HTML> tag and inject the following script after it:
<script language=\"JavaScript\">
    if (confirm(\"Do you want to read more at https:⁄⁄www.apriorit.com⁄dev-blog ?\"))
    {
         window.open(\"https:⁄⁄www.apriorit.com⁄dev-blog\");
    }
<⁄script>
The modified response is archived.
Next, the new HTTP response is formed using the header from the old response. If the Content-Length header was not found, then we replace its value with the new one based on the new response. Other header fields should not be changed. If the Transfer-Encoding: chunked field was found, then the length of the first chunk is replaced with the new one. The new data is inserted after the dividing row.
An HTTP response with the new data is sent out in place of the original, and the original response is deleted.
If a response doesn’t contain all the necessary data, then the functions to get all the data are called before injection.
In this section, we’ll cover how to inject custom JavaScript code into HTML in User mode.
To inject custom JavaScript in User mode, we need to get access to the process address space. This can be done by injecting a custom dynamic library (DLL) into the process. When access to the process address space has been gained, we can modify the memory in order to hook the standard function with our own. This allows us to modify HTTP traffic containing HTML code.
There are several ways to inject a DLL:
- via the
AppInit registry value - via the
SetWindowsHookEx function - via remote threads
- via a trojan
Each approach has its advantages and disadvantages.
This approach requires you to use the AppInit registry value, which stores the list of DLLs necessary to load the User32.dll library, which contains the functions to render the graphical interfaces of Windows applications. By adding the path to our own custom DLL to Applnit, we can guarantee that our DLL will be loaded into every graphical application in Windows. .
Advantages of This Approach
- This is the simplest approach in terms of implementation.
- There’s no need to specify the processes into which the DLL needs to be injected.
AppInit needs to be modified only once, after which the DLL will be loaded into all graphical applications.
Disadvantages of This Approach
- Doesn’t affect console applications, since they don’t use User32.dll
- Administrator permissions are necessary to modify the registry
The SetWindowsHookEx function lets you set hook procedures for windowed applications via DLL injection. The injection happens when a message to the process window to which the SetWindowsHookEx function has been applied is intercepted. The type of message is decided when SetWindowsHookEx is called, which allows us to set hook procedures for all graphical applications. You can learn more about SetWindowsHookEx here.
Advantages of This Approach
- Can cover a single graphical application or all applications
Disadvantages of This Approach
- Injection occurs only when specific messages are intercepted
- Applications that execute this function need to be launched by the user
- Console applications aren’t affected since they don’t use separate windows
This approach is based on using the CreateRemoteThread function, which allows you to create a remote thread in another process. The signature of the function transferred via a CreateRemoteThread should look like this:
DWORD WINAPI ThreadFunc(PVOID pvParam);
This allows us to use the LoadLibrary function (or more precisely, LoadLibraryA or LoadLibraryW, since LoadLibrary is a macro), which will load the DLL into the process. This approach is hard to implement for two reasons:
- Transferring the link to
LoadLibraryA/LoadLibraryW can result in a memory access violation because the direct link to LoadLibraryA/LoadLibraryW in a CreateRemoteThread call is transformed into a call to the LoadLibraryA gateway in the import section of your module. - Transferring the link (with parameters for the path to your DLL) to the
string also creates uncertain behavior, since the link will be projected onto the memory of another process, where this address will not contain a string.
Advantages of This Approach
- The most flexible way to inject a DLL
Disadvantages of This Approach
- The hardest approach to implement
- An application that calls the function needs to be running
- The process in which we want to inject our DLL needs to be clearly specified
There’s a way to hook an existing DLL with a custom DLL. For this, a custom DLL needs to export the same functions as the initial. This isn’t hard to do if the address modification for DLL functions is used.
If you want to use a trojan DLL for just one app, then you can give your custom DLL a unique name and add it to the import section of the executable module of the application. This, however, requires advanced knowledge of the Portable Executable (PE) format.
Advantages of this approach:
- A trojan DLL only needs to be hooked once, after which it will run by itself
- No need for administrative permissions
- A trojan DLL can perform two tasks: DLL injection and function hooking
Disadvantages of This Approach
- Advanced knowledge of the PE format is necessary
- Problems with system DLL hooking can arise due to digital signatures
Choosing How to Inject DLL
Our task requires the support of as many applications that receive and display HTML content as possible. Therefore, we can’t use the CreateRemoteThread function. A trojan DLL injection requires knowledge of PE formats. Thus, we’re left with a choice between the SetWindowsHookEx function and injection via AppInit registry value. The only advantage of the SetWindowsHookEx approach is that it doesn’t require administrative permissions. At the same time, AppInit provides the easiest way to inject DLL and will automatically work with all graphical applications. Since we need to capture network traffic with HTML and JavaScript, we need to cover browsers, all of which use graphical shells. Therefore, in this article, we’ll cover DLL injection via the AppInit registry value.
For the purposes of our task, there are two ways to hook a function:
- Change the PE file import table
- Change the beginning of the function
Each PE file has an import table that stores virtual memory addresses for functions imported from the DLL and used by the PE file from the DLL. By having access to the address space, the import table can be modified by changing a function pointer to point to our own custom function. This approach requires extensive knowledge of the PE format since there are no ready solutions such as libraries or WinAPI functions out there. However, a lot of proof of concept implementations of this approach can be found on the net.
Changing the Beginning of a Function
This approach is based on modifying the process address space (the beginning of the function, to be exact), which we need to change to the JMP of our function. This approach is implemented in the actively supported open-source MHook library. Moreover, with this approach, you still use the original function.
Choosing How to Inject the Function
Changing the beginning of the function relies on a convenient and actively supported library, and thus it’s the method we’ve chosen to use.
Overview of the Implementation Method
We’ll hook the recv function from Ws2_32.dll, since it’s used by all browsers to receive data from the network. First, we need to receive and save in a global variable a pointer to the original function. This can be done in the following way:
typedef int(WINAPI* _recv)(
    _In_  SOCKET s,
    _Out_ char   *buf,
    _In_  int    len,
    _In_  int    flags
    );
static _recv TrueRecv = (_recv)GetProcAddress(GetModuleHandle(L"Ws2_32.dll"), "recv");
After this, during the loading of a DLL into the process, we need to hook recv in DllMain and unhook it during unloading. The DllMain function will thus look as follows:
BOOL APIENTRY DllMain( HMODULE hModule,
DWORD ul_reason_for_call,
LPVOID lpReserved
)
{
switch (ul_reason_for_call)
{
case DLL_PROCESS_ATTACH:
{
if (TrueRecv)
Mhook_SetHook((PVOID*)(&TrueRecv), InjectedRecv); break;
}
case DLL_THREAD_ATTACH:
break;
case DLL_THREAD_DETACH:
break;
case DLL_PROCESS_DETACH:
if (TrueRecv)
Mhook_Unhook((PVOID*)(&TrueRecv)); break;
}
return TRUE;
}
In the InjectedRecv function, the real recv function is called via TrueRecv and results are processed.
Let’s take another look at the recv function signature:
int recv(
  _In_  SOCKET s,
  _Out_ char   *buf,
  _In_  int    len,
  _In_  int    flags
);
After custom JavaScript code is added to the HTML, the data size can exceed the size of the buf buffer. Among all the parameters of the recv function, buf and len are the most interesting for us. buf refers to the buffer with the len size that, after the call to the recv function, contains a response with the size len or smaller, received via a socket. The exact size can be determined by the returned value, which can lead to many related problems:
recv isn’t required to return the whole response at once, especially if the buffer doesn’t have enough memory.- Many services return responses in the qzip format, since it reduces the size and wait time for the server. In this case, qzip needs to be unpacked, the JavaScript injected into the HTML, and then the HTML compressed back into a qzip again. This scenario can be combined with both problems above. In the first case, the size of the
buf buffer will be exceeded. In the second case, the unpacking of an incomplete qzip produces uncertain behavior in the client code, since after compression the single part of the qzip will become the whole qzip, and all remaining parts will appear to the client code as binaries and will not be processed.
To solve this problem, during the recv call by the client code we need to call one or several recv functions under the hood to gather complete data and save it in the container. After this, the algorithm to inject JavaScript in the HTML can be used. The modified buffer is stored in a static container. This container is an std::map containing the following:
typedef std::pair<ByteBuffer, int> BufferInfo; static std::map<SOCKET, BufferInfo> g_bufferedData;
ByteBuffer is a typedef std::vector<unsigned char>. BufferInfo is a pair that stores a modified answer and how many bytes have been read by the previous recv. Therefore, our std::map stores a socket as a key and information on the buffer that needs to be transferred to a client as a value.
With each InjectedRecv call, first a check is performed to determine if there is data in the current socket in g_bufferedData. If data exists, then the part with the size len or smaller is returned, depending on how many byte are left. After all data has been transferred to the client code, the buffer and counter for read bytes are cleared.
If there is no data in the current socket, then the call to real recv is performed. We presume that for an HTTP request with HTML, the first part of an answer has all the necessary information to determine the size of the body of the answer. Based on this information, we can call the real recv until we either get all the data or an error occurs. If we get an error, we can save the received data without modification and then follow the steps for the previous case when there is data in g_bufferedData. Then we can modify the HTML, after which the data will be returned fully or partially, depending on the size of data and the len parameter.
Practical Example
Below this article, you can find a link to a DLL project for Visual Studio 2013 with C++11. This means that you’ll need Visual Studio 2013 or newer to view it.
You need to build the DLL with two static libraries – zlib and mHook. mHook is a part of the project and automatically links to the DLL, but you’ll need to add zlib manually for the right configuration. You can find zlib here.
If you have an x64 OS, you’ll need to look into whether the browser whose traffic you’re trying to intercept is using an x64 or x84 instruction set. It’s important that instruction sets used by the browser and DLL are the same, or else the DLL will not work.
The path to AppInit can differ depending on system architecture (64-bit vs 32-bit OS)
For x64 applications, the registry path is the following:
"HKEY_LOCAL_MACHINE\SOFTWARE\Microsoft\Windows NT \CurrentVersion\Windows"
Here, we need to set the LoadAppInit_DLLs parameter to 1 and set the path to the DLL in AppInit.
For x86 applications, the registry path to AppInit is the following:
"HKEY_LOCAL_MACHINE\SOFTWARE\Wow6432Node\Microsoft\Windows NT\CurrentVersion\Windows"
You also need to set the LoadAppInit_DLLs parameter to true (1).
"HKEY_LOCAL_MACHINE\SOFTWARE\Microsoft\Windows NT \CurrentVersion\Windows"
You need to set the LoadAppInit_DLLs parameter to 1 and set the path to the DLL in AppInit.
To test the DLL, we chose the website http://www.unit-conversion.info/. After injecting the DLL, when the webpage is loaded (only if it’s unencrypted) the message will be displayed, as shown in Figure 1 below.
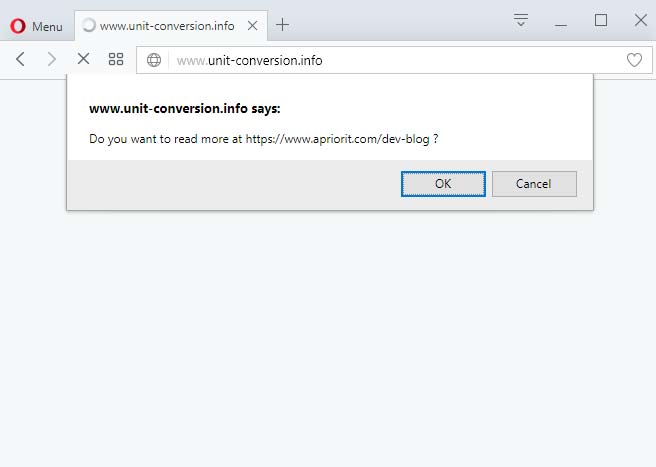
Figure 1. The message is displayed when opening a website after DLL injection
In this section, we’ll cover how to insert an ad banner via the Kernel driver.
Windows allows drivers to be embedded into every level of the data transfer protocol. This can be taken advantage of when creating a filter driver. The main platforms for filter drivers are:
- NDIS
- WFP
The Network Driver Interface Specification (NDIS) is an interface specification that was developed by Microsoft and 3Com to embed network adapter drivers into an operating system.
Driver initialization is fairly standard – information about the driver and pointers to functions that will call the NDIS are transferred.
Traffic modification happens within the function on the FILTER_SEND_NET_BUFFER_LISTS callback. This function is called from the driver each time the NdisSendNetBufferLists function is called from the protocol driver. The modification scenario needs to be set by the developer. All filtering and modification needs to be specified manually.
A driver will receive data from the NET_BUFFER and NET_BUFFER_LIST structures, modify this data and, if necessary, send data in these structures to other drivers.
The Windows Filtering Platform (WFP) is a universal network filtering technology covering all main network layers from the transport layer (TCP/UDP) to the data link layer (Ethernet) and providing a lot of interesting features for developers.
During driver initialization, information about the driver, the pointer to a filter function, and conditions for calling said function are transferred. These conditions include the layer of the data transfer protocol that will be used to process the data, the direction of the connection, the direction of packets, IP address, port, and so on. Since the driver is called by the system, it’s named a callout driver. Data for requests and responses with which the driver interacts is located in the NET_BUFFER and NET_BUFFER_LIST structures. Data necessary for filtration is located in the FWPS_FILTER and FWPS_CLASSIFY_OUT structures. Filtering is done by editing the FWPS_CLASSIFY_OUT structure.
- WFP was designed for the development of filtering and modifying drivers.
- WFP is well documented.
The thread layer is best suited for modifying HTTP responses. Therefore, we need to register the callout driver at the thread layer.
To get access to all traffic, conditions have been added:
- For incoming connections
- For outgoing connections
For analyzing and modifying data, we choose only responses from the server (incoming packets). We skip all other traffic, letting other filter drivers handle it.
Next, we need to analyze and inject data as described in the section above.
A common situation when the driver works with data is when all data needs to be gathered from several separate packages. In order to avoid any problems, we set the flag that tells WFP to gather more data in such cases.
To inject new data in a thread, we create a new NET_BUFFER_LIST and MDL. The MDL is injected into the thread in place of the old data, and the old data is blocked. Temporary resources are free.
If the object searched for isn’t found in the extracted data, then the data is sent further down the chain.
For the driver to work, you need to build it, install it, run it, and open the browser.
During the build process, the driver package is created, which contains the following:
- Driver security catalog (*.cat)
- *inf file
- driver file (*sys)
- WdfCoinstallerXXXXX.dll
Installing the driver is simple: right-click on the *inf file and choose “install.”
You can start the driver in two ways:
- Call “
net start driverName” from the console with administrative permissions. - Select “View → Show hidden devices” in the device manager, then find the driver with the right name in the “Non-Plug and Play Drivers” category and start it.
To test our driver, we used the http://msn.com website.
Figure 2 shows the website before the driver has been started.
After the driver has been started, when loading the page from scratch (and not simply refreshing), a dialog window with an ad is shown before the page is displayed, as seen in Figure 3.

Figure 2: MSN page before the driver has been launched
Figure 3: MSN page after the driver has been launched
Advantages
- Less knowledge of Windows programming is required than for Kernel mode.
- The worst thing that can happen in User mode is that an application stops working.
Disadvantages
- More memory is required to save the modified response compared to the Kernel mode approach.
- This approach covers only graphical applications.
- The DLL is injected in all applications, not only network-based.
- Errors inside a DLL can affect all applications in which it’s injected.
- Some antivirus software and other security software can prevent DLL injection or function hooking.
Advantages
- Documented and legal way to capture network requests
- Requires less memory: additional buffer memory needed only until new data is inserted in the thread
Disadvantages
- Greater responsibility on the part of the developer: any single error can result in a BSOD
- To get all the necessary knowledge, you need to read a lot of documentation
- Debugging is difficult and requires another computer or a virtual machine
- Usual
static libraries are not applicable and need to be rebuilt in Kernel mode - There are fewer third-party libraries for Kernel mode
In the end, both User mode and Kernel mode work for injecting data in the HTTP response, and thus your choice should be based on the analysis of the pros and cons of each approach and how they relate to the particular task at hand.
ApriorIT is a software research and development company specializing in cybersecurity and data management technology engineering. We work for a broad range of clients from Fortune 500 technology leaders to small innovative startups building unique solutions.
As Apriorit offers integrated research&development services for the software projects in such areas as endpoint security, network security, data security, embedded Systems, and virtualization, we have strong kernel and driver development skills, huge system programming expertise, and are reals fans of research projects.
Our specialty is reverse engineering, we apply it for security testing and security-related projects.
A separate department of Apriorit works on large-scale business SaaS solutions, handling tasks from business analysis, data architecture design, and web development to performance optimization and DevOps.
Official site: https://www.apriorit.com
Clutch profile: https://clutch.co/profile/apriorit
This member has not yet provided a Biography. Assume it's interesting and varied, and probably something to do with programming.


 General
  News
News  Suggestion
  Question
  Bug
Bug  Answer
  Joke
Joke  Praise
  Rant
Rant  Admin
Admin 


