Overview
Docker in Development
Docker is great for deployments... but it doesn't stop there. A lot of projects can be contained for use in development. This is a great solution for a number of use cases (see the examples below):
- Your project must be run with specific dependencies (Node 6.0, JRE 1.8.0_171-b25, etc.)
- Your project requires multiple configurable parts to run (e.g. MongoDB & Node)
- You want your project to start with one simple command line
argument docker-compose up
But It Can't Be Done!
If you've tried using Docker, you will likely have encountered some challenges. The reason for this is that there is a fair amount of network complexity in your workspace which unfortunately, for the time being, is not abstracted from client devices.
While most of this complexity is configured on your device before it is assigned to you, this doesn't cross over to contained environments (such as Docker). This is a problem which fundamentally stops us from using Docker without introducing a huge amount of complexity to every single image. Remember, Docker is supposed to simplify development and the resulting images should be easily executable.
How Do I Use Docker With All the Network Complexity?
The answer is simple, you don't - at least this seems to be the consensus after speaking to others about this problem. As long as your traffic is going through the corporate network, effectively using Docker is not possible. The complexity of the network needs to be both secure and transparent (this is how VPNs work).
Many at the lab will resort to using Docker without being connected to the VPN, and this works but comes at the cost of not having access to necessary resources such as repositories. If you follow the guide below, you should be able to get the best of both worlds. It's not ideal, but until the complexity our infrastructure is abstracted, we're going to have to deal with it on the client side.
Tutorial
1. Getting Set Up
Before we begin, you'll need a running Linux instance in VirtualBox. For the sake of this document, I'll assume that you have VirtualBox installed and a Fedora/CentOS/RHEL7 machine installed.
2. Configuring Network Interfaces
- Shut down your VM if it is running
- Right click your VM in Virtualbox Manager and navigate to `Settings -> Network`
- Enable Adapter 1 and attach it to `NAT`
- Enable Adapter 2 and attach it to `Bridged Adapter`
- Below `Bridged Adapter` choose the network interface that you use to connect to the internet
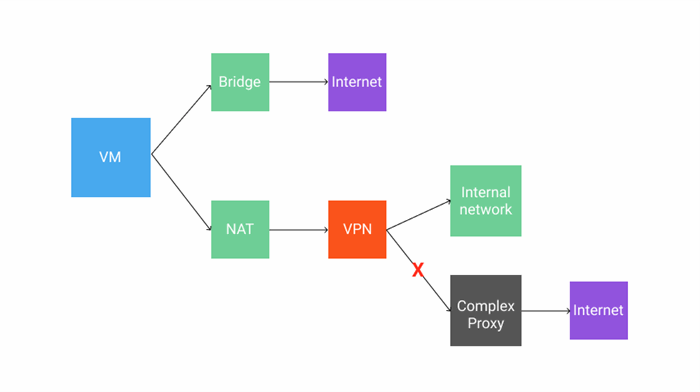
As demonstrated in the above diagram, this configures your VM to have two network interfaces. The first interface (our NAT) routes all traffic via the host machine and therefore via the VPN. The second interface creates a bridge, directly connecting to the internet.
3. Getting Our Gateway Addresses
Next, you'll need to get the gateway address of our two interfaces. By default, the gateway address of our NAT is 10.0.2.2 so we shouldn't have to worry too much about that.
To find the gateway address of our Bridged Adapter, you'll want to run ip route | grep default in the terminal. You should see something like this:
default via 10.0.2.2 dev enp0s3 proto dhcp metric 20100
default via 10.37.16.1 dev enp0s8 proto dhcp metric 20101
As we already know, the gateway for our NAT is at 10.0.2.2 so that means the default gateway for our Bridged Adapter in this case is 10.37.16.1.
4. Configuring Routing
You'll want to copy the below script to a file on your machine named routing.sh. This script will ensure that internal traffic is routed through the NAT while external traffic is routed through the Network Bridge.
NAT=10.0.2.2
BRIDGE=10.37.16.1
route add default gw $BRIDGE
ip route add 169.0.0.0/8 via $NAT
ip route add 10.0.0.0/16 via $NAT
ip route add 192.193.171.152 via $NAT
Following that, give the script execution permissions chmod +x routing.sh
5. Configuring DNS
Unfortunately, I haven't found a good way round this - any suggestions would be super helpful!
For the time being, I've opted to use OpenDNS as the default name server and specified internal DNS entries in the hosts file (example below).
127.0.0.1   localhost localhost.localdomain
192.193.215.65  anycast-65.nsroot.net
192.193.171.152 webproxy.wlb2.nam.nsroot.net
169.171.92.176 namicggtd01d-webapi.nam.nsroot.net
169.177.244.86 docker-icg-int-local.artifactrepository.pnajinnovations.com
docker-icg-dev-local.artifactrepository.pnajinnovations.com
docker-enterprise-prod-local.artifactrepository.pnajinnovations.com
169.177.217.177 cedt-icg-bitbucket.nam.nsroot.net
169.177.217.175 cedt-icg-bitbucketcli.nam.nsroot.net
168.72.217.161 www.artifactrepo-dev.nam.nsroot.net
169.177.217.86 cedt-icg-jira.nam.nsroot.net
You'll want to add any additional internal DNS entries to your /etc/hosts file.
6. Run the Routing Script and Test
Run the routing script we made earlier:
./routing.sh
Check for WAN access (you should get a 301 response):
curl -I http://amazon.com
7. Install Docker and Docker Compose
Follow the articles provided by Docker:
8. Finally, Test the Results
If everything has gone to plan, you should be able to clone and run the following repository.
Clone the Repo
git clone
https://cedt-icg-bitbucket.nam.nsroot.net/bitbucket/projects/TRADER-DESKTOP/repos/rfq-logging-api.git
Navigate to Project
cd rfq-logging-api
Start in Docker
docker-compose up
If everything goes according to plan, you just cloned a repo and started up the project in a single command. Running docker ps, you should see two containers running - MongoDB and a Node.js based REST API server (both of which are talking to each other).
Conclusion
You're done! Hopefully, by now, you're ready to take advantage of the huge boost in productivity, consistency, and simplicity that Docker provides.
If you haven't already, I strongly recommend looking into Docker Compose as a tool for orchestrating local development environments!
Disclaimer
This is by no means an ideal solution and, while I'm far from a network infrastructure expert, I think the best solution is for us to take a fresh look at how we can provide the most secure, simple and accessible network environment to our developers.
History
- 18th October, 2018: Initial version
Aditya was a Microsoft #YouthSpark Advocate, Microsoft Student Partner, Entrepreneur, Developer, UX Designer, Innovator, former Windows U Crew & National App Review Member and a good speaker in various Events.
He received several Awards during his professional career for innovation, quality and customer satisfaction. He received Microsoft's Imagine Cup 2014 People Choice Award for idea DietAlarm, as well his team is awarded as India's Best Enterprise Developer Team by Digit. He also won the Vodafone appStar challenge in Windows Category and many more MSP awards from Microsoft, & many Developer devices to test apps by Marmalade and Microsoft.
He completed his graduation in Information Technology branch as Bachelor of Engineering and now looking for Management study as post graduation in Business design, so I may get all management skills to run any business or get the designation in any industry at Board of Directors.
Aditya also has a technical expertise in coding standards, usability, UX & UI design, OOPs and refactoring of code. He has good hands on experience in .NET, C#, XAML. During his off-time, he built and published many applications in Windows Phone Store and Windows 8 Store. Which have 75000+ downloads over both stores.
Contact Details:
patiladitya31@gmail.com | +91 8600305712 | Twitter: @aditypa


 General
  News
News  Suggestion
  Question
  Bug
Bug  Answer
  Joke
Joke  Praise
  Rant
Rant  Admin
Admin 


