In this article, we learn how to secure ASP.NET Core MVC Applications against top 10 attacks given by OWSAP (Open Web Application Security Project) in a step by step manner.
Introduction
We are new to the .NET Core Framework and we are using it for developing production applications, but when we develop a production application, we must also think of security. So, in this article, we will run through 10 points which will help us to make our ASP.NET Core MVC code secure.
Table of Contents
- Broken authentication and session management
- Sensitive Data Exposure & Audit trail
- Cross-Site Scripting (XSS) attacks
- Malicious File Upload
- Security Misconfiguration (Error Handling Must Setup Custom Error Page)
- Version Discloser
- Cross-Site Request Forgery (CSRF)
- XML External Entities (XXE)
- Insecure Deserialization
- SQL Injection Attack
- Conclusion
- History
1. Broken Authentication and Session Management
In this part, if we do not manage proper authentication of application, this may allow an attacker to steal user credentials such as session, cookies which may allow an attacker to have a complete access to the entire application and then he may try to access application server and a database server which can lead to a large data breach.
Ways in which an attacker can steal data:
- Not Secure connection (Not Using SSL)
- Predictable login credentials
- Not storing credentials in Encrypted form
- Improper Application logs out
Attacks Possible
Session Fixation
Before finding a solution on how to prevent this attack, let’s have a look at a small demo how Session Fixation attack occurs.
Whenever a user sends the first request to server, the login page is loaded, then User enters valid Login credits to login in web application. After successful login, we assign some values in session to recognize Unique User, meanwhile a [".AspNetCore.Session"] cookie is added to the browser for recognizing a specific User who has sent a request and the [".AspNetCore.Session"] cookie value will be always sent to the server on every request till you are not logged out from the application. On logout, we basically write code for removing session values which are created, but we do not remove the [".AspNetCore.Session"] cookie which is created on Login. This value helps an attacker to perform a Session Fixation attack.
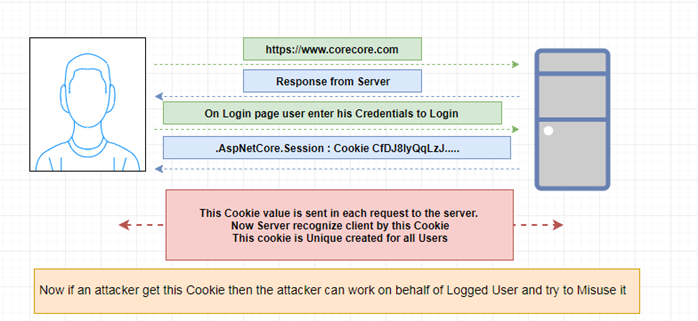
Figure 1. Session Fixation
After User Enter Valid Credentials
After entering Valid Login Credentials, [".AspNetCore.Session"] Cookie is added to the browser.
Note: When any data is saved into the Session, [".AspNetCore.Session"] cookie is created and added to the user browser.

Figure 2. Showing Application Cookies in Cookie Manager
After Logout from Application Cookie still exists in the browser
After Logout out from application, still [".AspNetCore.Session"] Cookie exits.
Figure 3. Showing Application Cookies in Cookie Manager after Logging out from the application.
Note: Pre-cookie and post cookie are the same which can lead to the session fixation.
Let’s Do Some Session Fixation Demo
The [".AspNetCore.Session"] Cookie which is not removed after logout which helps attacker for doing session fixation. I will open a browser (chrome) in that I will enter URL [http://localhost:53654/] of application in which we are going to do session fixation.
Figure 4. Login Page.
In this view, I have shown [".AspNetCore.Session"] cookie which is created in Firefox browser when the user logged in.
Figure 5. Showing created cookies after logging into the application.
A cookie which is already created in Firefox browser.
Note: For managing Cookie, I have installed Cookie Manager+ addon in Chrome browser.
Entering URL in the browser, now let’s check if we have any [".AspNetCore.Session"] Cookie created here. Oh, we don’t have any Cookie.
Figure 5. Showing cookies.
After having a view of [".AspNetCore.Session"] cookie in Firefox, now let’s create [".AspNetCore.Session"] cookie in Chrome browser similar to Cookie which is in Firefox browser with same [".AspNetCore.Session"] Cookie Name and Values.
Created New [".AspNetCore.Session"] Cookie in Chrome browser similar to Cookie created in Firefox browser.
This is a step where we have Fixed Session. This session is live on another browser [Firefox] we have copied values similar to that and created a [".AspNetCore.Session"] Cookie and assigned similar values of SessionID to this Cookie.
Figure 6. Copying old cookie values to create a new session cookie.
Note: For adding Cookie, I have installed Edit this Cookie addon in Chrome browser:
Figure 7. Creating New cookies by copying old cookie values.
After fixing cookie, now we no longer require any login to the application if we just enter Inner URL of application, we get direct access because this session is created after authentication.
My Inner URL which is to Access is: http://localhost:53654/Dashboard/Index.
Below, you can see I have accessed Dashboard Page without Login into the application using Session Fixation.
Figure 8. View after Creating New Session cookies.
Solution
- Remove
[".AspNetCore.Session"] after logout - Use SSL for Securing Cookies and Session
- Securing Cookies by Setting HTTP only
Remove [".AspNetCore.Session"] after logout
On logout, we are removing Session values. Along with that, we are removing [".AspNetCore.Session"] Cookie from the browser.
We have done a similar process in ASP.NET MVC, but Cookie Names are different in ASP.NET Core MVC.
Code Snippet
[HttpGet]
public ActionResult Logout()
{
try
{
HttpContext.Session.Clear();
CookieOptions option = new CookieOptions();
if (Request.Cookies[".AspNetCore.Session"] != null)
{
option.Expires = DateTime.Now.AddDays(-1);
Response.Cookies.Append(".AspNetCore.Session", "", option);
}
if (Request.Cookies["AuthenticationToken"] != null)
{
option.Expires = DateTime.Now.AddDays(-1);
Response.Cookies.Append("AuthenticationToken", "", option);
}
return RedirectToAction("Login", "Account");
}
catch (Exception)
{
throw;
}
}
Securing Cookie
For securing cookies On Login [HttpPost] Action Method, we are going to Create a New Session in that Session [Session["AuthenticationToken"]]. We are going to save NewGuid. Along with that, we are going to add a cookie with Name ["AuthenticationToken"] and it will also have same Value [Guid] which we have stored in Session.
Code Snippet
[HttpPost]
[AllowAnonymous]
[ValidateAntiForgeryToken]
public ActionResult Login(LoginModel model, string returnUrl)
{
if (ModelState.IsValid)
{
var storedpassword = ReturnPassword(model.UserName);
if (ReturnHash(storedpassword, model.HdrandomSeed) == model.Password)
{
HttpContext.Session.SetString("Username", Convert.ToString(model.UserName));
string guid = Convert.ToString(Guid.NewGuid());
HttpContext.Session.SetString("AuthenticationToken", Convert.ToString(guid));
CookieOptions option = new CookieOptions {Expires = DateTime.Now.AddHours(24)};
Response.Cookies.Append("AuthenticationToken", guid, option);
return RedirectToAction("Index", "Dashboard");
}
else
{
ModelState.AddModelError("", "The user name or password provided is incorrect.");
}
}
return View(model);
}
Code Snippet Description
- Creating a new Guid.
string guid = Convert.ToString(Guid.NewGuid());
- Saving a new Guid in Session.
The process of adding Session in ASP.NET Core is bit different than that of typical ASP.NET MVC application.
HttpContext.Session.SetString("AuthenticationToken", Convert.ToString(guid));
- Saving a new Guid in Cookie and insert Cookie to the browser.
The process of adding Cookie in ASP.NET Core is bit different than that of Typical ASP.NET MVC application.
CookieOptions option = new CookieOptions {Expires = DateTime.Now.AddHours(24)};
Response.Cookies.Append("AuthenticationToken", guid, option);
After storing data in session and adding a cookie in the browser, now let’s match these values on every request and check whether these values are similar. If not, then we are going to redirect to the Login page.
For doing this part, I am going to add an AuthorizationFilter in the project and inside that, we are going to write logic for checking Session and cookie values are similar or not.
AuthenticateUser ActionFilter
If you check the below code snippet, I have created an AuthorizationFilter with name AuthenticateUser this filter, we are inheriting IAuthorizationFilter Interface and FilterAttribute class. With this, we are implementing method inside interface [OnAuthorization] and write whole logic in this method.
using System;
using Microsoft.AspNetCore.Http;
using Microsoft.AspNetCore.Mvc;
using Microsoft.AspNetCore.Mvc.Filters;

namespace WebApplication13.Filters
{
    public class AuthenticateUser : Attribute, IAuthorizationFilter
    {
        public void OnAuthorization(AuthorizationFilterContext context)
        {
            string tempSession =
                Convert.ToString(context.HttpContext.Session.GetString("AuthenticationToken"));
            string tempAuthCookie =
                Convert.ToString(context.HttpContext.Request.Cookies["AuthenticationToken"]);

            if (tempSession != null && tempAuthCookie != null)
            {
                if (!tempSession.Equals(tempAuthCookie))
                {
                    ViewResult result = new ViewResult {ViewName = "Login"};
                    context.Result = result;
                }
            }
            else
            {
                ViewResult result = new ViewResult {ViewName = "Login"};
                context.Result = result;
            }
        }
    }
}
Code Snippet Description
In this method first, we are going to get session and cookie values.
string tempSession =
    Convert.ToString(context.HttpContext.Session.GetString("AuthenticationToken"));
string tempAuthCookie =
    Convert.ToString(context.HttpContext.Request.Cookies["AuthenticationToken"]);
After getting values from session and cookie, now we are going to check that both session and cookie values are not null. After that, we are going to see values are equal for both session and a cookie. If they are not, then we are going to redirect to login page.
if (tempSession != null && tempAuthCookie != null)
{
    if (!tempSession.Equals(tempAuthCookie))
    {
        ViewResult result = new ViewResult {ViewName = "Login"};
        context.Result = result;
    }
}
else
{
    ViewResult result = new ViewResult {ViewName = "Login"};
    context.Result = result;
}
After understanding code snippet now, we are going to apply this filter on every controller which user accesses when he is logged into application.
Applying AuthenticateUser Filter
Apply this filter on every controller which user accesses when he is logged into the application.
Figure 9. Applying the AuthenticateUser Filter.
After applying Action filter on all the controllers which user accesses after Logged into the application.
Now if the attacker knows [".AspNetCore.Session"] cookie value and a new cookie [Cookies["AuthenticationToken"]] value, he will still not able to Session Fixation attack here because the new [Cookies["AuthenticationToken"]] contains GUID which is unique and same values are stored in Session [Session["AuthenticationToken"]] on Web Server, but attacker can’t know the Session value that is stored on the web server and this values keep changing every time when user is logging to application and the old session values which attacker used to do attack will not work in this scenarios.
Finally, if we will allow that User access to the application who has valid Session["AuthenticationToken"] value and Cookies["AuthenticationToken"] value.
Real-time Values of both Cookies
Figure 10. Showing both Cookie Values
Use SSL for Securing Cookies and Session Values
SSL (Secure Sockets Layer) is Layer where there is Secure (Encrypted) communication between client and server such that any data [Banking details, Password, Session, Cookie and another financial transaction] passed from client and server is Secure (Encrypted).
Figure 11. SSL (Secure Sockets Layer) is Layer.
Set-Cookie HttpOnly True
Setting HttpOnly Cookies in ASP.NET Core.
HttpOnly is a flag that can be used when setting a cookie to block access to the cookie from client-side scripts. JavaScript, for example, cannot read a cookie that has HttpOnly set.
Code Snippet
- Setting HTTP only while creating
Cookie:
string guid = Convert.ToString(Guid.NewGuid());
CookieOptions option = new CookieOptions {Expires = DateTime.Now.AddHours(24),
HttpOnly = true};
Response.Cookies.Append("AuthenticationToken", guid, option);
- Setting HTTP only Globally in Startup.cs
Configure method.
Figure 12. Setting Cookie HttpOnly property to True.
Code Snippet
app.UseCookiePolicy(new CookiePolicyOptions
 {
     HttpOnly = HttpOnlyPolicy.Always,
     Secure = CookieSecurePolicy.Always,
     MinimumSameSitePolicy = SameSiteMode.None
 });
2. Sensitive Data Exposure & Audit Trail
The data which is traveling (sending and receiving) and data which is at one place should have protections. As we are into web development, we store Users personal information (which may contain Password, PAN number, Passport details, Credit Card Numbers, Health records, financial records, business secrets). In this part as a developer, I saw most of the people only encrypt passwords and store in database, the rest of the data are not encrypted. If the attacker gets access to such data, then he can misuse this data.
Solution:
- Always Send Sensitive Data to Server in an Encrypted format using Strong Hashing with Seed (Random Hash).
- Always apply SSL to the Web application.
- Do not store Sensitive data if want to store using Strong Hashing techniques.
Securing Login
Before securing, let’s have a look at Common login pages issues which most developers are creating.
Figure 13. Login Page.
Intercepting Login Page by an Attacker to Steal Credentials
When User enters Credentials in Login page and submits to server, the data [username and password] is transferred to the server in the clear text this data [username and password] can be intercepted by the attacker and steal your Credentials.
Figure 14. Intercepting Login page showing data in the Clear form.
Always Send Sensitive Data to Server in an Encrypted Format using Strong Hashing with Seed
In this demo, we are going use an MD5 algorithm with seed to encrypted data on the client side and send to a server such that it cannot be stolen by the attacker.
- We are going use an MD5 algorithm which is a hashing algorithm.
- The first step in this process is to generate a random number after than generating a hash value which is your seed which will be sent to the client.
- When the user enters username and password and clicks on login button at that moment, we generate MD5 hash which is a combination of seed +password.
- The hashed password is received at your server end when we post form, next we get hashed password (without seed) from database from username and then we combine password (without seed) with seed and password which is along with seed which we have received is compared if it is equal then user is logged in successfully, else we show error message.
Intercepting Login Page
In the below snapshot when user enters credentials and Post form.
Figure 15. Debug mode of Client-side Encryption.
Intercepting Post Request to show how the password has travelled in encrypted form.
Figure 16. Intercepting login page after Encryption of data.
Login Action Method after Posting Values from Login View
Here we can clearly see password is in encrypted form.
In the next step, we are going to compare password which is stored in a database. For doing that, first, we are going to get the password from username which the user has entered and then we are going to compare it against which is stored in the database. The line which is marked green is Seed value along with that, you can see Database stored password is marked as red which we get by passing Username and then yellow line which indicates that this password in posted from Login View and finally blue line which is combination of Database password and Seed, we compare it with password which is posted.
Figure 17. Using the [hdrandomSeed] property as a hidden field on View.
Use SSL for Securing Web Application
SSL (Secure Sockets Layer) is Layer which Secure (Encrypted) communication between client and server such that any data [Banking details, Password, and another financial transaction] passed from client and server is Secure (Encrypted).
Do Not Store Sensitive Data in Database in a Clear Form
SQL Server provides encryption as a new feature to protect data against attackers' attacks. Attackers might be able to gain access to the database or tables, but owing to encryption, they would not be able to understand the data or make use of it.
A Simple Example of How to Encrypt Data in SQL Server
I have simply created a demo table with three columns. First is int, second is Varchar, third is VARBINARY.
After creating a table, we have created "Master Key" for encryption, then "Certificate" and "SYMMETRIC KEY", then using Symmetric key, we are going to encrypt data.
Below is a snapshot that shows how we have encrypted "Encrycolumn" column data.
Then Using Same Key, we are going to Decrypt "Encrycolumn" column data.
Read Detail process of SQL Data Encryption and Decryption.
Below is a list of algorithms which can be used according to need for encryption and decryption for data.
Hash Algorithm
If someone wants just Hash then they can use Hash Algorithm we mostly use the Hash function for Encrypting Password.
Symmetric Algorithm
If someone wants just one key for encryption and decryption, then they can use Symmetric Algorithm.
Asymmetric Algorithm
If someone wants just one key for encryption (Public key) and another key decryption (Private key), then they can use Asymmetric Algorithm. For example, we can use this when we are sharing Web Services and WebAPI with clients.
Hash Algorithm
Symmetric Algorithm
- Aes
- DES
- RC2
- Rijndael
- TripleDES
Asymmetric Algorithm
- DSA
- ECDiffieHellman
- ECDsa
- RSA
Audit Trails
In a production application, we have millions of transactions that occur in that Client or Users Create data, Update data, Delete Data, along with that we can also get insights of any errors or performance issues in a production application if anyone is trying to attack application, then we can know their attempts.
Solution:
Keep Audit Trail of all User activity on Web Application and always Monitor it.
AuditTB Model
[Table("AuditTB")]
public class AuditTb
{
    [Key]
    public int UsersAuditId { get; set; }
    public int? UserId { get; set; }
    public string SessionId { get; set; }
    public string IpAddress { get; set; }
    public string PageAccessed { get; set; }
    public DateTime? LoggedInAt { get; set; }
    public DateTime? LoggedOutAt { get; set; }
    public string LoginStatus { get; set; }
    public string ControllerName { get; set; }
    public string ActionName { get; set; }
    public string UrlReferrer { get; set; }
    public string Method { get; set; }
}
After having a look at Model which is generated, now let’s create an AuditTB table.
AuditTB Table
Figure 18. AuditTb table view.
After having a look at Model which is generated, now let’s create an ActionFilter with AuditFilter.
AuditFilterActionfilter Code Snippet
AuditFilter is a Custom ActionFilter which we have created in this filter. We insert data of User Activity into AuditTB table along with this, we also check whether User is Logged in or not into application, in the same way we also insert IP address of User who is accessing the application, and time stamp of User logged in and out. For inserting this data, we use the ORM entity Framework core.
Code Snippet
public class AuditFilter : ActionFilterAttribute
{
private readonly DatabaseContext _databaseContext;
public AuditFilter(DatabaseContext databaseContext)
{
_databaseContext = databaseContext;
}
public override void OnActionExecuting(ActionExecutingContext context)
{
try
{
string actionName = null;
string controllerName = null;
if (((Microsoft.AspNetCore.Mvc.Controllers.ControllerActionDescriptor)
context.ActionDescriptor).ActionName != null)
{
actionName = ((Microsoft.AspNetCore.Mvc.Controllers.
ControllerActionDescriptor)context.ActionDescriptor)
.ActionName;
}
if (((Microsoft.AspNetCore.Mvc.Controllers.ControllerActionDescriptor)
context.ActionDescriptor).ControllerName != null)
{
controllerName = ((Microsoft.AspNetCore.Mvc.Controllers.
ControllerActionDescriptor)context.ActionDescriptor).ControllerName;
}
var objaudit = new AuditTb
{
UserId = context.HttpContext.Session.GetInt32("UserID") ?? 0,
UsersAuditId = 0,
SessionId = context.HttpContext.Session.Id,
IpAddress = context.HttpContext.Connection.RemoteIpAddress.ToString(),
PageAccessed = context.HttpContext.Request.GetDisplayUrl(),
LoggedInAt = DateTime.Now,
Method = context.HttpContext.Request.Method
};
if (actionName == "Logout")
{
objaudit.LoggedOutAt = DateTime.Now;
}
objaudit.LoginStatus = "A";
objaudit.ControllerName = controllerName;
objaudit.ActionName = actionName;
_databaseContext.AuditTb.Add(objaudit);
_databaseContext.SaveChanges();
base.OnActionExecuting(context);
}
catch (Exception)
{
throw;
}
}
}
Registering UserAuditFilter in Globally
Figure 19. Registering UserAuditFilter in globally.
Output
The data which got inserted while User Request pages and does some activity in Audit Table.
Figure 20. Showing Data from Audit Table.
3. Cross-Site Scripting (XSS) Attacks
Cross-site Scripting (XSS) is an attack in which malicious scripts are injected via input fields. This attack is most common and allows an attacker to steal credentials and valuable data that can lead to a big security breach.
Ways in which this attack is carried out:
- From Inputs
- Query Strings
- Http Headers
- Data Coming from Databases
For showing a demo, I have created a simple form with two fields which takes HTML as inputs.
Figure 21. Entering malicious script in inputs.
What is the first question that arises when you see JavaScript is entered into text fields.
This must show the below error "A Potentially Dangerous Request.Form Value Was Detected from The Client".
Note
But in ASP.NET Core, you will not get this error because ASP.NET Core 2.0 does not deny HTML in fields.
After posting that form, we do not get any errors and values are received in the model as shown in the below snapshot.
Figure 22. Entering malicious script in inputs which are populated in the model.
Solution:
[RegularExpressionAttribute]- HTML Encoding using Razor
- URL Encoding
The first solution to XSS attack is validating all your Fields with Regular Expression such that only valid data can move in.
1. [RegularExpressionAttribute]
Use Regular Expression to validate input to protect from XSS attack below is snapshot.
After applying Regular expression, we have the first line of defense which does not allow malicious inputs.
Figure 23. Showing Errors Messages after Entering malicious script in inputs.
List of Regular Expression to Use
- Alphabets and Space [a-zA-Z ]+$
- Alphabets ^[A-z]+$
- Numbers ^[0-9]+$
- Alphanumeric ^[a-zA-Z0-9]*$
- Email
- [a-z0-9!#$%&'*+/=?^_`{|}~-]+(?:\\.[a-z0-9!#$%&'*+/=?^_`{|}~-]+)*@(?:[a-z0-9](?:[a-z0-9-]*[a-z0-9])?\\.)+[a-z0-9](?:[a-z0-9-]*[a-z0-9])?
- Mobile no. ^([7-9]{1})([0-9]{9})$
- Date Format( mm/dd/yyyy | mm-dd-yyyy | mm.dd.yyyy)
- /^(0[1-9]|1[012])[- /.](0[1-9]|[12][0-9]|3[01])[- /.](19|20)\\d\\d+$/
- Website URL ^http(s)?://([\\w-]+.)+[\\w-]+(/[\\w- ./?%&=])?$
- Credit Card Numbers
- Visa ^4[0-9]{12}(?:[0-9]{3})?$
- MasterCard ^5[1-5][0-9]{14}$
- American Express ^3[47][0-9]{13}$
- Decimal number ((\\d+)((\\.\\d{1,2})?))$
But Regular Expression was for fields which do not allow HTML as input, but in an application where we need to take HTML as input there we need another techie to defend right.
2. HTML Encoding using Razor
The Razor engine used in MVC automatically encodes all output sourced from variables unless you work really hard to prevent it doing so.
For the demo, I have stored some XSS attack script in the database which must get executed when we render this on View.
Figure 24. Stored malicious script into the database.
When I display these values on Index View which do not get executed because Razor engine used in MVC automatically encodes all output values.
Figure 25. In Debug mode to show how the malicious script is rendered.
Below are encoded values from Razor View engine which does allow scripts to get executed.
Figure 26. Displaying malicious script values which are stored in the database.
Will now show you what if you do not encode this value properly.
Figure 27. In Debug mode to show how the malicious script is rendered.
If we don’t encode values properly, then this will allow executing a malicious script.
Figure 28. Executed malicious script stored in the database.
3. URL Encoding
We mostly use URL to transfer data from open page another page using query string, but we never encode data which we are sending which can also lead to an XSS attack.
For HTML Encode, URL Encode we have built-in the library which we need to install from NuGet’s.
Figure 29. Installing NuGet’s package.
Encoding URL on View.
After encoding EmailId field on View, next we are going see the value of an encoded field using developer tools.
Figure 30. Debug mode to display the value of an encoded field.
Displaying how we can encode URL and HTML.
4. Malicious File Upload
We mostly secure our input fields by applying client-side and server-side validation, but when it comes to file upload control, we ignore validation, am I right? The one thing we validate in file upload is the file extension if it is proper, then we consider the file as a valid file. But in a real scenario, things are different. An attacker can upload a malicious file which may cause a security issue. The attacker can change file extension [tuto.exe to tuto.jpeg] and the malicious script can be uploaded as an image file. Most developers just look on the file extension of the file and save in folder or database, but file extension is valid not file, it may have a malicious script.
Solution:
- The first thing we need to do is validate file uploads.
- Allow only access to files extension which are required.
- Check the file header.
Figure 31. Displaying file upload control along with HTML helper.
We have added File upload control on View, next we are going validate file on Submit.
Validating File Uploads on Index HttpPost Method
In this method, first we are going to check file upload count if the count is zero, then User has not uploaded any file.
If file count is greater than zero, then it has a file and we are going to read Filename of File along with Content Type and File Bytes.
Code Snippet
[HttpPost]
public IActionResult Document(UploadModel uploadModel)
{
if (ModelState.IsValid)
{
var upload = HttpContext.Request.Form.Files;
if (HttpContext.Request.Form.Files.Count == 0)
{
ModelState.AddModelError("File", "Please Upload Your file");
}
else
{
foreach (var file in upload)
{
if (file.Length > 0)
{
byte[] tempFileBytes = null;
var fileName = file.FileName.Trim();
using (BinaryReader reader = new BinaryReader(file.OpenReadStream()))
{
tempFileBytes = reader.ReadBytes((int)file.Length);
}
var myUniqueFileName = Convert.ToString(Guid.NewGuid());
var filetype = Path.GetExtension(fileName).Replace('.', ' ').Trim();
var fileExtension = Path.GetExtension(fileName);
var types = CoreSecurity.Filters.FileUploadCheck.FileType.Image;
var result = FileUploadCheck.isValidFile(tempFileBytes, types, filetype);
if (result)
{
var newFileName = string.Concat(myUniqueFileName, fileExtension);
fileName = Path.Combine(_environment.WebRootPath, "images") +
$@"\{newFileName}";
using (FileStream fs = System.IO.File.Create(fileName))
{
file.CopyTo(fs);
fs.Flush();
}
}
}
}
}
}
return View(uploadModel);
}
Until now, we have done basic validation. Let’s validate file, which is uploaded. For doing that, I have written a static class with name FileUploadCheck. In this class, there is Various Method for validating different file type, for now, I am going to show you how to validate Images files and allow image files only.
Figure 32. FileUploadCheck class.
In the above snapshot, there is ImageFileExtension enum which contains Image formats and File types.
private enum ImageFileExtension
{
    none = 0,
    jpg = 1,
    jpeg = 2,
    bmp = 3,
    gif = 4,
    png = 5
}
public enum FileType
{
    Image = 1,
    Video = 2,
    PDF = 3,
    Text = 4,
    DOC = 5,
    DOCX = 6,
    PPT = 7,
}
If it has passed basic validation, then we are going to call isValidFileMethod which take bytes, File type, FileContentType as input.
public static bool IsValidFile(byte[] bytFile, FileType flType, String fileContentType)
 {
     bool isvalid = false;

     if (flType == FileType.Image)
     {
         isvalid = IsValidImageFile(bytFile, fileContentType);
     }
     else if (flType == FileType.Video)
     {
         isvalid = IsValidVideoFile(bytFile, fileContentType);
     }
     else if (flType == FileType.PDF)
     {
         isvalid = IsValidPdfFile(bytFile, fileContentType);
     }

     return isvalid;
 }
After calling the isValidFile method, it will call another static method based on File type.
If File type is image, then it will call first method [isValidImageFile], else File type is Video, then second method [isValidVideoFile] and in a similar way, if File type is PDF, then last method [isValidPDFFile] will get called.
After completing with understanding isValidFileMethod, let’s have a look at [isValidImageFile] method which will get called.
Below is the complete code snippet of [isValidImageFile] method.
In this method, we are allowing limited Image file extensions [jpg, jpeg, png, bmp, gif].
Working with this isValidImageFile method.
When we pass bytes and FileContentType to this method, then it will first check for FileContentType on the basis of that, it will set ImageFileExtension, after that it is going to check header bytes which we have against uploaded file bytes if it matches that, then File is valid [true] else file is invalid [false].
public static bool IsValidImageFile(byte[] bytFile, String fileContentType)
{
    bool isvalid = false;

    byte[] chkBytejpg = { 255, 216, 255, 224 };
    byte[] chkBytebmp = { 66, 77 };
    byte[] chkBytegif = { 71, 73, 70, 56 };
    byte[] chkBytepng = { 137, 80, 78, 71 };

    ImageFileExtension imgfileExtn = ImageFileExtension.none;

    if (fileContentType.Contains("jpg") | fileContentType.Contains("jpeg"))
    {
        imgfileExtn = ImageFileExtension.jpg;
    }
    else if (fileContentType.Contains("png"))
    {
        imgfileExtn = ImageFileExtension.png;
    }
    else if (fileContentType.Contains("bmp"))
    {
        imgfileExtn = ImageFileExtension.bmp;
    }
    else if (fileContentType.Contains("gif"))
    {
        imgfileExtn = ImageFileExtension.gif;
    }

    if (imgfileExtn == ImageFileExtension.jpg || imgfileExtn == ImageFileExtension.jpeg)
    {
        if (bytFile.Length >= 4)
        {
            int j = 0;
            for (Int32 i = 0; i <= 3; i++)
            {
                if (bytFile[i] == chkBytejpg[i])
                {
                    j = j + 1;
                    if (j == 3)
                    {
                        isvalid = true;
                    }
                }
            }
        }
    }

    if (imgfileExtn == ImageFileExtension.png)
    {
        if (bytFile.Length >= 4)
        {
            int j = 0;
            for (Int32 i = 0; i <= 3; i++)
            {
                if (bytFile[i] == chkBytepng[i])
                {
                    j = j + 1;
                    if (j == 3)
                    {
                        isvalid = true;
                    }
                }
            }
        }
    }

    if (imgfileExtn == ImageFileExtension.bmp)
    {
        if (bytFile.Length >= 4)
        {
            int j = 0;
            for (Int32 i = 0; i <= 1; i++)
            {
                if (bytFile[i] == chkBytebmp[i])
                {
                    j = j + 1;
                    if (j == 2)
                    {
                        isvalid = true;
                    }
                }
            }
        }
    }

    if (imgfileExtn == ImageFileExtension.gif)
    {
        if (bytFile.Length >= 4)
        {
            int j = 0;
            for (Int32 i = 0; i <= 1; i++)
            {
                if (bytFile[i] == chkBytegif[i])
                {
                    j = j + 1;
                    if (j == 3)
                    {
                        isvalid = true;
                    }
                }
            }
        }
    }

    return isvalid;
}
Calling isValidFile method from Action Method
We are going to call (FileUploadCheck.isValidFile) method and then we are going to pass Parameter File Bytes, Types, FileContentType.
This method will return Boolean value, if it is valid file then true, else it will return false.
byte[] tempFileBytes = null;
var fileName = file.FileName.Trim();
using (BinaryReader reader = new BinaryReader(file.OpenReadStream()))
{
tempFileBytes = reader.ReadBytes((int)file.Length);
}
var myUniqueFileName = Convert.ToString(Guid.NewGuid());
var filetype = Path.GetExtension(fileName).Replace('.', ' ').Trim();
var fileExtension = Path.GetExtension(fileName);
var types = CoreSecurity.Filters.FileUploadCheck.FileType.Image;
var result = FileUploadCheck.IsValidFile(tempFileBytes, types, filetype);
After understanding code snippet, now let’s see a demo with how it works.
The below snapshot shows an Employee form with file upload control.
We are going to fill the below form and choose a valid file.
Figure 33. File Upload.
Snapshot of Debugging Index Post Action Method
In this part, we have posted a form with a file. Here, we can see how it is validating basic validations.
Figure 34. Debug mode after uploading an image.
Snapshot of debugging Index Post Action Method
In this part, you can see the real-time value of file which we have uploaded. It has passed basic validation.
Snapshot of FileUploadCheck class while isVaildFile method gets called.
In this part, after calling isValidFile method, it going to call another method according to its FileContentType.
Snapshot of isVaildImageFile Method while checking Header Bytes
In this method, it will check header bytes of the image which is uploaded against the bytes which we have if it matches, then it is a valid file else it is not a valid file.
Figure 35. Checking bytes headers.
5. Security Misconfiguration (Error Handling Must Setup Custom Error Page)
As we develop web application, then end output is always an HTML right, but this is downloaded at the end-user end, if end-user is bit intelligent then he plays with HTML tags and try to change values at the client end and post it to the server. That’s why it is always mandatory to do both client-side and server-side validation.
So, let us demonstrate the same practically.
Example
For showing demo, I have created an Employee form which takes basic Employee details.
Figure 36. Registration form.
Registration Model View
public class Registration
    {
        public int? RegistrationId { get; set; }

        [Required(ErrorMessage = "Enter FirstName")]
        [StringLength(50, ErrorMessage = "Only 50 Characters are Allowed")]
        public string FirstName { get; set; }

        [StringLength(50, ErrorMessage = "Only 50 Characters are Allowed")]
        [Required(ErrorMessage = "Enter LastName")]
        public string LastName { get; set; }

        [EmailAddress(ErrorMessage = "Invalid Email Address")]
        [Required(ErrorMessage = "Enter EmailId")]
        public string EmailId { get; set; }

        [Required(ErrorMessage = "Enter Username")]
        public string Username { get; set; }

        [Required(ErrorMessage = "Enter Password")]
        public string Password { get; set; }

        [NotMapped]
        [Required(ErrorMessage = "Enter ConfirmPassword")]
        [Compare("Password", ErrorMessage = "Password does not match")]
        public string ConfirmPassword { get; set; }


        public DateTime? CreatedDate { get; set; }
        public DateTime? UpdateDate { get; set; }
        public bool? Status { get; set; }
    }
So are data annotation validations more than enough to secure the page. No, that’s not enough for securing page I will show you a small demo of how these validations get bypassed.
The below snapshot shows that FirstName field is validating. It asks for only 50 characters.
Figure 37. After adding validation to Model, now we are validating form you can see FirstName input field which only accepts 50 characters, it is not accepting more than 50 characters, it shows Error and message.
Intercepting Add Registration View
Now let’s intercept this form and then submit to the server from the intercept. I am using a tool called as burp suit, which catches your request that is going to the server and coming from the server.
In the below snapshot, I have caught a request which is going to the server.
Figure 38. Intercepting Add Registration form using burp suite, you can view that if the user submits the form, then it catches data in this tool.
In the below snapshot, the request which I have caught is going to the server. You can see that I have changed the FirstName field which is only taking 50 I have added more than 50 characters and then submitted to the server.
Intercepted FirstName field of Add Registration Form
Figure 39. Intercepted FirstName field in burp suite and submitted to the server.
Below is the snapshot which shows the request which is submitted to the server which has more than 50 characters.
Debugging Mode of the Registration Form
After submitting more than 50 characters to the FirstName fields, the server throws an exception. Because in the database, the data type of FirstName field is varchar(50) and the data is more than 50 so an exception is but obvious.
Figure 40. Intercepted FirstName field in burp suite and submitted to the server.
Figure 41. Intercepted FirstName field Caused an error.
Problem With Displaying Error Occurred to Users
Now exception which occurs is directly displayed to the attacker which leaks lots of valuable information about the server and our program behavior. Using this error information, he can try various permutations and combinations to exploit our system.
Figure 42. Displaying Error directly to Users.
So, the solution here is we need to set some kind of error page which does not show the internal technical error, but rather shows a custom error message.
We have two approaches for it:
- Create a custom Error handling Attribute
- Setting Custom Error page
Solution 1
Create a custom Error handling Attribute using ExceptionFilterAttribute.
This attribute will handle the exception and write an exception in a text file according to date, it is stored inside the wwwroot folder -> ErrorLogPath.
If you also store this exception in the database, then you just need to add a table and write ADO.NET code for inserting data.
public class CustomExceptionFilterAttribute : ExceptionFilterAttribute
{
private readonly IHostingEnvironment _hostingEnvironment;
public CustomExceptionFilterAttribute(IHostingEnvironment hostingEnvironment)
{
_hostingEnvironment = hostingEnvironment;
}
public override void OnException(ExceptionContext context)
{
string strLogText = "";
Exception ex = context.Exception;
context.ExceptionHandled = true;
var objClass = context;
strLogText += "Message ---\n{0}" + ex.Message;
if (context.HttpContext.Request.Headers["x-requested-with"] == "XMLHttpRequest")
{
strLogText += Environment.NewLine + ".Net Error ---\n{0}" +
"Check MVC Ajax Code For Error";
}
strLogText += Environment.NewLine + "Source ---\n{0}" + ex.Source;
strLogText += Environment.NewLine + "StackTrace ---\n{0}" + ex.StackTrace;
strLogText += Environment.NewLine + "TargetSite ---\n{0}" + ex.TargetSite;
if (ex.InnerException != null)
{
strLogText += Environment.NewLine + "Inner Exception is {0}" + ex.InnerException;
}
if (ex.HelpLink != null)
{
strLogText += Environment.NewLine + "HelpLink ---\n{0}" +
ex.HelpLink;
}
StreamWriter log;
string timestamp = DateTime.Now.ToString("d-MMMM-yyyy", new CultureInfo("en-GB"));
string errorFolder = Path.Combine(_hostingEnvironment.WebRootPath, "ErrorLog");
if (!System.IO.Directory.Exists(errorFolder))
{
System.IO.Directory.CreateDirectory(errorFolder);
}
if (!File.Exists(String.Format(@"{0}\Log_{1}.txt", errorFolder, timestamp)))
{
log = new StreamWriter(String.Format(@"{0}\Log_{1}.txt", errorFolder, timestamp));
}
else
{
log = File.AppendText(String.Format(@"{0}\Log_{1}.txt", errorFolder, timestamp));
}
var controllerName = (string)context.RouteData.Values["controller"];
var actionName = (string)context.RouteData.Values["action"];
log.WriteLine(Environment.NewLine + DateTime.Now);
log.WriteLine
("------------------------------------------------------------------------------------------------");
log.WriteLine("Controller Name :- " + controllerName);
log.WriteLine("Action Method Name :- " + actionName);
log.WriteLine
("------------------------------------------------------------------------------------------------");
log.WriteLine(objClass);
log.WriteLine(strLogText);
log.WriteLine();
log.Close();
context.HttpContext.Session.Clear();
if (!_hostingEnvironment.IsDevelopment())
{
return;
}
var result = new RedirectToRouteResult(
new RouteValueDictionary
{
{"controller", "Errorview"}, {"action", "Error"}
});
context.Result = result;
}
}
After creating CustomExceptionFilterAttribute, next, we are going to register this filter globally.
Figure 43. Registering CustomExceptionFilterAttribute filter globally.
Whenever an error occurs, the CustomExceptionFilter attribute will get called and it will redirect to Errorview Controller and Error Action method.
Figure 44. Displaying Custom Error page if any error occurs in Application.
The occurred exception is also being stored in ErrorLog folder which is inside the wwwroot folder.
Figure 45. Displaying Errors stored in the error log folder.
Solution 2
The ASP.NET Core has three environments:
- Development
- Staging
- Production
Before deploying the application in production, we should set Hosting environment to "Production".
Next, we are going to configure UseExceptionHandler middleware. Before that, we can check our hosting environment name by env.IsProduction()" method if it is set to "Production", the if statement will execute.
Figure 46. Configuring Exception Handler.
Inside that, we are going to set "UseExceptionHandler" middleware where you can just set your error handling path for a production application.
If any error occurs, it will call "Home" Controller and Error Action method which will display error view.
Figure 47. Exception page in the Development environment.
Note: Enable the developer exception page only when the app is running in the Development environment.
6. Version Discloser
The version in which application is developed must not be disclosed to end-user, because if an attacker gets a specific version in which application is developed, then he may try to target specific attack on that Version which is disclosed.
Whenever browser sends HTTP to request to the server in response we get response header which contains information of [ Server, X-Powered-By, X-SourceFiles]
The server shows information about which web server is begin used.
Server: Kestrel: application as hosted by Kestrel
X-Powered-By: ASP.NET: shows information of which framework your website is running on.
Note
X-SourceFiles header is only generated for localhost requests and serves debugging purposes of Visual Studio and IIS Express.
Figure 48. Response header disclosing Version Information.
Solution:
- For removing Server: Kestrel header
- For removing X-Powered-By: ASP.NET header
- Adding
NWebsec.AspNetCore.Middleware from NuGet for securing headers
For Removing Server: Kestrel Header
For removing Server: Kestrel header you need to set "AddServerHeader = false".
Code Snippet
using Microsoft.AspNetCore;
using Microsoft.AspNetCore.Hosting;

namespace CoreSecurity
{
    public class Program
    {
        public static void Main(string[] args)
        {
            BuildWebHost(args).Run();
        }

        public static IWebHost BuildWebHost(string[] args) =>
            WebHost.CreateDefaultBuilder(args)
                .UseKestrel(c => c.AddServerHeader = false)
                .UseStartup<Startup>()
                .Build();
    }
}
Figure 49. Removing the Server header.
Below is the snapshot after removing Server: Kestrel header.
Figure 50. Response after Removing Server header.
For Removing X-Powered-By: ASP.NET Header
For removing this header, we need to add a web.config file to project.
Figure 51. Adding web.config file to project.
After adding web.config file, we are going to add <httpProtocol> element under <system.webServer> element for removing "X-Powered-By" header.
Code Snippet of web.config File When Newly Added
="1.0"="utf-8"
<configuration>
<system.webServer>
<handlers>
<remove name="aspNetCore"/>
<add name="aspNetCore" path="*" verb="*"
modules="AspNetCoreModule" resourceType="Unspecified"/>
</handlers>
<aspNetCore processPath="%LAUNCHER_PATH%" arguments="%LAUNCHER_ARGS%"
stdoutLogEnabled="false" stdoutLogFile=".\logs\stdout" />
</system.webServer>
</configuration>
Elements to Add Under <system.webServer>
<httpProtocol>
  <customHeaders>
    <remove name="X-Powered-By" />
  </customHeaders>
</httpProtocol>
Code Snippet of web.config File after Adding <httpProtocol> Element under <system.webServer>
="1.0"="utf-8"
<configuration>
<system.webServer>
<handlers>
<remove name="aspNetCore"/>
<add name="aspNetCore" path="*" verb="*"
modules="AspNetCoreModule" resourceType="Unspecified"/>
</handlers>
<aspNetCore processPath="%LAUNCHER_PATH%" arguments="%LAUNCHER_ARGS%"
stdoutLogEnabled="false" stdoutLogFile=".\logs\stdout" />
<httpProtocol>
<customHeaders>
<remove name="X-Powered-By" />
</customHeaders>
</httpProtocol>
</system.webServer>
</configuration>
Below is the snapshot after removing "X-Powered-By" header.
Figure 52. Snapshot after removing "X-Powered-By" header.
Adding NWebsec.AspNetCore.Middleware from NuGet for Securing Headers
NWebsec middleware for ASP.NET Core applications.
NWebsec helps you set important security headers and detect potentially dangerous redirects.
It NWebsec prevents against cross-site scripting, iframes and prevents clickjacking attacks.
Figure 53. Installing NWebsec.AspNetCore.Middleware from NuGet for Securing Headers.
Code Snippet to add in Configure Method in Startup Class
// X-Content-Type-Options header
app.UseXContentTypeOptions();
// Referrer-Policy header.
app.UseReferrerPolicy(opts => opts.NoReferrer());
// X-Xss-Protection header
app.UseXXssProtection(options => options.EnabledWithBlockMode());
// X-Frame-Options header
app.UseXfo(options => options.Deny());
// Content-Security-Policy header
app.UseCsp(opts => opts
    .BlockAllMixedContent()
    .StyleSources(s => s.Self())
    .StyleSources(s => s.UnsafeInline())
    .FontSources(s => s.Self())
    .FormActions(s => s.Self())
    .FrameAncestors(s => s.Self())
    .ImageSources(s => s.Self())
    .ScriptSources(s => s.Self())
);
Figure 54. Configuring NWebsec.AspNetCore Middleware.
Below is the snapshot after adding headers to protect.
Figure 55. Adding Response header to protect against clickjacking and cross-site scripting (XSS) attacks.
Referenced from: https://damienbod.com/2018/02/08/adding-http-headers-to-improve-security-in-an-asp-net-mvc-core-application/
7. Cross-Site Request Forgery (CSRF)
Cross-Site Request Forgery (CSRF) is an attack that forces an end user to execute unwanted actions on a web application in which they're currently authenticated. CSRF attacks specifically target state-changing requests, not theft of data since the attacker has no way to see the response to the forged request. With a little help of social engineering (such as sending a link via email or chat), an attacker may trick the users of a web application into executing actions of the attacker's choosing. If the victim is a normal user, a successful CSRF attack can force the user to perform state-changing requests like transferring funds, changing their email address, and so forth. If the victim is an administrative account, CSRF can compromise the entire web application.
Definition is referenced from: https://www.owasp.org/index.php/Cross-Site_Request_Forgery_(CSRF)
Take this Simple Example
User logs in to the bank server.
Bank authorizes and a secure session is established between the user and the bank server.
The attacker sends an email with a malicious link saying "Earn 100000$ now" to the user.
User clicks on the malicious link and the site tries to transfer money from your account to the attacker's account.
Because the secure session is established, the malicious code can execute successfully.
Microsoft has recognized this threat and for preventing the same, we have something called as AntiForgeryToken.
Solution
We need to add asp-antiforgery="true" HTML attribute on form HTML tag and set its property to true to generate anti-forgery. By default, it is false which means it will not generate an anti-forgery token. And on the Action Method which handles your post ([HttpPost]) Request, we need to add [ValidateAntiForgeryToken] attribute which will check if the token is valid or not.
Figure 56. Setting anti-forgery attribute on form tag.
Adding [ValidateAntiForgeryToken] Attribute to [HttpPost] Method.
Working of AntiForgeryToken
When we set anti-forgery token to true (asp-antiforgery="true") on form help tag, it creates a hidden field and assigns a unique token value to it and meanwhile a session Cookie is added to the browser.
When we post form HTML, it checks for __RequestVerificationToken Hidden field and whether __RequestVerificationToken Cookie is present or not. If either the cookie or the form __RequestVerificationToken Hidden field values are missing, or the values don't match, ASP.NET MVC does not process the action. This is how we can prevent cross-site request forgery attack in ASP.NET MVC.
Figure 56. RequestVerificationToken generated the hidden field.
RequestVerificationToken Cookie snapshot.
Figure 57. RequestVerificationToken generated a cookie.
8. XML External Entities (XXE)
This attack is against an application that parses XML. We nowadays consume various web services which return XML if we do not check what response we are receiving, then it may cause the attack to take place.
- Billion Laughs attack is illustrated in the XML file
- External Entities Attack
Note: Document Type Definition (DTD)
Billion Laughs Attack
Figure 58. Billion Laughs attack XML
This kind of attack causes Denial of Service (DoS) attack which makes your server utilization too high which causes server shutdown.
Billion Laughs Attack is Illustrated in the XML File
="1.0"
<!DOCTYPE lolz [
<!ENTITY lol "lol">
<!ENTITY lol2 "&lol;&lol;&lol;&lol;&lol;&lol;&lol;&lol;&lol;&lol;">
<!ENTITY lol3 "&lol2;&lol2;&lol2;&lol2;&lol2;&lol2;&lol2;&lol2;&lol2;&lol2;">
<!ENTITY lol4 "&lol3;&lol3;&lol3;&lol3;&lol3;&lol3;&lol3;&lol3;&lol3;&lol3;">
<!ENTITY lol5 "&lol4;&lol4;&lol4;&lol4;&lol4;&lol4;&lol4;&lol4;&lol4;&lol4;">
<!ENTITY lol6 "&lol5;&lol5;&lol5;&lol5;&lol5;&lol5;&lol5;&lol5;&lol5;&lol5;">
<!ENTITY lol7 "&lol6;&lol6;&lol6;&lol6;&lol6;&lol6;&lol6;&lol6;&lol6;&lol6;">
<!ENTITY lol8 "&lol7;&lol7;&lol7;&lol7;&lol7;&lol7;&lol7;&lol7;&lol7;&lol7;">
<!ENTITY lol9 "&lol8;&lol8;&lol8;&lol8;&lol8;&lol8;&lol8;&lol8;&lol8;&lol8;">
]>
<lolz>&lol9;</lolz>
Figure 59. Billion Laughs attack XML.
For showing demo, I have added a controller with name XXE controller which contains index action method.
In index action method, I am going to consume an XML from "XmlFiles" folder which contains the malicious XML ("Billion Laughs attack XML") then we are going to parse XML using "XmlTextReader".
CodeProject
[HttpGet]
public IActionResult Index()
{
    var fileName = Path.Combine(_environment.WebRootPath, "XmlFiles") + "\\temp.xml";
    XmlTextReader reader = new XmlTextReader(fileName);
    reader.DtdProcessing = DtdProcessing.Parse;
    while (reader.Read())
    {
        var data = reader.Value;
    }
    return View();
}
If you run this example, then you can see your system will have high utilization do at your own risk.
The Solution to this Attack
To avoid this kind of attack, we can set the DtdProcessing property of "XmlTextReader" to Prohibit or Ignore.
Prohibit – Throws an exception if a DTD is identifiedIgnore – Ignores any DTD specifications in the document, skipping over them and continues processing the documentParse (Default) – Will parse any DTD specifications in the document. (Potentially vulnerable)
CodeProject
[HttpGet]
public IActionResult Index()
{
    var fileName = Path.Combine(_environment.WebRootPath, "XmlFiles") + "\\temp.xml";
    XmlTextReader reader = new XmlTextReader(fileName);
    reader.DtdProcessing = DtdProcessing.Ignore;
    while (reader.Read())
    {
        var data = reader.Value;
    }

    return View();
}
External Entities Attack
This attack malicious XML is configured in such a way that it can access files from your server, this attack is from external source hence it is named as XML external entities.
For a demo, I have stored a text file on my D drive with name demo.txt.
Now I will try to access this file from using malicious XML.
External Entities Attack is Illustrated in the XML
<?xml version=\"1.0\"?><!DOCTYPE doc
[<!ENTITY win SYSTEM \"file:///D:/demo.txt\">]><doc>&win;</doc>
Code Snippet
using System;
using System.IO;
using System.Xml;

namespace ConsoleApplication1
{
    class Program
    {
        static void Main(string[] args)
        {
            string xml = "<?xml version=\"1.0\"?><!DOCTYPE doc
            [<!ENTITY win SYSTEM \"file:///D:/demo.txt\">]><doc>&win;</doc>";

            XmlReaderSettings rs = new XmlReaderSettings();
            rs.DtdProcessing = DtdProcessing.Parse;

            XmlReader myReader = XmlReader.Create(new StringReader(xml), rs);

            while (myReader.Read())
            {
                Console.WriteLine(myReader.Value);
            }
            Console.ReadLine();
        }
    }
}
Figure 60. Output after executing malicious XML.
The Solution to this Attack
To avoid this kind of attack, we can set the DtdProcessing property of "XmlTextReader" to Prohibit or Ignore.
After setting this property, it will not allow XML to parse.
Figure 61. Error after setting DtdProcessing property to Prohibit.
9. Insecure Deserialization
Before going into understanding what is Insecure Deserialization, let’s understand what is serialization and Deserialization process?
Serialization is a task to converting an object into a stream of bytes such that it can be stored or transported.
Deserialization is the reverse of Serialization in that stream of bytes are again converted into an object.
In a Modern era of web development, we frequently use Serialization and Deserialization with JSON data and XML data. But the Serialization process does do not have Issues because we do that process at our application end, but Deserialization process we received files or stream of bytes from trusted and untrusted source which cause issues.
We frequently use databases, cache servers, file systems to store Serialize data and:
- denial-of-Service (DoS) attack
- remote code execution attack
- data tampering or access control
Figure 62. Serialization and Deserialization process.
Affected Libraries snapshot
Breaking .NET Through Serialization by James Forshaw whitepapers@contextis.com
Link to document where this snapshot is taken from.
https://media.blackhat.com/bh-us-12/Briefings/Forshaw/BH_US_12_Forshaw_Are_You_My_Type_WP.pdf
Figure 63. Affected Libraries.
Example of Deserialization
I have created a simple API with name "stock" in ASP.NET Core which gets stock data from a database according to company name (name) parameter which consumer sends and in response, we send stock data of that company only.
Valid Request
Request URL: http://localhost:57777/api/Stock
Request Json:
{'Stockid':"1",'Name':"GComp1"}
Figure 64. Posting valid request. Debugging view after sending request.
Figure 65. Debug view after posting values.
Invalid Request
Request URL: http://localhost:57777/api/Stock
Request Json:
{'Stockid':"1",'Name':" 'or'1'='1 "}
Figure 66. Posting invalid request (malicious request).
Debugging view after sending request.
Figure 67. Debug view after posting malicious values.
In this process, you can see I am sending a malicious JSON data to API and that is causing an SQL injection attack.
The Solution to this Attack
- If you are using third-party NuGet extension, check the latest updates and also check they have a solution to this kind of attack.
- Check input data which you receive before deserialization (JSON and XML).
- To avoid SQL injection attack using parameterize query or stored procedures, Entity framework also uses parameterize query.
Use Parameterized Queries to Query SQL Server
Figure 68. Parameterized queries.
10. SQL Injection Attack
The top attack for the last three years is SQL injection attack. Because every application needs a database where data is been stored, data is valuable. SQL injection attack can give valuable data to the attacker that can lead to a big security breach and can also take full access to the database server.
In SQL Injection, attacker always try to enter malicious SQL statement which will get executed in the database and return unwanted data to the attacker.
Figure 69. SQL injection attack example which shows how attack mostly occurs if you are using inline queries.
Simple View which shows User data
View shows single Registration data based on RegistrationId as displayed in the below snapshot.
Figure 70. Registration View which displays user data.
Simple View which Shows All User Data after SQL Injection Attack
In this Browser View as attacker saw Application URL which contains some valuable data which is ID [http://localhost:3837/demo/index?Id=1], attacker tries SQL Injection attack as shown below:
Figure 71. Registration View which displays all User data after SQL injection.
After trying permutation and combination of SQL injection attack, the attacker gets access to all user data.
Displaying SQL Injection in Debug Mode
Here, we can see in detail how attacker passed malicious SQL statement which gets executed in the database.
Figure 72. Debug mode which shows malicious SQL statement while getting executed.
SQL Profiler View of SQL Statement
Figure 73. SQL Profiler view after executing the SQL Statement.
Solution:
- Validate inputs
- Use of low-privileged database logins
- Use Parameterized queries
- Use ORM (e.g., Dapper, Entity framework)
- Use Stored Procedures
Validate Inputs
Always validate input in both side Client side and Server side such that no special characters are entered in inputs which allow an attacker to get into the system.
In MVC, we use Data Annotations for Validation.
Data Annotations attribute are a simple rule that is applied to the Model to validate Model data.
Figure 74. View After Applying regular expression.
Server-Side Validating Inputs
Model state is false - this indicates that Model is not valid.
Use of Low-Privileged Database Logins
Db_owner is default role for the database which can grant and revoke access, create tables, stored procedures, views, run backups, schedule jobs can even drop the database. If this kind of Role access is given to database, then User who is using can have full access and he can perform various activities on it. We must create a new user account with least-privileged and give only that privilege that user must access.
For example, if the user has to work related to Selecting, Inserting and Updating Employee details, then only select, Insert and update permission should be provided.
Figure 75. Creating a New User and assign access to objects.
Step to Add New User and Provide Privilege
After choosing table, we are going to provide permission to the table as shown below, you can see that we have only given permission to ‘Insert’, ‘Select’, ‘Update’ for this User.
Figure 76. Assigning Permission.
With least-privileged, it will help us to safeguard database from attackers.
Use Stored Procedures
Stored procedures are a form of parameterized query. Using Stored Procedures is also one way to protect from SQL injection attack.
In the below snapshot, we have removed inline Query which we were using. Before now, we have written code for getting data from database using stored procedure, which helps us to protect against SQL injection attack, then to stored procedure, we need to pass parameter [@RegistrationID] and according to parameter, it is going to get records from database after passing parameter, we have used CommandType [CommadType.StoredProcedure] which indicates we are using a stored procedure.
Note: Always use parameter with the stored procedure if you do not use it, you are still vulnerable to SQL injection attack.
Figure 77. Use Stored Procedures.
After using Stored Procedure, let's Request Demo View.
Registration View Which Displays Record
Figure 78. Registration View which displays user details according to Registration ID.
Profiler View After Using Stored Procedure
Displaying trace of stored procedure which we have used.
Figure 79. SQL Profiler view after executing the SQL Statement.
Using Stored Procedure, let’s try SQL injection attack again.
Displaying SQL Injection Attack Execution in Debug Mode after using Stored Procedure
If you have look at parameter id [?Id=1or 1=1] which contains malicious SQL script after passing it to the stored procedure, it shows an error which indicates that it not get executed because parameter which we are passing is an integer which only takes numeric values as input if we pass malicious SQL script [?Id=1 or 1=1] it throws an error.
Profiler View after using Stored Procedure
Figure 80. SQL Profiler view after executing the SQL Statement.
Output
Figure 81. Displaying error page after executing Malicious SQL script.
Use Parameterized Queries
Using parameterized Queries is another solution to prevent against SQL injection attack. It is similar to the stored procedure. Instead of a concatenating string, you need to add parameters to the SQL query and pass parameter value using the SqlCommand.
Figure 81. Performing SQL injection attack.
Figure 82. An error occurred after executing Malicious SQL script.
Profiler View of parameterized Query
Figure 83. SQL Profiler view after executing SQL Statement
Output
Figure 84. Displaying error page after executing Malicious SQL script.
Using ORM (Entity Framework)
ORM stands for Object Relational Mapper which maps SQL object to your domain object [C#].
If you are using entity framework properly, you are not prone to SQL injection attack because entity framework internal uses parameterized query.
Normal Execution of Entity Framework
Here, we have passed the name as parameter [?name=Saineshwar].
Figure 85. Passing firstName value from the Query string.
Snapshot of the Controller During Execution
In debug mode, we can see that we have passed name parameter from Querystring which we then passed to LINQ query to get records.
Figure 86. Debug view Passing firstName value from the Query string.
Profiler View of LINQ Query
Entity Framework internally uses Parameterized query it's true, here is a snapshot.
Figure 87. SQL Profiler view after executing the SQL Statement.
Let’s Try SQL Injection Attack on Entity Framework
In this part, we are trying SQL injection attack on entity framework. For that, we have passed the parameter as [?firstName=Saineshwar or 1=1].
Figure 88. SQL Injection Attack on Entity Framework.
Snapshot of the Controller During Execution
In debug mode, we can see that we have passed name parameter from Querystring which we then passed to LINQ query to get records, but this time, it has a malicious script along with normal parameter.
Figure 89. SQL Injection Attack on Entity Framework.
Profiler View of LINQ Query
If you see trace closely, it is considering the name and malicious script as a single parameter which prevents it from SQL injection attack.
Figure 90. SQL Profiler view after executing the SQL Statement.
Conclusion
In this article, we have learned how to secure ASP.NET Core MVC applications against the top 10 attacks given by OWSAP (Open Web Application Security Project) in a step by step manner.
Thank you for reading. I hope you liked my article.
History
- 5th September, 2018: Initial version


 General
  News
News  Suggestion
  Question
  Bug
Bug  Answer
  Joke
Joke  Praise
  Rant
Rant  Admin
Admin 


