Authentication has always been one of the vital factors for security, and web security managers focus heavily on it to ensure protective pass-ons from the specific pages. Authentication is mainly required for those web pages which contain sensitive data and are applied specially on login applications to make user logins secured through it. Today, the increasing number of account breaches - especially on the social networking sites - has led organizations to realize the importance of using authentication feature on different web pages.
Today, all popular web applications that accumulate chunks of user data, use two-factor authentication process for maintaining effective security measures because it allows applications to smartly validate users through two-pronged process, so that the access to the private information becomes highly protective.
Two-Factor Authentication also known as TFA or 2FA is a popular two-step verification process that adds an extra layer of security to your application. It not only requires username and password to validate the user’s identity, but also requires some specific information that is only accessible by the respective user.
Primarily, SMS verification is the most popular method used in Two-factor authentication. If any intruder somehow enters the right username and password, then he would be further asked to verify via code sent to the registered number, hence making it impossible for intruder to advance further, as that verification code would only be accessible to the actual user who has done verification along with his contact number.
Firebase uses the Two-Factor authentication as well to complete the login process. Users have to enter the code sent via SMS to their registered numbers to gain access of the dashboard. This is just like the Phone code verification process used in Whatsapp and other apps to authenticate the actual ID of the user.
In this Firebase Phone authentication process, it is mandatory for users to have both correct cell phone number and physical access to that phone. Because the code verification is done live, therefore access to the phone becomes essential to receive and enter the code in Firebase to get dashboard access.
In this article, I will demonstrate how to integrate Firebase phone number authentication in Laravel.
For the purpose of this tutorial, I assume that you have a Laravel application installed on a web server. My setup is:
- Laravel 5.5
- PHP 7.x
- Google Firebase Realtime Database
For optimized dev stack, I have installed my Laravel application on a Cloudways managed server. You can also sign up for free on Cloudways, and setup your Laravel server easily within a few minutes.
If you don’t have any Firebase account as of yet, sign-up for free by following this article which details all the steps required to create a Firebase account. After completing the sign-up, the following screen is shown:
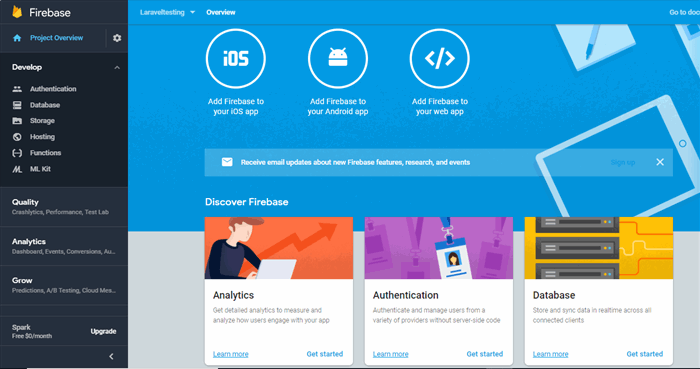
Firebase has many features like real-time database, analytics, user-authentication and much more. For now, I have used Firebase authentication feature via phone number that lets users to verify their identity by entering the code sent to their number.
First of all, I will create a new project with the name "Laraveltesting". After creating the project, I will open the Authentication section given upwards on the left sidebar, and after clicking that, I will navigate to the "Sign-in Method" tab, where I will enable the phone number sign-in method to implement phone authentication.

Note: Also ensure the authorization of your domain in the authorized domain section. If not, you can manually place your domain there. Meanwhile by default, localhost has been set up there, by default.
After completing the above-mentioned step and setting-up Firebase authentication, now I will copy the web config file parameters and paste it in the view file named invcaptcha.blade.php.
Now, let’s create a controller with the name of HomeController.php. For this purpose, I open up the SSH Terminal and type the following command to create the Controller:
<a id="docs-internal-guid-f9b838da-7fff-f779-b250-c7070870440b">php artisan make:controller HomeController</a>
Next, paste the following code in the Controller file:
namespace App\Http\Controllers;
use Illuminate\Http\Request;
use App\Http\Requests;
class HomeController extends Controller
{
public function __construct()
{
}
public function invcaptcha()
{
return view('invcaptcha');
}
In this Controller, I have created a function named invcaptcha () that particularly returns the view.
Firebase also provides FirebaseUI which offers customizable Ul binding. In my case, I have created a custom UI for authentication process.
Now I have created a view for Firebase authentication with the name invcaptcha.blade.php. After that, I have pasted the following code into invcaptcha.blade.php file.
<!DOCTYPE html>
<html lang="en">
<head>
 <title>Bootstrap Example</title>
 <meta charset="utf-8">
 <meta name="viewport" content="width=device-width, initial-scale=1">
<link rel="stylesheet" href="https://code.getmdl.io/1.1.3/material.orange-indigo.min.css">
<link rel="stylesheet" href="https://fonts.googleapis.com/icon?family=Material+Icons">
<script src="https://code.getmdl.io/1.1.3/material.min.js"></script>
<link rel="stylesheet" href="https://maxcdn.bootstrapcdn.com/bootstrap/3.3.7/css/bootstrap.min.css">
</head>
<body>

<div class="container">
   <div class="row">
    <div class="col-md-12">
                   <div class="row">
                       <div class="col-md-12">
                      <h3><center> <img src="sd.PNG" width="5%"/>
                                    Firebase Phone Auththentication With Laravel</center></h3>
                       </div>
                   </div>
               <div>
                   <form id="sign-in-form" action="#">
                   <div class="mdl-textfield mdl-js-textfield mdl-textfield--floating-label">
                     <input class="mdl-textfield__input" type="text" pattern="\+[0-9\s\-\(\)]+"
                                                         id="phone-number">
                     <label class="mdl-textfield__label" for="phone-number">
                                                         Enter your Mobile number..</label>
                     <span class="mdl-textfield__error">Input is not an international M number!</span>
                   </div>

                   <button class="btn btn-primary" id="sign-in-button">Sign-in</button>
                 </form>

                 <button class="mdl-button mdl-js-button mdl-button--raised" id="sign-out-button">
                 Sign-out</button>
                 <form id="verification-code-form" action="#">
                   <div class="mdl-textfield mdl-js-textfield mdl-textfield--floating-label">
                     <input class="mdl-textfield__input" type="text" id="verification-code">
                     <label class="mdl-textfield__label" for="verification-code">
                      Enter the verification code...</label>
                   </div>
                   <input type="submit" class="btn btn-success"
                    id="verify-code-button" value="Verify Code"/>
                   <button class="btn btn-danger" id="cancel-verify-code-button">Cancel</button>
                 </form>
               </div>
   </div>
   </div>
   <br />
   <br />
   <div class="row">
       <div class="col-md-12">
           <div class="card card-default">
               <div class="card-header">
                   <div class="row">
                       <div class="col-md-12">
                           <h4>User Login Information</h4>
                       </div>
                   </div>
               </div>

               <div>
                   <div>
                       Firebase sign-in status: <span id="sign-in-status">Unknown</span>
                       <div>Firebase auth <code>User Details</code> object value:</div>
                       <pre><code id="account-details">No User Login</code></pre>
                   </div>
               </div>
           </div>
       </div>
   </div>
</div>
If you want to create a separate JavaScript file to have your Firebase web config code written in it, the following JS file is particularly created for that. After creating custom view of form, now I will set-up my new firebase web config file and will also check other authentication functions in the file.
<!-- Here your js code -->
<script src="https://www.gstatic.com/firebasejs/4.9.1/firebase.js"></script>
<script type="text/javascript">
var config = {
apiKey: "AIzaSyB3sASkM1mkR6NQIs-nhqMWUm16F3GnbrQ",
authDomain: "laraveltesting-bd2b9.firebaseapp.com",
databaseURL: "https://laraveltesting-bd2b9.firebaseio.com",
projectId: "laraveltesting-bd2b9",
storageBucket: "laraveltesting-bd2b9.appspot.com",
messagingSenderId: "259663454120"
};
firebase.initializeApp(config);
var database = firebase.database();<meta charset="utf-8">
After setting up web config, I will now setup firebase authentication parameters for checking users’ parameters.
window.onload = function() {
firebase.auth().onAuthStateChanged(function(user) {
if (user) {
var uid = user.uid;
var email = user.email;
var photoURL = user.photoURL;
var phoneNumber = user.phoneNumber;
var isAnonymous = user.isAnonymous;
var displayName = user.displayName;
var providerData = user.providerData;
var emailVerified = user.emailVerified;
}
updateSignInButtonUI();
updateSignInFormUI();
updateSignOutButtonUI();
updateSignedInUserStatusUI();
updateVerificationCodeFormUI();
});
Now I will create different event bindings to call particular events.
  document.getElementById('sign-out-button').addEventListener('click', onSignOutClick);
  document.getElementById('phone-number').addEventListener('keyup', updateSignInButtonUI);
  document.getElementById('phone-number').addEventListener('change', updateSignInButtonUI);
  document.getElementById('verification-code').addEventListener('keyup', updateVerifyCodeButtonUI);
  document.getElementById('verification-code').addEventListener('change', updateVerifyCodeButtonUI);
  document.getElementById('verification-code-form').addEventListener('submit', onVerifyCodeSubmit);
  document.getElementById('cancel-verify-code-button').addEventListener('click', cancelVerification);

  window.recaptchaVerifier = new firebase.auth.RecaptchaVerifier('sign-in-button', {
    'size': 'invisible',
    'callback': function(response) {
      onSignInSubmit();
    }
  });

  recaptchaVerifier.render().then(function(widgetId) {
    window.recaptchaWidgetId = widgetId;
    updateSignInButtonUI();
  });
};
Now I will create a function for users’ login and logout the login or logout. Every time a user clicks the login, logout button, the following function will be called.
function onSignInSubmit() {
  if (isPhoneNumberValid()) {
    window.signingIn = true;
    updateSignInButtonUI();
    var phoneNumber = getPhoneNumberFromUserInput();
    var appVerifier = window.recaptchaVerifier;
    firebase.auth().signInWithPhoneNumber(phoneNumber, appVerifier)
        .then(function (confirmationResult) {

          window.confirmationResult = confirmationResult;
          window.signingIn = false;
          updateSignInButtonUI();
          updateVerificationCodeFormUI();
          updateVerifyCodeButtonUI();
          updateSignInFormUI();
        }).catch(function (error) {

          console.error('Error during signInWithPhoneNumber', error);
          window.alert('Error during signInWithPhoneNumber:\n\n'
              + error.code + '\n\n' + error.message);
          window.signingIn = false;
          updateSignInFormUI();
          updateSignInButtonUI();
        });
  }
}
To initiate the verification process, I will create a function which will be called when a user clicks the verify button. I will call this function again to check the code entered for verification.
function onVerifyCodeSubmit(e) {
e.preventDefault();
if (!!getCodeFromUserInput()) {
window.verifyingCode = true;
updateVerifyCodeButtonUI();
var code = getCodeFromUserInput();
confirmationResult.confirm(code).then(function (result) {
var user = result.user;
window.verifyingCode = false;
window.confirmationResult = null;
updateVerificationCodeFormUI();
}).catch(function (error) {
console.error('Error while checking the verification code', error);
window.alert('Error while checking the verification code:\n\n'
+ error.code + '\n\n' + error.message);
window.verifyingCode = false;
updateSignInButtonUI();
updateVerifyCodeButtonUI();
});
}
}
After pasting all the JavaScript code in JS file or in HTML file, now firebase authentication feature will send verification code to my phone. After receiving, I will enter that code in the verification window and will successfully log in the application.
In the firebase project console, this user tab will show the newly logged-in user after completing the phone authentication.
This brings us to the end of this article. As we all know that Laravel is known for high performance and security, integrating it with the Firebase phone authentication double checks the security measures for web applications. In this article, I have demonstrated in detail how you can setup Firebase phone authentication process with Laravel and can enhance the security of your applications. Still, if you got any questions regarding the article, you can just leave your comment below and I will answer them.
This member has not yet provided a Biography. Assume it's interesting and varied, and probably something to do with programming.


 General
  News
News  Suggestion
  Question
  Bug
Bug  Answer
  Joke
Joke  Praise
  Rant
Rant  Admin
Admin 


