Introduction
Welcome to another article in the Flutter Getting Started series. Here, I will explore ListView widget. According to Flutter website:
Quote:
ListView is the most commonly used scrolling widget. It displays its children one after another in the scroll direction
Let's delve more into flutter, the promising framework of future.
Background
The ultimate aim of this article to create a UI like this:
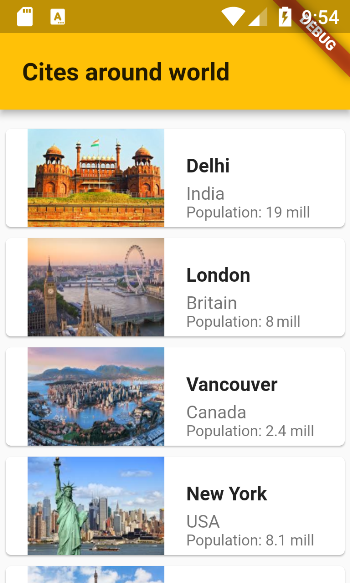
Here, we wish to create a scrollable list which is showing City popular landmark as its display image, additional information includes city population and country in which it’s situated.
Aim of Tutorial
In this article, we will create a ListView based application, where first, we display a very primitive list of city, then we build on that to show City name, its population, Country of which it's part of. Thirdly, we display its popular landmark as image and finally, we enhance the UI further and show SnackBar (a type small message notification) on user tap of ListItem.
Using the Code
Task #1: Let's start with the first phase of application in which we create primitive ListView displaying just city name.
First, create class City under model folder (you have to create that folder inside lib folder), which will act as base model for display. In case you don't know how to create flutter project, I have explained that in detail, please refer to this article for getting general knowledge.
class City {
final String name;
final String image;
final String population;
final String country;
City({this.name,this.country,this.population,this.image});
}
In this class, I am providing a basic skeleton class, which will provide model to be displayed in the tiles. Let's also add code in City class to provide list to Cities, though it's not good practice, however I am doing it here for the sake of simplicity.
static List<City> allCities()
{
  var lstOfCities = new List<City>();

  lstOfCities.add(new City(name:"Delhi",country: "India",population: "19 mill",image: "delhi.png"));
  lstOfCities.add(new City(name:"London",
                  country: "Britain",population: "8 mill",image: "london.png"));
  lstOfCities.add(new City(name:"Vancouver",
                  country: "Canada",population: "2.4 mill",image: "vancouver.png"));
  lstOfCities.add(new City(name:"New York",
                  country: "USA",population: "8.1 mill",image: "newyork.png"));
  lstOfCities.add(new City(name:"Paris",
                  country: "France",population: "2.2 mill",image: "paris.png"));
  lstOfCities.add(new City(name:"Berlin",
                  country: "Germany",population: "3.7 mill",image: "berlin.png"));
  return lstOfCities;
}
With this, our City class is complete, save all code in city.dart file. Now, add another folder inside lib folder by name pages, add our only page homepage.dart. Since we don't need to play with state here, we can simply build our class HomePage which extends StatelessWidget. Here is the initial code:
import 'package:flutter/material.dart';
import 'package:flutter4_listview/model/city.dart';
class HomePage extends StatelessWidget {
final List<City> _allCities = City.allCities();
HomePage() {}
@override
Widget build(BuildContext context) {
return new Scaffold(
appBar: new AppBar(
title: new Text(
"Cites around world",
style: new TextStyle(
fontSize: 18.0,
fontWeight: FontWeight.bold,
color: Colors.black87),
),
),
body: new Padding(
padding: EdgeInsets.fromLTRB(0.0, 10.0, 0.0, 0.0),
child: getHomePageBody(context)));
}
getHomePageBody(BuildContext context) {
return ListView.builder(
itemCount: _allCities.length,
itemBuilder: _getItemUI,
padding: EdgeInsets.all(0.0),
);
}
Widget _getItemUI(BuildContext context, int index) {
return new Text(_allCities[index].name);
}
}
Now in the above code, we are doing the following things:
- I included the class variable
_allCities which will have all data of cities, though above is not the right approach for providing data to variable; a better way would be by using dependency injection. - I have created a simple material app
scaffold, which provides basic skeleton to app, by providing basic AppBar and body to put widget inside it. - I have created the scaffold body using
ListView.builder method, as it provides better infra for creating unlimited list, as it dynamically callback for only those index which will become visible on screen, hence improving performance. - I built each tile using normal text widget, which shows only city name at moment, we will extend it further in this tutorial.
Last but not least for task#1, delete everything from main.dart file and paste the following code to make HomePage class as opening page of your application. There would not be any further changes in this file.
import 'package:flutter/material.dart';
import 'package:flutter4_listview/pages/homepage.dart';
void main() => runApp(new MyApp());
class MyApp extends StatelessWidget {
@override
Widget build(BuildContext context) {
return new MaterialApp(
title: 'Flutter Demo',
theme: new ThemeData(
primarySwatch: Colors.amber,
),
home: new HomePage(),
);
}
}
Now run the application in emulator and see the result
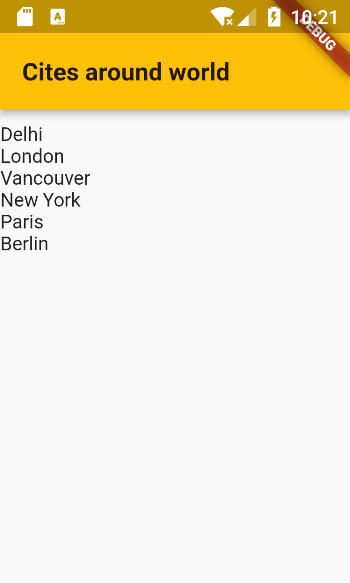
With this, I come to the end of task#1.
Task #2: In this task, I wish to display everything, i.e., all the properties exposed by City class object.
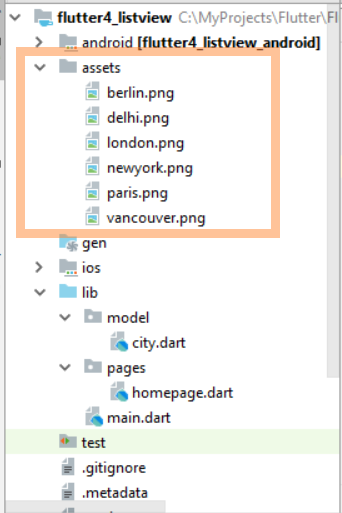
As you see in the above code, displaying the text properties is relatively easy, You can use Text widget and place whatever text you have, just put inside it constructor. However for displaying image, little configuration is required at pubspec.yaml (the main configuration file). For this demo, I have collected a famous landmark for different cities from Google image search. I saved them in assets folder at root location. My folder structure looks like this after adding images:
Now since all these images are statically included in the project, we need to include the same in pubspec.yaml like this:
assets:
  - assets/berlin.png
  - assets/delhi.png
  - assets/london.png
  - assets/newyork.png
  - assets/paris.png
  - assets/vancouver.png
Please remember the above code would come in flutter section, and you should be careful with the spacing, otherwise image might not load or there would be compilation error. The safest way to perform the above step is to use single tab key at assets: and double tab when including images prefix by dash (-).
To load Image in the page, we have to use Image.asset factory constructor with image's relative path. So basically, we will use Card widget to display image with other exposed properties, now modfied code for _getItemUi() looks like this:
Widget _getItemUI(BuildContext context, int index) {
return new Card(
child: new Column(
children: <Widget>[
new ListTile(
leading: new Image.asset(
"assets/" + _allCities[index].image,
fit: BoxFit.cover,
width: 100.0,
),
title: new Text(
_allCities[index].name,
style: new TextStyle(fontSize: 14.0, fontWeight: FontWeight.bold),
),
subtitle: new Column(
mainAxisAlignment: MainAxisAlignment.start,
crossAxisAlignment: CrossAxisAlignment.start,
children: <Widget>[
new Text(_allCities[index].country,
style: new TextStyle(
fontSize: 13.0, fontWeight: FontWeight.normal)),
new Text('Population: ${_allCities[index].population}',
style: new TextStyle(
fontSize: 11.0, fontWeight: FontWeight.normal)),
]),
onTap: () {
_showSnackBar(context, _allCities[index]);
},
)
],
));
}
Here, I am doing the following stuff in the above code:
- At Card leading location, I am displaying the image using
Image.asset, with fixed width of 100.0 - Card title would be city name
- For Card Subtitle, I am using column widget, which gives flexibility of putting widget in vertical alignment, I am putting Country first followed by its population
- Last but most important, I am showing snackbar
onTap on any card item. The code for snackbar is as follows:
_showSnackBar(BuildContext context, City item) {
  final SnackBar objSnackbar = new SnackBar(
    content: new Text("${item.name} is a city in ${item.country}"),
    backgroundColor: Colors.amber,
  );
  Scaffold.of(context).showSnackBar(objSnackbar);
}
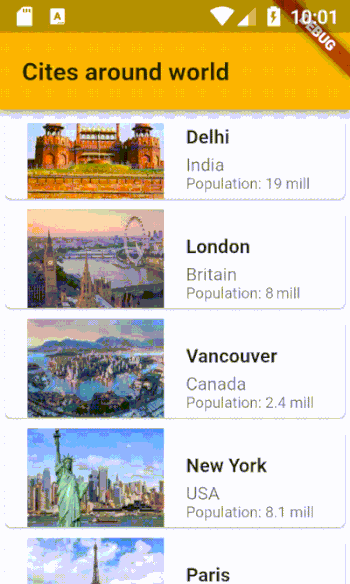
So finally, we are getting this:
End of tutorial!
Points of Interest
Please go through these articles. It might give you a headway, where the wind is actually flowing:
- Flutter — 5 reasons why you may love it
- What’s Revolutionary about Flutter
- Why Flutter Uses Dart
- https://material.io/design/components/cards.html
- Github: https://github.com/thatsalok/FlutterExample/tree/master/flutter4_listview
Flutter Tutorial
- Flutter Getting Started: Tutorial 1 Basics
- Flutter Getting Started: Tutorial 2 - StateFulWidget
- Flutter Getting Started: Tutorial 3 Navigation
Dart Tutorial
- DART2 Prima Plus - Tutorial 1
- DART2 Prima Plus - Tutorial 2 - LIST
- DART2 Prima Plus - Tutorial 3 - MAP
History
- 18-July-2018: First version


 General
  News
News  Suggestion
  Question
  Bug
Bug  Answer
  Joke
Joke  Praise
  Rant
Rant  Admin
Admin 


