Table of Contents
My previous article demonstrates how to build a WCF OData web service. This article demonstrates how to consume that service in a .NET client application.
Firstly, you should add the data services client nuget package.
PM> Install-Package Microsoft.Data.Services.Client
With Visual Studio 2017, Microsoft has removed support for OData service references, i.e., it will not be able to resolve the service metadata through the add service reference screen.
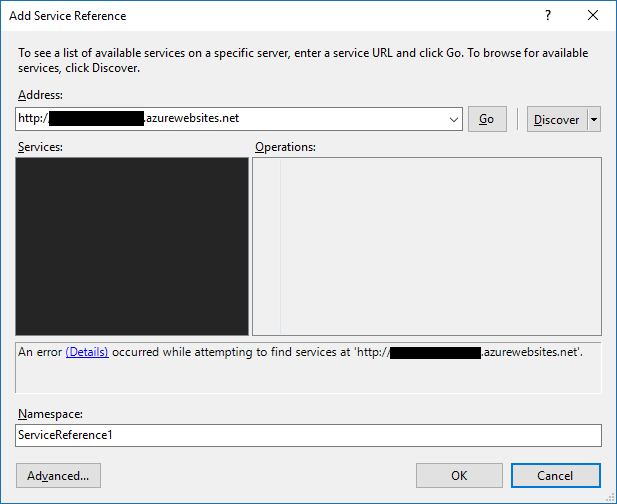
Visual Studio 2017 will also not be able to update any existing service references that you added in previous versions of Visual Studio, i.e., when you right click on your existing service reference for your WCF OData web service and click on update, you will get the following message.

So In order to add a service reference in visual 2017 you will need to go one of the following routes.
Firstly, you need to install the OData Connected Service extension from the Tools->Extensions and Updates menu.
Right click your project and choose to add a “Connected Service”.
Choose “OData Connected Service” from the list of choices. Note that this choice is added by the OData Connected Service extension.
Enter your service endpoint. This URL should be obvious from checking out my previous article on creating the web service. Also, you want to give your service a friendly name. Click Next.
If at this point you get a cannot access error then it's simply that the authentication in the web-service is blocking the extension from downloading the meta-data. You will unfortunately need to temporarily remove any authentication from the web-service.
Enter the file name for the class to be generated and click finish.
If you get an error message that says "Value cannot be null.\r\nParameter name: path1" then you need to download the Microsoft WCF ToolKit and install it. Then go to the registry and find the following key: [HKEY_LOCAL_MACHINE\SOFTWARE\WOW6432Node\Microsoft\Microsoft WCF Data Services]. Create a duplicate of "VS 2010 Tooling" or “VS 2012 Tooling” (if this doesn't exist, use "5.6" instead) named "VS 2014 Tooling". Then try again.
More information on the extension and about these errors can be found here.
When the extension completes, it will create a package under the connected services node. Right clicking the package reveals the option “Update OData Connected Service” which you will need to do if you make changes to the entities that the data service is serving.
The other option for generating the service reference is to use the data service utility command line program.
From an elevated command line, navigate to “C:\Windows\Microsoft.NET\{OSArchitecture}\{Framework Version}” where {OSArchitecture} is dependent on your OS/CPU architecture and {Framework Version} is the version of .NET.
e.g. C:\Windows\Microsoft.NET\Framework64\v4.0.30319
Then run the following to create the MyDataService.cs with all of the OData bindings. You will need to add this resulting code file to your client application. The {URI} should be replaced with the service endpoint.
datasvcutil /language:Csharp /out:C:\temp\MyDataService.cs /uri:{URI}
You could potentially build the command line into a post build command in your Visual Studio solution. However, unfortunately, similar to the connected service extension, the datasvsutil.exe cannot download from an authenticated endpoint.
Add the WCF Data Services Client via nugget (it might be the case that this is added automatically by the connected service extension.)
PM> Install-Package Microsoft.Data.Services.Client. </font>
You can initialize a context object for queries and crud operations via the following. The ModelName and EntityCollectionName will be different depending on what you called things in the data service. If you’ve followed my article on creating the web service, it should be easy to discover what these need to be. The service endpoint is the same URL that you used with the connected service extension or the datsvcutil.exe.
var context = new {ModelName}.{EntityCollectionName}(new Uri("{serviceendpoint}");
context.Credentials = new NetworkCredential("username", "password");
In your Azure portal search for app registrations:
Click the add button and enter details for your client application. The application type should be native. The redirect URI can be anything for the moment but you will change it shortly.
Once the app is registered, you will be able to see the application id that Azure has assigned. Make a note of this GUID as you will need to input it in various places. The RedirectURI can be anything for the moment but you will change it in the next step.
To change the redirectURI, click on Settings and then Redirect URIs. Update the URI as per the example below, replacing the {Application ID} part with your application ID GUID (which is obviously blacked out in my screenshot) e.g., msal14bc971b-0afd-4de5-9006-b2db00d2c0a2://auth.
Next below RedirectURIs, click required permissions and finally click on the Add button.
For API selection, search for the name of your data service application which should also be registered in the Azure portal on the same tenant. See my article on creating a WCF data service for more details..
With the API selected, select the permission to allow access / user_impersonation.
Add the Microsoft.Identity.Client nuget package.
PM> Install-Package Microsoft.Identity.Client
Here is the code for using the msal client to authenticate and to include the access token in the dataservice header to be used with your data-service.
- Replace {Application ID of native client} with your native client application ID GUID, e.g.,
14bc971b-0afd-4de5-9006-b2db00d2c0a2. - Replace {tenant name} with the name of the tenant where you registered your application, e.g.,
mytenant.onmicrosoft.com. - Replace {Dataservice App ID URI} with the app ID uri/Sign On URL of the
dataservice application, this can be found in the properties of the dataservice app registration (see my article on creating a WCF data service) e.g., https://mydataservice.azurewebsites.net.
string clientId = "{Application ID of native Client}";
string[] applicationScopes = new string[] { "{DataService App ID URI}/user_impersonation" };
string authority = "https://login.microsoftonline.com/{tenant name}/";
string redirectUri = "msal{Application ID of native Client}://auth"</span>
Var msaClient = new PublicClientApplication(clientId,Authority)
{
RedirectUri = redirectUri
};
Var authResponse= await msaClient.AcquireTokenSilentAsync
(applicationScopes, msaClient.Users.FirstOrDefault()) ??
await msaClient.AcquireTokenAsync(applicationScopes,null);
context.SendingRequest2 += (s, e) =>
{
e.RequestMessage.SetHeader
("Authorization", authResponse.CreateAuthorizationHeader());
};
To make things work correctly in iOS and Android and to return to your application once the token is acquired, you must modify the native projects to understand the redirectUri scheme.
For Android, you need to edit Android_Project/Properties/AndroidManifest.xml.
Add the following BrowserTabActivity to the application tag, replacing {Application ID of native client} with the correct GUID, e.g., msal14bc971b-0afd-4de5-9006-b2db00d2c0a.
="1.0"="utf-8"
<manifest xmlns:android="http://schemas.android.com/apk/res/android"....>
<application ....>
<activity android:name="microsoft.identity.client.BrowserTabActivity">
<intent-filter>
<action android:name="android.intent.action.VIEW" />
<category android:name="android.intent.category.DEFAULT" />
<category android:name="android.intent.category.BROWSABLE" />
<data android:scheme="msal{Application ID of native client}" android:host="auth" />
</intent-filter>
</activity>
...
</application>
</manifest>
For iOS, you need to edit the info.plist file:
Right click on the info.plist, choose "open with" and then select the "iOS Manifest Editor".
In the advanced tab, click on "Add URL Type" and add an entry similar to below, replacing the {Application ID of Native Client} with the correct GUID, e.g., msal14bc971b-0afd-4de5-9006-b2db00d2c0a.
The following examples are taken from here.
Add
NorthwindEntities context = new NorthwindEntities(svcUri);
Product newProduct =
Product.CreateProduct(0, "White Tea - loose", false);
newProduct.QuantityPerUnit = "120gm bags";
newProduct.ReorderLevel = 5;
newProduct.UnitPrice = 5.2M;
try
{
context.AddToProducts(newProduct);
DataServiceResponse response = context.SaveChanges();
foreach (ChangeOperationResponse change in response)
{
EntityDescriptor descriptor = change.Descriptor as EntityDescriptor;
if (descriptor != null)
{
Product addedProduct = descriptor.Entity as Product;
if (addedProduct != null)
{
Console.WriteLine("New product added with ID {0}.",
addedProduct.ProductID);
}
}
}
}catch (DataServiceRequestException ex)
{
throw new ApplicationException(
"An error occurred when saving changes.", ex);
}
Update
string customerId = "ALFKI";
NorthwindEntities context = new NorthwindEntities(svcUri);
where customer.CustomerID == customerId
select customer).Single();
customerToChange.CompanyName = "Alfreds Futterkiste";
customerToChange.ContactName = "Maria Anders";
customerToChange.ContactTitle = "Sales Representative";
try
{
context.UpdateObject(customerToChange);
context.SaveChanges();
}catch (DataServiceRequestException ex)
{
throw new ApplicationException(
"An error occurred when saving changes.", ex);
}
Delete
NorthwindEntities context = new NorthwindEntities(svcUri);
try
{
var deletedProduct = (from product in context.Products
where product.ProductID == productID
select product).Single();
context.DeleteObject(deletedProduct);
context.SaveChanges();
}
{
throw new ApplicationException(
"An error occurred when saving changes.", ex);
}
History
This member has not yet provided a Biography. Assume it's interesting and varied, and probably something to do with programming.


 General
  News
News  Suggestion
  Question
  Bug
Bug  Answer
  Joke
Joke  Praise
  Rant
Rant  Admin
Admin 


