In this article, I will show you how to create the Docker images using a Node.js web application that are not dependent on a platform or environment, and can be deployed to other platforms like OpenShift, using examples on Azure platform.
Introduction
Docker had been a topic that I wanted to cover since ages, but I never had something too simple and real-world on my head that I could use to explain the concept of Docker images and how to build your first Docker image. I have been working around in the Docker environment since a while and I personally think, the simpler your application be, the better it would be to create an image out of it. For the similar purpose, I chose Node.js environment to create and run the applications in. Docker, moreover, provides some extra abstraction over the underlying infrastructure, app environment, networking, storage and much more. Thus, it would be easier for us to understand how Docker works, and how Node.js works—without needing to learn how they match up or how they integrate.
That is where, Node.js jumps in, the framework itself is pure beauty. I always hated JavaScript; still do, but the fact does not cloud my judgement when it comes to deciding whether Node.js is a good framework or not. Cutting short on the stories, let's now go ahead and take a look at how to create an image, running a Node.js server and how we can serve that in Docker containers, and much more.
Also, a bit of Node.js and Docker introduction is highly appreciated as I might just take sharp turns on the learning curve, so it would be amazing if you have some understanding of what Node.js runtime is, how to develop on top of that, and how to develop containers and images.
Developing Node.js App
I am not going to build a server from ground-up, and that is why I expect that you know the basics of what Node.js is all about. In this section, I am going to talk about how to develop the Node.js server, while keeping the best practices for Dockerization in mind. Docker is a concept—apart from being a company, and a service for containerizing the applications—and dockerization requires a huge change in the way we develop our applications, and the way we imagine the process of development. But we can leave that part to some other time. For the time being, we can get our heads around the basic concepts of environment variables, and see how we can manage the runtime configurations for our application. Remember that this is one of the most important parts in the deployment of a Node.js runtime, and in our own case, we will be utilizing this in order to package and deploy the application on different platforms from a single build artifact. Once again, we are going to follow along with the repository; https://github.com/afzaal-ahmad-zeeshan/nodejs-dockerized, and check out how that was built.
Visual Studio Code as an IDE
I used Visual Studio Code as the IDE for this project, you can use any other text editor, but I would recommend that you consider using this. There are several benefits for this, apart from light-weight and cross-platform. In Visual Studio Code, basic syntax highlighting, language support is provided built-in to the editor, and you can always extend the functionality using the extensions in the IDE.
Anyways, you can use any text editor of choice and have the Node.js tools installed, such as the NPM. We are going to use the NPM to create and manage the project we are going to start, and then write the code to create our simple packagable image in the Docker environment. To create a new project, open up the terminal in a directory and execute the following command:
$ npm init
What this command does is that it will ask you about the package name (NPM is a Node.js Package Manager), and then version, license, entry point, and a few more elements such as the description of the package and the repository where it would reside; GitHub for instance. You can enter all the fields and then lastly, check out what it says, everything will go in a very basic package.json file that contains everything from basic settings, to friendly configurations for your package and for the packages that depend on that package.
After my inputs to the command-prompts, the package.json with the following content was added:
{
  "name": "express-nodejs",
  "version": "1.1.0",
  "description": "Sample Express based Node.js app for containerization samples and demos. ",
  "main": "./src/app.js",
  "scripts": {
    "test": "echo \"Error: no test specified\" && exit 1",
    "start": "node ./src/app.js"
  },
  "keywords": [
    "express",
    "nodejs",
    "afzaalahmadzeeshan",
    "docker",
    "image"
  ],
  "author": "Afzaal Ahmad Zeeshan",
  "license": "MIT"
}
This package.json file tells, that the package has an entry point (./src/app.js), and the scripts to run the program, some basic keywords to help in the searching of the package and lastly, the author and license this package is published under.
This is not the most important part, as this part will merely help the NPM and basic Node.js runtime to know about the package and what dependencies to resolve before running, however the most important part of our Dockerized Node.js app is the app.js file, so far that has nothing (and frankly, that is not created either). Now, this is the part where I need you to have some basic understanding of the Node.js runtime, and how a basic Node.js application is developed.
Adding Node.js Dependencies
Now the thing about a Node.js app is that it has its own built-in HTTP handlers, and the server components are written on top of those HTTP handlers. We are going to use Express server for Node.js runtime, and apart from that we are going to build the front-end with the Pug templating framework. The reason to choose these two is that these are the most widely used server and templating implementations for Node.js. Besides, we also want to log our container's usage so for that, we will be adding the Azure's Application Insights SDK and using that to monitor how our app is being used by the people.
There are two ways to install the dependencies, one of them is by using the NPM command line interface, by which you can easily install the package by issuing the following command in the terminal under the directory where your app resides,
$ npm install package-name
This will also update the dependencies element in the package.json file. This can be helpful in most cases, otherwise, you can update the dependencies element inside the package.json file and have it include the packages that you want to download and setup for the application. So, in this way, you can have the dependencies added to the package.json.
"dependencies": {
    "express": "^4.16.3",
    "pug": "^2.0.3",
    "applicationinsights": "^1.0.2"
}
This element can be attached anywhere in the package.json object, once done, just execute the following command:
$ npm update
This will download and install the packages for you. Till now, it was all just basic hello Node.js app, and the focus of this article was not to guide you in writing a good Hello Node.js app, rather how to write the containerized Node.js apps. That is why, we now go ahead and discuss the basic configurations needed to develop the containers.
Building Containerized Node.js Server
You can go to any Node.js hello world sample, and you will find that the most basic of the Node.js app would be using an Express server and a basic call to the listen function! The call goes something like this:
let Express = require("express");
let app = new Express();
app.all("*", (req, res) => {
res.send("Hello there!");
});
let port = 1234;
app.listen(port, () => {
console.log("Server is now listening on localhost:" + port);
});
This is the most basic of a Node.js app, and a completely functional web application that can handle a request, and provide a response—the same response everytime, but we can handle that as well. Now try to visualize this, a Docker application is a portable program that runs once deployed on the runtime as needed. This program is mostly going to kill that, for several reasons:
- Server is hardwired to listen on 1234! Can be changed, see below.
- Server does not check environment constraints, it starts as it has to.
- Server's naming and ports would be followed in the Dockerfile.
Dockerfile and app must move in a transition, somethings should be taken care of from app and some must be left for Docker to manage and handle, networking, storage, etc. is to be left for Docker. That is not to be followed here. So in the next sections, instead of building a Node.js app, I will show the best practices to break your Node.js app down into chunks and build a portable and flexible container image out of it!
Initial Dockerfile
Let us start with the Dockerfile creation and then we will move ahead and check how we can improve the app overall. The most basic of our Dockerfile would look like this, remember to place this file in the root of the Node.js app, where the package.json exists.
FROM node:9
EXPOSE 1234
COPY . .
RUN [ "npm", "update" ]
CMD [ "npm", "start" ]
This tells Docker to take five steps in building the image. Let's talk about the lines in detail:
FROM directive tells the Docker runtime to use this specific image as the backbone for current image. In this command, node with the tag 9 is the parent image and our image depends on that runtime. In other simple words, our image will have Node.js version 9 installed and ready to be used, that is the guarantee of Docker!EXPOSE command allows networking on a specific port, or a range of ports (1234-1240 etc.). I am only allowing the port that we are interested in, the 1234 port.COPY command would—you guessed it!—copy the content from source to destination. In my case, I am using a period sign in both cases, which means, that from this directory (on the host file system), to the current directory (in the Docker container file system).RUN command runs a command during the building process of the Docker image. Think of it, like resolving the dependecies, unzipping content, downloading some config files, etc. You can use this command to execute a specific command inside the container and have it ready for further steps, such as execution of the app. The structure is to pass the main executable name as the first parameter, and extra parameters as a sequence of strings. For a basic .NET Core application, we might have to do:
RUN [ "dotnet", "MyApp.dll" ]CMD is the command that tells Docker to execute this command, when you have to run the image as a container. There is another command, ENTRYPOINT that does more-or-less the same job, you can read about the different here on Stack Overflow.
That pretty much sums up, what we did here. So far we have a server, that will listen on port 1234, and everything is all setup. Let's go ahead and create a new Web App for Containers on Microsoft Azure and try it over there.
Web App for Containers on Azure
Web App for Containers is a specific platform (as a service) offered by Microsoft Azure, that lets you run your containers in less than minutes from the image that you provide it with! Some characteristics of the Web App for Containers is, that:
- It supports Linux containers only, support for Windows containers is not provided so far; check this link for more information.
- It handles load-balancing auto-scaling all by itself.
- Serverless environment for your containers!
- Can follow CI/CD from Docker Hub (you can use the Webhooks from Docker to automatically upgrade the images in the containers)
More advanced features on this platform are that you can integrate Azure AD for authentication (just the way you can do that with App Service), you can also setup custom domains on the containers. I think that is enough as an introduction to the Web App for Containers platform. Now let's go ahead and create one ourselves.
Visit Azure Portal, and search for "web app for containers", choose the offering by Microsoft and create a new instance.
I am going to use this Docker image to run the container from https://hub.docker.com/r/afzaalahmadzeeshan/express-nodejs/, you can always download and try it out yourself. If you do not have an Azure account, sign up for a Free Trial, otherwise, you can run Docker locally and try the image locally as well.
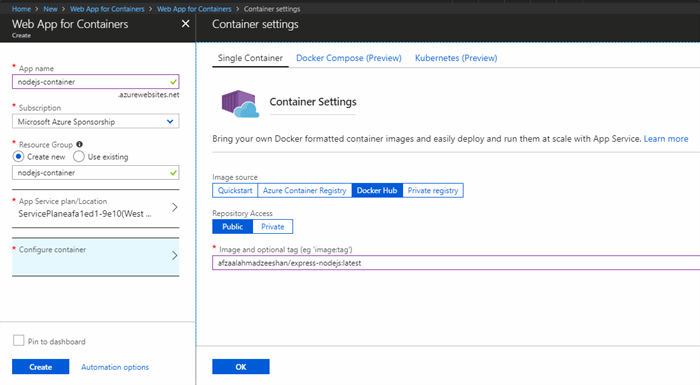
Figure 1: Creating the Web App for Containers on Azure Portal with the Docker image.
As you can see, Docker Compose and Kubernetes clusters deployment is also in preview so far, you can check back for these services, or check out this post and learn how to deploy a multicontainer app. The container we deployed runs pretty fine.

Figure 2: Node.js app running in a containerized environment on Azure App Service.
Now if we run the app, you will see that Azure automatically configures the ports and networking for us. There are some common problems.
- What to do if we want to shift the platform from Azure to something else, like AWS, or Heroku, or any other platform?
- What if the platform no longer supports 1234 port, or platform demands that you must have a port 80 enabled?
- What if the platform asks that you use an environment variable and always listen to the port to be used by a variable?
The third point is what Redhat's OpenShift requires, otherwise it won't accept the image and run it as a container. Azure is intelligent cloud and knows what to do, other platform just might now know that.
Figure 3: OpenShift configuration for the service pods and routes shown.
You can study the Routes configuration and study how to manage the basic routing for the containers. In most of the cases, the best practices in developing apps for Docker containerization, is, to remove the hardwiring and dependencies on the platforms and instead using environment variables to configure how your app starts.
Decreasing Hardwiring of Containers
Now the hard work begins, we now need to think out of the box and we need to redesign the application to be able to deploy it anywhere we want to. The first thing to do is that we now need to redesign the app to be able to handle and listen on the ports that environment requires it to. The benefit of using Docker is that we can route any external traffic to the container, and container will not bother to check what the route is being followed by external connectors and users. That is something that ordinary processes cannot have, and perhaps a load balancer is required to follow up with these.
Let us now start with the app.js file itself, the thing we need to remove from this is the hardcoding of the port. We can do the following:
let port = process.env.PORT || 1234;
But this now binds our process to consider a PORT variable in the environment, and if null, then move to 1234 port again. Leaving us in circles with the problem we were trying to resolve. So, that is why, we now need to reimagine a few concepts here and use the modular approach. We need a module that takes care of this for us, and we can extend more functionality in it, making it more flexible to be controlled. Same goes with other elements, such as connection strings for the logging services—check App Insights section below.
The idea that I came up with was to have a separate module, or an import, that defines the ports that my server would be listening on. And a few other configurations along with it, The structure for that content was something like this:
let port = process.env.PORT || process.env.PORT_AZURE || process.env.PORT_AWS || 5000;
if(process.env.OPENSHIFT_NODEJS_PORT) {
port = process.env.OPENSHIFT_NODEJS_PORT;
}
if(process.env.OVERRIDE_PORT) {
port = process.env.CUSTOM_PORT;
}
if(process.env.VARIABLE_PORT) {
port = process.env[process.env.VARIABLE_PORT_NAME];
}
module.exports = {
serverPort: port,
applicationInsightsInstrumentationKey: process.env.appInsightsKey
};
Now as you can see, the module now contains an object that holds the serverPort and the applicationInsightsInstrumentationKey. The thing to consider here is, that these are now totally configurable, and nothing is tied anywhere. These values will come from the environment and will control where the data flows, and where the traffic comes from. In the above form, we can now create some environment variables, and control how our app listens. We can pass variables in all different modes,
- We can pass the value using
PORT, PORT_AZURE, PORT_AWS, or it will target the 80. - We can also check if OpenShift node ports are enabled, and then listen to them—I think I have missed the OpenShift IP mapping here, but that can be done in next iteration, so far you get the idea.
- We can also override the port, and set a very custom port. This can be handy if a platform asks you to use a specific port.
- Lastly, you can also configure to use a variable name for the port itself, I could not imagine of a platform but if there is a chance where you are required to get the port by a specific name—for example, OpenShift uses
OPENSHIFT_NODEJS_PORT, to capture the port.
In a normal case, we would have to edit the app, change the port's environment variable and then repackage and deploy. That will also mean we would need a separate image to not cause our other platforms to crash due to name mismatches. In these cases, passing a name of the environment variable and then checking to see if a key is available would help us in this case. Thus providing a lot of flexibility to write the app, and letting Docker environment control how our application listens to the requests, on which ports. So with this, our app.js would now change to the following,
let serverConfigurations = require("./serverconfig");
app.listen(serverConfigurations.serverPort, () => {
    let serverStatus = `Server listening on localhost:
                        ${serverConfigurations.serverPort}.`;
    console.log(serverStatus);
});
As you see, now we are no longer trying to capture the ports in the app.js, rather providing it with the values all by ourselves, via the environment variables. Now our server can listen to any port. Azure logs the following messages on the portal for us to understand what happens:
2018_06_28_RD0003FF4BD7B3_docker.log:
db7d242cd7f4: Pull complete
Digest: sha256:17fb0bd0e2aac1161341049cfd56201f24f17a7d724917ccb965aa37dee6156a
Status: Downloaded newer image for afzaalahmadzeeshan/express-nodejs:latest

2018-06-28 12:59:01.404 INFO  - Starting container for site
2018-06-28 12:59:01.406 INFO  - docker run -d -p 51254:80
    --name nodejs-container_0 -e WEBSITES_ENABLE_APP_SERVICE_STORAGE=false
    -e WEBSITE_SITE_NAME=nodejs-container -e WEBSITE_AUTH_ENABLED=False
    -e PORT=80 -e WEBSITE_ROLE_INSTANCE_ID=0
    -e WEBSITE_INSTANCE_ID=580f93078686e0f2f3ba43ac3ad7d74b00459611341f6979290f
       ec8ac61c929f afzaalahmadzeeshan/express-nodejs:latest

2018-06-28 12:59:01.410 INFO  - Logging is not enabled for this container.
Please use https://aka.ms/linux-diagnostics to enable logging to see container logs here.
2018-06-28 12:59:13.169 INFO  - Container nodejs-container_0 for site
                                nodejs-container initialized successfully.
If you study the logs closely, you can see that Azure causes our code to short circuit and stop at the process.env.PORT because there is a variable set, ($ docker ... -e PORT=80 ...), that means our app will start to listen on this port, and then Azure targets the traffic using the load balancer and forwards the 51254 port traffic to port 80 of container. Makes sense? :-)
Removing EXPOSE from Dockerfile
Now there is a problem with our Docker container. Not every platform is Azure, thus leaving us in circles with the ports and networking configurations. That is why, we need to remove the explicit port exposition, and control that from the command-line. In a typical scenario, you have
- Option to not expose anything and not listen to any traffic. App will be accessible from within the container.
- Option to expose the port, and not grant access to the app from external networks.
- Option to expose the port and also publish the container on a host-to-container port mapping.
First of the options will not be useful at all, unless you are going to pass a volume and have the app do something internally. Second one might be useful, think of an architecture, where a load balancer is also deployed, and last one is the one we are interested in. But rather hardcoding this, we can use the --expose parameter to the command and expose a dynamic port for the container. An example of doing so it:
$ docker run -d --name mynodeapp --expose=1234 afzaalahmadzeeshan/express-nodejs:latest
This one can do that trick for us, we can now remove the hardcoded EXPOSE command—correct me if wrong—, and I believe this terminal command will override the EXPOSE directive provided in the Dockerfile as well. But again, it is actually -p or --publish, that does the actual mapping of host and the container; read this thread to learn a bit more on this.
Exposing App Insights Key via Environment Variables
Nuff said! Now, let us take an actual example of how this works, and how we can pass the values to a certain section of the app via environment variables. I am going to use the Azure's App Service and configure the settings from there to expose some values inside the environment. This time, we will have our own setting added, the setting I want to add will have the key, appInsightsKey, because that is where our app will try to look for the environment variable's value. Let's go and configure that, I created an extra resource in the Azure of type Application Insights, and I will fetch the Instrumentation Key, which is available under the Properties tab, or you can capture that inside the Overview blade as well.
Figure 4: Application Insights Overview blade on Azure Portal.
Capture the key, and then use the App Settings blade in the App Service and input that value there, this will create a new variable in the environment for the runtime, and will allow your app to capture the value from environment, rather hardcoded or provided inside the Dockerfile.
Figure 5: Application Settings page on Azure App Service in Azure Portal.
Once done, please restart the app so that environment variables can be fed into the app as it starts. Now that we know our app will have the variable set, we use the following code inside the insights to check how the app is listening to the variable and configuring the pipeline to push the loggings to the App Insights.
const appInsights = require("applicationinsights");
const serverConfig = require("../serverconfig");

let enabled = true;
try {
    appInsights.setup(serverConfig.applicationInsightsInstrumentationKey)
        .setAutoDependencyCorrelation(true)
        .setAutoCollectRequests(true)
        .setAutoCollectPerformance(true)
        .setAutoCollectExceptions(true)
        .setAutoCollectDependencies(true)
        .setAutoCollectConsole(true)
        .setUseDiskRetryCaching(true)
        .start();
} catch (error) {
    console.log("Cannot start Application Insights; either pass the value to this app,
                 or use the App Insights default environment variable.");
    enabled = false;
}

module.exports = {
    ready: enabled,
    logRequest: function(req) {
        let message = `Request was captured for path: ${req.originalUrl}.`;
        console.log(message);
        if(this.ready) {
            appInsights.defaultClient.trackRequest({ name: "normalPage", properties:
                { type: "page", value: req.originalUrl, dateTime: new Date() }});
        }
    },
    logEvent: function(name, data) {
        if(this.ready) {
            appInsights.defaultClient.trackEvent
            ({ name: name, properties: { data: data }});
        }
    },
    logApiCall: function(apiRoute) {
        if(this.ready) {
            appInsights.defaultClient.trackRequest({ name: "apiCall", properties:
            { type: "api", value: apiRoute, dateTime: new Date() }});
        }
    }
}
This was the most basic implementation of the logging, what it does is that it prints information on the console, and if AppInsights are enabled then it also logs the requests there. Now if we again go back and hit our service on the Azure Portal, we can easily check that the logs are made available as soon as the traffic starts to hit.
Figure 6: Application Insights Metric Explorer showing the metrics for current app usage and server response time.
And the benefit of doing this way, was, that we now are able to change the AppInsights at the runtime. And even better is that we can test the service with different instrumentation key, in the App Settings as well. Azure supports Deployment Slots where we can test the app, this way we can remove the dependency of the application on a resource and provide the resources, paths and pipelines on the runtime.
Why Bother at All?
Dockers is a new way of building and publishing your application on the cloud platforms. Docker works on local environment as well, such as deployment of the clusters on-premises. The problem with Docker is, that you never know how your application is served to the customers. It can run,
- as an isolated process, that no one can access.
- as a single process, that listens to the traffic—again, traffic is managed internally by the host.
- as a single node in a service, running behind a load balancer.
There are many ways to deploy the app. The problem comes in, when you have to define different dependencies on different platforms, and environments. Straight-forward way of doing this is to deploy a separate image with different tags, and follow along. Like this:
1: afzaalahmadzeeshan/express-nodejs:azure
2: afzaalahmadzeeshan/express-nodejs:aws
3: afzaalahmadzeeshan/express-nodejs:gcp
4: afzaalahmadzeeshan/express-nodejs:production
5: afzaalahmadzeeshan/express-nodejs:testing
6: afzaalahmadzeeshan/express-nodejs:legacy
They work, and they are different images and you can run them all separately. But that means you now have to manage the apps and images separately. You would have different Dockerfiles, and different configurations to check, not to mention different testing you would have to put them through. A great way to do this is to use the concepts learnt via Inversion of Control, or the Dependency Injection. You inject the parameters, objects and more to the app and app continues to function as directed.
That was the primary target of this article, to explain some of the basic practices that I had to try out, on my journey to deploy the Node.js containerized app on Azure, AWS and OpenShift. I still have to try out Heroku platform and check how that works. But for the time being, this was it for the time.
I would encourage you to please try out the sample, and the image, and please share your feedback and problems so that I can improve. Oh, you are also welcome to submit improvements directly to my GitHub repository. :-)
Afzaal Ahmad Zeeshan is a computer programmer from Rabwah, Pakistan, currently living in The Netherlands, likes .NET Core and Node.js for regular everyday development. Afzaal Ahmad works at Adyen as a Developer Advocate.
He is an expert with Cloud, Mobile, and API development. Afzaal has experience with the Azure platform and likes to build cross-platform libraries/software with .NET Core. Afzaal is an Alibaba Cloud MVP, twice he has been awarded Microsoft MVP status for his community leadership in software development, four times CodeProject MVP status for technical writing and mentoring, and 4 times C# Corner MVP status in the same field.


 General
  News
News  Suggestion
  Question
  Bug
Bug  Answer
  Joke
Joke  Praise
  Rant
Rant  Admin
Admin 


