Introduction
A while back, I wrote an article for CodeProject in regards to how to open a modal dialog using Bootstrap in an Angular JS application. Here is a link to that article. As I explained in it, the motivation for that article is that I couldn't get ui-bootstrap to work at the time. After the completion of that article, I know the solution I have proposed is not the best solution, and I was determined to get ui-bootstrap integrated into my Angular JS application. And I knew if I studied a little deeper, the answer was going to be revealed. After some experiments, I figured it out. In this article, I will discuss how all these works.
First, I will explain how to properly add ui-bootstrap into an Angular JS application. This is strictly limited to Angular JS 1.6.x, and not to Angular version 2 to version 5. Next, I will show how to open a modal dialog via ui-bootstrap. Then I will explain the way data can be passed from the caller into the modal dialog. Lastly, I will show how to pass the results data back to the caller.
Overall Architecture
Attached to this article is a sample application. The page has a button that will trigger the modal dialog to open. Once the dialog opens, the input fields on the dialog will show the values passed into dialog from the caller. When the user clicks "Search" on the dialog, it will close, and pass a result (an object with some mock data) back to the caller. The caller would display the result in a table.
There are two controllers, one is for the main app; the other is for the dialog. I separated the controller and the markup of the dialog out by itself so that it can be reused. This is the major distinction between my tutorial and the tutorials you found in the first couple pages on google search results. Those search results didn't help me much with my design. So, it is nice to provide some alternative to existing solutions.
When the button on the main app page is clicked, the main app controller calls ui-bootstrap's $uibModal to popup the modal dialog. This is where the input data can be passed into the controller of the modal dialog. When user closes the modal dialog, one of the two operations can occur. One is called $close, the other is called $dismiss. In the case of $close, the operation done on the dialog is successful, and any result data can be returned. In the case of $dismiss, user probably cancelled the operation, and any result data from the modal dialog should not be returned. All these will be explained as part of the code walkthrough. First, let me show you how to add ui-bootstrap into an Angular JS application.
Adding ui-bootstrap into Angular JS Application
To integrate ui-bootstrap into an Angular JS application, two JavaScript files are needed:
- ui-bootstrap-2.5.0.min.js
- ui-bootstrap-tpls-2.5.0.min.js
I get these two files from the github repository listed by ui-bootstrap official site: https://github.com/angular-ui/bootstrap/tree/gh-pages. I picked the latest version. At the time of writing this, the latest version is 2.5.0. In my "index.html," you can see the following, which incorporates these two files into the Angular JS application:
<script type="text/javascript" src="./assets/ui-bootstrap/js/ui-bootstrap-2.5.0.min.js"></script>
<script type="text/javascript" src="./assets/ui-bootstrap/js/ui-bootstrap-tpls-2.5.0.min.js"></script>
These two files should be placed in the index.html file of your Angular JS application. Then in the controller where the modal dialog is used, a.k.a., the caller controller, you need to inject the angular module ui.bootstrap. Here is an example:
var appModule = angular.module("appModule", [ "ui.bootstrap", "dlgModule" ]);
This is located in the "app.js" file of the sample application. It defines a module called appModule. And it depends on two modules. One is the ui.bootstrap module. The other is a module called dlgModule (which is not important at this time, it will be soon). Let me summarize, the first step is adding the ui.bootstrap JavaScript files to the index.html page or any html page that would eventually be displayed and having these two JavaScript files loaded. The next step is to add the ui.bootstrap as a injected module into the controller that would use the modal dialog.
The Index Page
The index page would be the entry point of an Angular JS application. For this sample application, it has a title, a button called "Open Dialog", and a hidden table that would only be displayed when the dialog closes with result data available. The source code for the page looks like this:
<div class="row" style="margin-top: 65px; margin-bottom: 30px;">
   <div class="col-xs-12 col-sm-offset-1 col-sm-10 col-md-offset-2 col-md-8"
    ng-app="appModule" ng-controller="appController">
      <div class="page-header">
         <h1>Search People</h1>
      </div>
      <button class="btn btn-default" ng-click="openDialog()">Open Dialog</button>
      <div class="row" ng-if="result != null">
         <div class="col-xs-12">
            <table class="table">
               <thead>
                  <tr>
                     <th>Name</th>
                     <th>Age</th>
                     <th>Profession</th>
                     <th>Years of Experience</th>
                  </tr>
               </thead>
               <tbody>
                  <tr>
                     <td>{{result.name}}</td>
                     <td>{{result.age}}</td>
                     <td>{{result.profession}}</td>
                     <td>{{result.yearsOfExp}}</td>
                  </tr>
               </tbody>
            </table>
         </div>
      </div>
   </div>
</div>
The definition of the button can be found in the above HTML source code as:
<button class="btn btn-default" ng-click="openDialog()">Open Dialog</button>
Let's take a look at the Angular controller of the main app.
The App Controller
The Angular controller for the main app has just one method, used to handle the button click for "Open Dialog". Then there is also a callback for handling the return result when the dialog closes. Here is the code:
(function () {
   "use strict";
   var appModule = angular.module("appModule", [ "ui.bootstrap", "dlgModule" ]);
   appModule.controller("appController", [ "$scope", "$uibModal", function ($scope, $uibModal) {

      $scope.result = null;

      $scope.openDialog = function () {
         var modalInstance = $uibModal.open({
            templateUrl: "assets/app/templates/modalDialog.html",
            controller: "dialogController",
            size: "sm",
            resolve: {
               params: function () {
                  return {
                     name: "John",
                     age: 32
                  };
               }
            }
         });

         modalInstance.result.then(function (result) {
               $scope.result = result;
            }, function () {
               console.log("Dialog dismissed");
            });
      };

   }]);
})();
There are a couple things worthy of mentioning. The first is JavaScript closure, and the other is IIFE (immediate invocation of function expression). The outer most anonymous function definition creates a closure, a scope that encloses all the functions and variables. And once it is defined, it would be immediately invoked. This is a very short explanation of these two concepts. And they are pretty important (would always be asked during a job interview), so please look them up when you get a chance. Here is the code on closure and IIFE:
(function () {
...
})();
The definition of the application module and controller is as follows:
"use strict";
var appModule = angular.module("appModule", [ "ui.bootstrap", "dlgModule" ]);
appModule.controller("appController", [ "$scope", "$uibModal", function ($scope, $uibModal) {
...
}]);
In the top three lines, the middle line defines the angular module, and add injection of ui.bootstrap module. It also injects my custom module dlgModule. The last line defines appController. Note that there is an array of string and function that was passed in, that defines the dependencies injected into this controller. appController needs $uibModal for opening the modal dialog, and creating the modal instance that can later be used for receiving the results.
Opening the modal dialog is done by the following code:
$scope.openDialog = function () {
   var modalInstance = $uibModal.open({
      templateUrl: "assets/app/templates/modalDialog.html",
      controller: "dialogController",
      size: "sm",
      resolve: {
         params: function () {
            return {
               name: "John",
               age: 32
            };
         }
      }

      ....
   });
The code segment $scope.openDialog is set to a function, which is used by ng-click on the button in index.html. Inside the method, there is an invocation of $uibModal.open(...). This is where ui.bootstrap is doing its work. The method open() will pop up a Bootstrap modal dialog. It is also the place where dialog can be initialized, and input data to be passed in.
You should notice the following:
$uibModal.open(...) takes in an object.- The first property of the object is
templateUrl. This property points to a file where the template of the Bootstrap modal dialog is, which I will list the full code in the next section. - The second property is called
controller, and its value is "dialogController". Where is this controller? It is defined in the module "dlgModule", which is injected when appModule is defined. - The third one is called
size, its value can be "sm", "md", and "lg". - The last one is called
resolve, which takes in an object. This is where the input data is passed in. In this object, there is one property called "params", which points to a method that would return the input data. When the modal dialog is initialized, it will call this function get the input data.
The second part of the method $scope.openDialog handles the data returned after dialog closes.
modalInstance.result.then(function (result) {
      $scope.result = result;
   }, function () {
      console.log("Dialog dismissed");
   });
modalInstance.result is a promise, as far as I can tell. A promise is a way to handle the callback of an async operation at a undetermined time. For this example, all you need to know is that it is used to pass down the results from the modal dialog to the caller. In the above code, the first method of the method then(), all I do is pass the result to the result of the scope, $scope.result. The second method then() will be invoked when the modal dialog is cancelled (or dismissed).
When a valid result return and assigned to the result variable of the app controller. On the html mark up, once $scope.result is available, the table would immediately display the result as a row.
The Dialog Html Markup
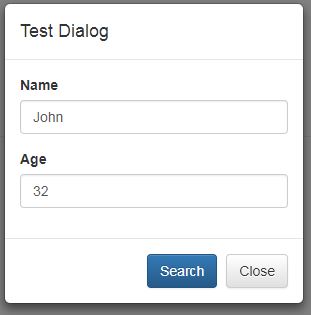
The mark up HTML for modal dialog is very simple. It is located in the file "assets/app/templates/modalDialog.html". And the content looks like this:
<div class="modal-header">
   <h4 class="modal-title">Test Dialog</h4>
</div>
<div class="modal-body">
   <form class="form">
      <div class="form-group">
         <label>Name</label>
         <input type="text" class="form-control" ng-model="name">
      </div>
      <div class="form-group">
         <label>Age</label>
         <input type="number" class="form-control" ng-model="age">
      </div>
   </form>
</div>
<div class="modal-footer">
   <button type="button" class="btn btn-primary" ng-click="ok()">Search</button>
   <button type="button" class="btn btn-default" ng-click="cancel()">Close</button>
</div>
This is not a full definition of a Bootstrap modal dialog. We don't need a full definition of the dialog because the outer most <div> will be provided by ui-bootstrap. This took me a while to figure out. If you use the full definition of a modal dialog, when running the sample application, you will see only a thin line on the screen.
Note that on this dialog, there are two input fields. One is called "Name" and "Age". Both are used to show the input data. There are also two buttons, one is used to pass the result back to the caller; the other would dismiss the dialog (for cancelling the dialog). Next, I will show you the controller for the dialog.
Controller for the Modal Dialog
The controller for the modal dialog is similar to controller for the application. Here is the code:
(function () {
   "use strict";
   var dlgModule = angular.module("dlgModule", []);
   dlgModule.controller("dialogController", function ($scope) {
      var params = $scope.$resolve.params;

      $scope.name = params.name;
      $scope.age = params.age;

      $scope.cancel = function () {
         $scope.$dismiss();
      };

      $scope.ok = function () {
         var retObj = {
            name: $scope.name,
            age: $scope.age,
            profession: "Car Mechanic",
            yearsOfExp: 3
         };
         $scope.$close(retObj);
      };
   });
})();
The definition of the module and controller is straight forward. The module is called "dlgModule". There are no depended modules injected into "dlgModule". The controller is called "dialogController". Where is this controller used? In $uibModule.opne(). You can find it in app.js.
What is important with the above controller definition are two things:
- The way to retrieve the input data
- The way to return the calculated data back to the caller
It turns out that both are quite easy to realize. As I have pointed out earlier, $uibModal.open() uses resolve to pass in the input data into the controller of the modal dialog, which is the dialogController. Once the program execution flow gets to dialogController, here is code that gets the input data:
var params = $scope.$resolve.params;
In the scope for the dialog, $resolve holds the input data. I passed in an object called "params" via $uibModal.open with resolve. It is why we have a params reference in $scope.$resolve. Once I got the reference to params, I assign them to scope variables "name" and "age". And they would be displayed in the input fields on the modal dialog. Here it is:
$scope.name = params.name;
$scope.age = params.age;
Assuming all goes well with the interaction between user and modal dialog, we get a result and return back to the caller. Here is how it is done:
var retObj = {
   name: $scope.name,
   age: $scope.age,
   profession: "Car Mechanic",
   yearsOfExp: 3
};
$scope.$close(retObj);
The first part of this is creating an object called retObj. Then I call $scope.$close(), which passes in the object retObj. This is how ui-bootstrap resolves the results (resolve and promise) and returns it back to the caller. Caller's callback via then() would be triggered and handles the returned result.
In case user cancels the operation with the modal dialog, we call $scope.$dismiss(), here is the code:
$scope.cancel = function () {
   $scope.$dismiss();
};
This is all. I have covered everything about the usage of ui-bootstrap's modal dialog. Time to discuss how to test.
Time to Test
This sample program cannot be tested by clicking on the index.html and open it in a browser window. So I test it in a Jetty Web Server. I wrote an article about this a while back. Here is the link. Here are the steps:
- Download the zip archive of the sample application to a temp folder.
- Unzip the zip archive.
- Find all the files that have extension .sj and change the extension to .js.
- Copy the folder "uibootstrap" that contains the "WEB-INF" subfolder, the "assets" subfolder, and "index.html" to webapps in Jetty web server.
- Start Jetty Web Server with command:
java -cp start.jar.
Once Jetty web server starts successfully, we can use the following URL to test the sample application:
http://localhost:8080/uibootstrap/
You will see the following screenshot if everything starts running successfully:

When you click on the button, it will pop up the modal dialog:
When you click on the button "Search", it will close the modal dialog, and the index page will display the hidden table:
Click on "F5" and refresh the index page, then click on "Open Dialog", the modal dialog I'll display again. This time, click on "Close" button on the modal dialog. The modal dialog will close, and no table would be displayed.
Points of Interest
A little persistence, effort, and patience finally paid off. I was able to learn how to integrate ui-bootstrap Angular component into my Angular JS application. The sample application has demonstrated how everything works. I like ui-bootstrap. And I will be busy integrating this into my personal project.
What I really hope is that this example will help people who were also stuck with the same problem, unable to get ui-bootstrap to work. The sample app and the instructions in this article should help with your development journey regarding Angular JS and ui-bootstrap. Good luck to you!
History
- 03/26/2018 - Initial draft
This member has not yet provided a Biography. Assume it's interesting and varied, and probably something to do with programming.


