Introduction
The Project in Less than 30 Words and in Three Pictures
This project is about a RFID based time clock (attendance recorder) solution based on Raspberry hardware and integrated to an instance of Dynamics AX 2009 ERP system.
The Good (The Hardware)
The Bad (The Software)

The Ugly (The Result)
Background
There was the demand to replace an existing (very basic) time clock solution for work time tracking at one of the sites in Asia.
The first idea was to buy something ready working, should not be such a hard task, there are thousands of products available. So there was no intention to have a make or buy decision. But like always, projects (especially IT projects) don’t follow the direct path. When it comes to define the requirements, it turned out it would be a good idea to have all data in the ERP, which is MS Dynamics AX 2009 at that site. One of the main reasons for that was that all the employees data is already within its database.
Shouldn’t be a problem either… Yes maybe, but there was no ready-to-go solution for that at a reasonable price. Actually, we were at a point where we ordered an existing solution but it turned out that it doesn’t seem to work like the supplier assured us. So back to the make or buy decision and check the options.
It turned out that if using a Raspberry hardware based system would give us all that we need for the terminal and we can do the system integration at the ERP by ourselves.
So we did some prototyping and it looked so good, we decided to give the project a go.
The Requirements
These were the requirements defined for this project:
- a terminal based solution where user could scan an unique RFID-Tag for identification within the sign in or sign out process
- all sign in / sign out data records should be stored in the ERP
- a report that shows all currently available persons at the site
- a report which could have a definable date range that shows an overview which employee worked for how many hours within the date range including a grand total
These requirements were defined while the project was in the implementation phase:
- The touch display has to be 7 inch, everything else is too tiny.
- The hardware should be based on Raspberry using Raspbian.
- To track the time correctly, the employee needs to have the possibility to sign out for break or a business trip.
- Signing in/out has to be possible even if the network is down or the ERP is unavailable.
- The solution should be portable to other ERP systems.
- The user should have feedback in the form of a beep when he/she signs in/out.
- Wrong sign in/out postings or forgotten postings need to be corrected in the ERP.
- In the ERP, all manual added postings should have a marker, so they could be identified.
- It should not be possible to delete postings in the ERP.
- All time processing will be done on a minute basis.
- The system should have a service menu function which gives a privileged user the possibility to restart or shutdown the system. The menu should be opened by using a special RFID-Tag or by entering a numeric code.
- Every posting record should be fetched by the server separately to make sure that we lose one posting in the worst case. (If the network loses connectivity while transmitting, e.g. …)
The Hardware
At the hardware side, there was the decision made to have a terminal that has a 7 inch touch screen, so we ordered the Raspberry starter kit that contains these items:
- Raspberry Pi 3
- 7 inch capacitive touch screen
- Case for the touch screen
- SD card
- Power supply
- HDMI cable
- Power supply
- Heat sink
As additional hardware, we used:
- USB RFID reader that emulates a keyboard and types in the unique id of the RFID like it was typed on a keyboard
- An active buzzer for the Raspberry to minimize the amount of code needed for control
Most of the components in the starter pack:
The USB-RFID reader:
The buzzer module:
Building it
The first step was to attach the Raspberry to the Display panel and connect the cable to the DSI connector:
The display also needs two powerlines which are added in the next step:
When this is done, the heat sink modules could be attached and the display could be mounted to the case:
(I would suggest to insert the SD card before doing that because it is much easier to do it while the backside of the case is not attached.)
In the last step, the buzzer module was attached to the case using hot glue and connected to power and GPIO port 23:
(To make sure that the buzzer sticks, I roughed the surface of the case a little where I put the hot glue. I would not suggest to remove the sticker, the buzzer is getting really loud without it.)
Booting the system will show if everything runs fine:
The Software
The software consists of three components:
- The Raspbian operating system and its configuration
- A few Python scripts running on the Raspberry
- The implementation in the ERP system with the code to pull the data and process it
The Concept
While thinking about the best approach for the architecture to fulfill the project requirements, these decisions were made:
All sign in/out postings should be stored locally in the filesystem and be pulled by the processing system using HTTP or HTTPS. The processing system should not be limited to Dynamics AX. An implementation of any other system that supports HTTP or HTTPS, even Microsoft Access, should be possible.
After the data is pulled from the terminal, it should be deleted to prevent that the SD card runs out of memory.
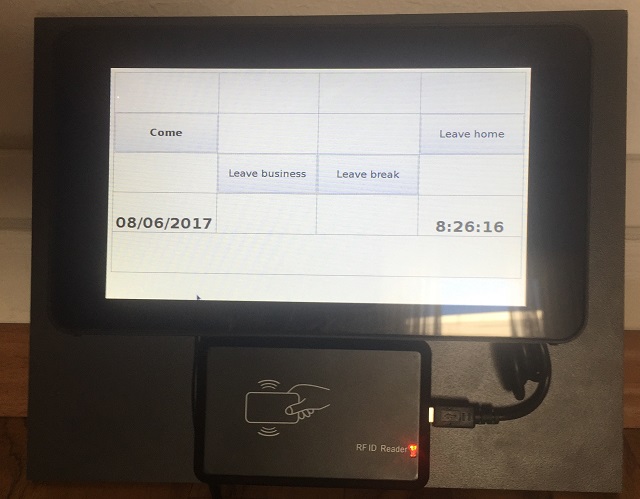
The user interface on the terminal should run as a webpage.
Multiple terminals should be possible and it should not make any difference where the user signs in/out.
Apache2 is used as the application server component and all scripts were made in Python.
Downloads
For this project, a few tools were needed that could be found on the internet.
- The Raspbian image (Current version 2017-07-05-raspbian-jessie) could be found here.
- A tool to write the image to the SD card is found here.
- VNC-Viewer to get remote access to the system on a graphical way could be downloaded from this link.
- Putty SSH client to access the Raspbian system on terminal level can be found at this link.
The Operating System
After downloading the Raspbian image and the program to write the image to the SD card, the image should be written to the SD card.
After booting the system from the SD card, the first steps are to enable SSH and VNC:
After a reboot, all services run and the Raspberry will be available using SSH and VNC when you connect it to the network.
The first steps should be to change the default password and enable the root account and give it a password as well. I know Debian, the base of Raspbian, uses the sudo approach, but I prefer to login as root and do the work directly in the root context. You could disable the root account later on if you have security concerns.
The next step would be to install midnight commander, for me it is essential to do installation and maintenance on the system:
Installing apache2 would need a system update first on the current Raspbian release:
Installing apache2:
A quick check shows that the Apache2 is running:
To enable Python for cgi, a few steps have to be done in console and mc:
Add the red marked configuration line to /etc/apache2/conf-enabled:
For audio feedback, it is necessary to allow the apache process to interact with the GPIO to turn on the buzzer. This is done with these commands:
All sign in/out data will be stored in a directory named /tk/, this has to be created and be writeable for the apache process:
The apache user also needs the access right to shutdown the system via the service menu:
The user pi has by far too much access rights, so we create a new user account called guest and configure autologon as well as autostart of chromium and opening the sign in/out webpage for it:
Now the system needs a reboot because the users home directory currently does not contain the autostart file which has to be edited now and added this line:
@chromium-browser --noerrdialogs --kiosk --incognito --disable-pinch
--overscroll-history-navigation=0 http://localhost/cgi-bin/wtt.py
This will automatically start the browser in Kiosk mode, disable the pinch to zoom and the history swipe function.
Within the project files, you will find a folder /usr/bin/ that contains a script called mutebeep.py. The installation is happening later on. When you already added the buzzer, you will notice it will make noise when the system boots. The reason for it is, that it is low active and the output of GPIO pin 23 has to be on level high to make buzzer silent. This is done by the mutebeep.py script.
We add it to the rc.local file located in /etc/:
The next step is optional if you would like to change the systems hostname using the raspi-config program:
Currently, the system is obtaining its IP-Address by dhcp. If you would like to assign a static one, please do this step:
To make sure we have to correct time at the terminal, we have to set the timezone as well (for me, it’s Germany, Berlin):
Talking about time, it would always be a good idea to make the terminal sync the local time against a time server. If you are in an AD domain, you could use any domain controller for it or use one on the internet, if the system is allowed to communicate directly outside.
If you are in a proxy environment, you may find this link useful, it shows how to configure the Raspbian:
The Python Scripts
After downloading and unzipping the project, you will have three folders.
- AX -> Containing all files for import in AX as a Project and single files
- Raspi_bin -> Containing all files for the /usr/bin folder
- Raspi_cgi-bin -> Containing all files for the /usr/lib/cgi-bin folder
The files in the Raspi* folder have to be copied to the Raspberry in the right folders and finally made executable. You can copy them via an USB thumb drive to the Terminal and run these commands:
chmod +0755  /usr/bin/mutebeep.py
chmod +0755  /usr/lib/cgi-bin/reboot.py
chmod +0755  /usr/lib/cgi-bin/service.py
chmod +0755  /usr/lib/cgi-bin/shutdown.py
chmod +0755  /usr/lib/cgi-bin/wtt.py
chmod +0755  /usr/lib/cgi-bin/wtt_get.py
Files in the cgi-bin Folder in Detail
reboot.py	-> Script that does the system reboot
service.py	-> Script that shows the service menu
shutdown.py	-> Script that does the system shutdown
wtt_get.py	-> Script called from remote application to get the sign in/out data
			-> Returns OK:posting data if data is returned or
                       NONE: if no data is available
wtt.py		-> Script that shows the main application and creates the sign in/out records
The wtt.py gives some configurable options:
The serviceTagID holds the ID of the tag that if scanned, opens the service menu.
The adminCode is the code that entered on a keyboard opens the service menu.
The storagePath configures the absolute path in filesystem where the folder is located, that temporarily stores the sign in/out data
The postText* defines the text shown when a sign in/out is posted in the webpage.
The buzzerPort defines to which GPIO port the buzzer is connected.
ERP Software Components
The AX folder in the zipped project contains this AX 2009 components in two separate folders:
All elements are exported by themselves in the folder objects and can be imported separately.
In the subfolder, project contains the whole AX development project.
The important items are the three forms, the two reports and the two classes WTTcloseLastWorkingDays and WTTfetchTerminalData.
Form WTT-Terminals
In this form, every terminal from that data that will be fetched has to be added:
Hint: No data will be fetched from terminals that are not enabled.
Form WTT_RfidTagTable
In this table, every RFID tag needs to be entered and connected to the employee who is using the tag.
Form WTT_WorkingDayTable
This is the main form of the application:
For every user that checked in/out, a record in the Working Day grid (upper) is created. As long as the day is not closed, the work time minutes are not accurately calculated. Days get closed by a batch job that runs at night. In the “Postings” section (lower), you can see every sign in/out process at the terminal as well as manual generated correction postings. Manual correction postings are marked by a yes in the corresponding field.
By clicking the “Post correction” button, this dialog opens where you have to specify the details about the sign in/out record:
Report WTT_CheckedInEmployees
This reports prints an overview of all currently checked in employees at site. The intention is to have something at hand in case of an emergency:
Report WTT_WorkTimeOverview
This reports shows the number of hours every employee worked in a definable timespan:
It is important to understand that only closed days are considered in this report.
Class WTTcloseLastWorkingDays
This class could be run manually but is intended to run as a batch job in the morning. It’s main purpose is to close the days with postings and calculate the amount of working minutes. It looks seven days in the past and checks if any corrections have to calculated.
Hint: If a day is closed and a correction posting is done manually, the working time will be recalculated instantly.
Class WTTfetchTerminalData
This class is intended to run in batch mode. It fetches all available posting records from all terminals.
Every posting is transmitted separately to make sure, that in a case of network loss or any other error we lose just one sign in/out information.
It should run every hour or whatever your demand is.
Menu Items
You will notice that currently no elements are added to an existing AX menu.
It is up to you to add the items to a menu at your wish.
Using the Code
The source code is pretty forward and can be modified as you want.
Additional Features
Features I found interesting but didn’t find the time to implement would be:
- Sending the employee names from the ERP to the terminal, so the terminal could welcome the employee by name, or as an enhancement shows a picture of the signing in person
- Tracking of vacation days (maybe with an extra menu button where the employee signs out for vacation)
- Automate reporting by sending emails at the end of the month
Hints and Tricks
If you have a workstation where you want to be able to sign in/out, you can attach an USB-RFID-Reader to it and open the terminals webpage wtt.py on that workstation.
You can easily customize the terminals UI by adding the company logo to it, because everything is HTML:
If you have the issue that your screen is upside down when the display is mounted to the wall, you can edit the configfile /boot/config.txt and add this line at the end:
lcd_rotate=2
A Few Words about Security
If you are in an environment where security is a concern, you can do this to increase the security:
- Disable VNC
- Disable SSH (but SSH is secure currently)
- Disable SSH logins for the user account pi
- Change the transmission protocol to HTTPS (but be aware that you have to take care about the certificate validity!)
- Change the transmission protocol for exchanging the sign in/out data to SSH
- Limit the incoming and outgoing network access by using the firewall
- Block the USB ports (mechanically) at the Raspberry
Conclusion
Work time tracking can be done with a low cost terminal based on the Raspberry hardware and a RFID reader with a reasonable amount of effort.
Useful Links (dated 05.08.2017)
History
- 6th August, 2017: Version 1.00 Initial release
- 8th August, 2017: Version 1.01 Format correction and a few typos
License of Code Files
All code provided by me is licensed GPL v3 or later.
© 2017 by Ulrich Fiege
This member has not yet provided a Biography. Assume it's interesting and varied, and probably something to do with programming.


 General
  News
News  Suggestion
  Question
  Bug
Bug  Answer
  Joke
Joke  Praise
  Rant
Rant  Admin
Admin 


