Introduction
Google Actions provides the feature to build conversation chat for the Google Assistant. You can use this integration through Google Home device with Google Pixel smartphone, Allo (messaging app). Also, it can be integrated with other experiences in which Google Assistant is available. This article will describe the step by step process of creating a sample agent using api.ai integrated with Google Actions.
API.AI
API.AI provides natural language understanding platform. The process of creating NLU interface is simple and easy for developers and non-developers too. We can integrate conversational user interfaces into mobile apps, web apps, devices, and bots. We are using Node.Js as the development platform. The main steps involved in the creation and integration of bot with Google Actions have been listed below.
Create bot
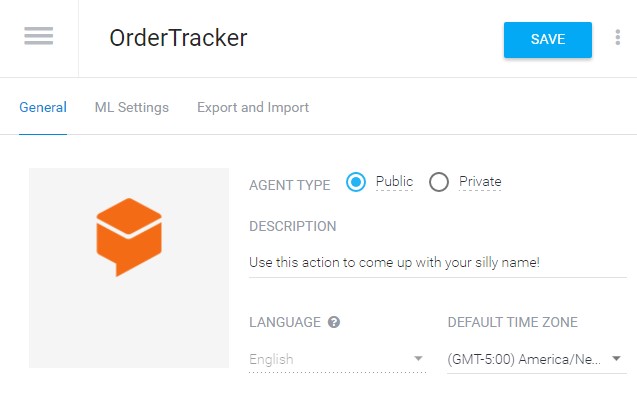
Agents are the NLU (Natural Language Understanding) modules for our applications. The purpose is to transform natural user language into actionable data. Login into API.AI and create a new agent in the api.ai where I created the agent name called “OrderTracker”. The task of the order tracker agent is to get the order status for a specific order id.
The next step is creating Entities. Create entity “orderid” which should be in alphanumeric combination. I have provided the entity reference value and corresponding synonym value (optional). The option “Allow auto expansion” can be enabled so that the order id with the same combination will be identified without training. Refer to the following screen for the example.

Next, we’re creating the “Order Status” intent, and train the query “show me order status for D55880006”. When creating the intent, I didn’t use the built-in entity data type. Since we created our custom “orderid” entity and it will be identified as order id in any combination. Mention the Action as “inputorderid”. The Action name can be defined manually. It is the triggering word for the app to perform a particular action. It will be accessed from our index.js and referred later in this document.
Writing Business logic
In this example, we are using the NPM module named “actions-on-google”. Install it in your project path using “npm install”. The package.json file contains the dependent library details. The package.json file should be like this:
{
  "name": "ordertracker",
  "version": "1.0.0",
  "private": true,
  "scripts": {
    "start": "node server.js",
    "deploy": "Cloud path if you are using cloud deployment"
  },
  "description": "An agent to get the order status from your order id.",
  "main": "index.js",
  "repository": "",
  "author": "Rethinavel Moorthy",
  "dependencies": {
    "actions-on-google": "^1.0.5"
  }
}
Create index.js and paste the following code. It has two functions to access default welcome message intent and order status intent. I have written two functions “welcome Intent” and “trackOrderStatus”. The first one deals with accessing the default welcome intent and setting a welcome message. The second one deals with accessing the “orderid” entity from the “order status” intent and setting a response text. These two functions will be triggered by mapping it with the apiai-assistant library.
var apiaiAssistant = require ('actions-on-google').ApiAiAssistant;
const WELCOMEINTENT = 'input.welcome';
const ORDER_STATUS = ‘input.orderstatus’;
const ORDERID = 'orderid';
function welcomeIntent(assistant) {
assistant.ask("With EShopping, you can get the product order status);
}
function trackOrderStatus(assistant) {
var orderidfromuser = assistant.getArgument(ORDERID);
var orderStatusMessage = "";
var orderDescription = "Your order" + orderidfromuser + "is";
if (orderidfromuser != null) {
assistant.ask (orderStatusMessage + "\n" +"is Available");
}
else {
assistant.ask("please provide valid order id to check your order status");
}
}
exports.agent = function (request, response) {
var assistant = new ApiAiAssistant({request: request, response: response});
var actionMap = new Map ();
actionMap.set(WELCOMEINTENT, WelcomeIntent);
actionMap.set(ORDER_STATUS, trackOrderStatus);
assistant.handleRequest(actionMap);
};
Now writing the functional part is over and we have to point the deployment server link to run this code. We could run the function locally on the machine. The API.AI will point the local machine using the fulfillment configuration where the end-point URL is referred. We can make live changes to the code, and test the changes after completion of this step. So we are going to use the Cloud Functions emulator, with the ngrok tool which allows us to expose our local host to the internet with public URL. Please refer to the step to install the Cloud Functions emulator, as shown in this documentation:
- Open project root directory in windows cmd prompt.
- Install the cloud functions emulator:
npm install -g @google-cloud/functions-emulator
- To retrieve the index.js file locally and run in our local machine, we need to install the actions-on-google npm module for the project. The system should have at least Node version 6.9.
npm install actions-on-google
- Define the project ID of your agent and I mentioned the project id as “
ordertracker-157615”. You can define the project Id which can be any meaningful name for your agent. This project id will be used during the formation of endpoint url.
functions config set projectId ordertracker-157614
- Start the cloud functions emulator.
functions start
- Deploy the project locally using the following command:
functions deploy agent --trigger-http
- If the function deployed successfully on the machine, we can see the following:
- Note the Resource url http://localhost:8010/ordertracker-157614/us-entral1/agent
- We want this function to be accessed from the web. ngrok will be used in this case. Download the ngrok tool and unzip it. Run the ngrok tool using the following command. Here 8010 is the default port which is accessed by the project. So use the port 8010.
ngrok http 8010
- Take the https forwarding url and convert the resource url which is taken from the above step as below. This url will act as the endpoint url.
https://63ace30e.ngrok.io/what-time-is-it-157614/us-central1/agent
Open the Fulfillment options from the menu. Paste the Endpoint URL obtained from above steps into the URL field. Refer to the following image for clarification.
Open the intents in the API.AI field and enable the “Use webhook” option available in the fulfillment tab at the bottom. This option will look at the functions available in the index.js file at run time.
Open the intents in the API.AI field and enable the “Use webhook” option available in the fulfillment tab at the bottom. This option will look at the functions available in the index.js file at run time.
Testing the Code with Google Actions Emulator
Create action.json file inside the project directory and paste the following content. The action.json will be referred by Google Actions emulator, which has the version details, agent info, endpoint server URL. Whenever you are changing the ngrok URL, then it should be replaced in the following “url” field.
{
  "versionLabel": "1.0.0",
  "agentInfo": {
    "languageCode": "en-US",
    "projectId": "ordertracker-157614",
    "voiceName": "male_1"
  },
  "actions": [
    {
      "initialTrigger": {
        "intent": "assistant.intent.action.MAIN"
      },
      "httpExecution": {
        "url": "https:// 63ace30e.ngrok.io "
      }
    }
  ]
}
Enable Actions on Google:
- In the API.AI console, select Integrations tab in the left panel.
- Enable the toggle switch on the Actions on Google card.
- Click on SETTINGS and the Action on Google displays.
- Provide invocation name for the testing field, enter the name for the conversation action. From our example, provide the name as order tracker.
- Welcome Intent is a mandatory select the Default Welcome Intent from the drop down. The response for the default welcome intent has been sent from the index.js.
- You can change the TTS voice from the available option.
- Click the AUTHORIZE link which is in the lower right. Follow the instructions to give the client access to the new Conversation on the simulator.
- Check the lower right corner of the Actions on Google view and click the PREVIEW button.
- If the PREVIEW button is not available, then check the following steps matches:
- Authorize the client to access the Conversation Action (click the AUTHORIZE button)
- Check the value of the invocation name for testing
- Check the Welcome Intent has provided.
- In successful case, a link to the Google Home Web Simulator provided in the lower right corner:
- Click the displaying link For the Google Home Web Simulator. Now start testing your conversation by saying “
Talk to order tracker”. The “Talk to” is a default conversation initiator.
This member has not yet provided a Biography. Assume it's interesting and varied, and probably something to do with programming.


