Introduction
I wrote the app I explain in this article, because it is one that I wanted for myself. I often send a quick text message to my wife before leaving work for the day. Generally I do not notice her reply because I am already driving and I'm very disciplined about not looking at my phone while driving. This often leads to me missing her message asking me to pick something up at the store on the way home. No more.
Watch this youtube (only 12 seconds long) to see the app (Vext) in action -- running on my phone (click the image or the link).
 https://youtu.be/cVUbWvnyqT4
Now I simply start up my Android app and my phone uses the TextToSpeech API to read her (or any incoming SMS) messages to me while I drive.
Update - Fixed Permissions Runs on All Versions (KitKat through Nugat)
I've fixed the permissions issue for SMS Text on Marshmallow and Nugat and now this code will run on all versions. Get the v2 above and run on any version that supports TextToSpeech. See Fixing Permissions section below for details of added code.
WARNING - Please note : Marshmallow, Nugat users -- at this point I'm excited to release this article so I'm releasing it with the version that will work on Android 4.3 - Lollipop (5.1.1). After Lollipop, Android put in more security for SMS so I have to add code to get the SMS message that warns the user the first time it runs. The code won't work on those platforms for now. I will update this soon. For now, I hope you'll read and maybe by the time your done I'll have it fixed (next day or two -- target of 4/27/2017).
First Version Is Ugly (Basic UI)
This first version is not pretty because I just wanted the funtionality and wasn't interested in creating a beautiful UI. It's a basic empty Android form (Activity) that I've added a few basic controls to. The following image shows an EditText and a button which will allow you to type any text you want and have the the app speak the text to you.
I call the app Vext (a portmanteau^ of Voice-text).

Fun At Parties
You can type whatever text you want in the EditText control, push the [Speak] button and the app will speak it for you in the default device voice. You'll be the hit of every party you attend. :)
Watch the app speak a short phrase in this very short video.
https://youtu.be/D5X3z7miXjQ (opens in new tab)
The SeekBar control (aka Slider in the Windows world) further down the Activity allows you to set the volume of the voice. When the app first starts, it gets the max volume by calling the following method on the MainActivity :
int maxVol = am.getStreamMaxVolume(am.STREAM_MUSIC);
The first time you run, it will default to 3. After you set the value, I store the value in your SharedPreferences so that each initial run of the app will remember the volume you want the voice to be.
We'll go over more of those details in the body of this article. Here's the concepts we will cover in this article.
Concepts We Will Cover
- Receiving SMS Message, grabbing body of message
- Using TextToSpeech API
- Setting and Saving TextToSpeech volume in SharedPreferences
Invoking the Functionality
For now, running the app will be the way to turn the feature on and off. That means, start the app and the following incoming message(s) will be read to you. Stop the app and your texts will no longer be read aloud.
Android Widget
This app would be nice to have as an Android Widget (available from your home and lockscreen) and I am already working on that. However, the Android API for Widgets is brittle and difficult to work with. Things could definitely be easier. As I've attempted to implement it I've run into bugs I can't explain. Until I get those fixed we'll have to settle for this basic app.
That was a long introduction so let's jump into some code. We'll start by taking a look at the MainActivity code where everything starts.
MainActivity onCreate()
When an Android app starts, the MainActivity is loaded and the onCreate() function is called. That method gives us the chance to do some initialization when the app starts. I'm not going to show you all the initialization of the UI components so I can stay focused on the main subject of this article. The first code we see in onCreate() that is interesting to us is:
AudioManager am = (AudioManager)getSystemService(Context.AUDIO_SERVICE);
int maxVol = am.getStreamMaxVolume(am.STREAM_MUSIC);
Log.d("MainActivity", "max vol : " + String.valueOf(maxVol));
volumeSeekBar.setMax(maxVol);
Setting Up UI Components (SeekBar)
This code allows us to get the max volume level of the system's Audio service using the AudioManager. To set the volume of the TextToSpeech voice, we will use the AudioManager's method named setStreamVolume() later on. This part of the code obtains the max volume that is possible so we can set our SeekBar's (think slider) max value. Usually this value is around 13 to 15. This insures the user can only use the SeekBar to set the volume to a valid value.
Set Current Volume
The next line calls a method I wrote that sets the current volume value:
setCurrentVolumeLevel();
That method is a bit further down in the MainActivity.java file and it looks like :
private void setCurrentVolumeLevel() {
 SharedPreferences preferences = PreferenceManager.getDefaultSharedPreferences(getApplicationContext());
 int volumeLevel = 0;
 volumeLevel = preferences.getInt("volumeLevel", 3);
 volumeSeekBar.setProgress(volumeLevel);
}
Using SharedPreferences Is Easy and Helpful
This method shows you how to read from the Android SharedPreferences. These values can only be read and written by this app so they are considered safe. Of course, we are just saving and retrieving the value of the current volume so it doesn't matter. The value of using SharedPreferences is that our values will be set and remembered each time the app is run.
Once we have our preferences object, which we've obtained from the PreferenceManager, we can query it for values that may already be saved. In our case, we are looking for a integer value named volumeLevel. We use the getInt() method which takes the name of the value we are looking for and a default value to return (3 in our case) if it isn't found. The first time the app runs, the value won't be found so we will set the value to 3.
Update SeekBar UI
Once we get the value (or the default) then we simply call the setProgress() method with the value to insure the SeekBar UI is updated with the correct value. The method returns and we are back in onCreate().
Intents and Broadcasting
In the Android world, whenever you want some generic functionality to be resolved you can do so using an Intent. For example, if you want the user to be able to watch an video from your app it is likely that there is a video service already available for that. That means you just need to set up an Intent properly and request the service handle the action.
For Vext, I decided that the easiest way to make the TextToSpeech functionality available was to create a BroadcastReceiver that we can call when needed via an Intent. This will also allow the functionality to be more easily accessible when I implement the Android Widget (more about that at a later time).
As I said, you can request functionality outside of your app, but in our case I want to keep the service local and I've learned that I can do so by creating a class that descends BroadcastReceiver. Later on, we will see this added class named TTSReceiver.
In the MainActivity onCreate() you can see where I initialize a member variable named lbm for this use and then create a new TTSReceiver.
lbm = LocalBroadcastManager.getInstance(this);
ttsReceiver = new TTSReceiver();
That prepares the TextToSpeech system as we will use it. But to see how TextToSpeech will be implemented in our app, let's take a closer look at the TTSReceiver class.
public class TTSReceiver extends BroadcastReceiver {
private TextToSpeech tts;
private Set<Voice> allVoices;
private String messageBodyText;
private TextToSpeech.OnInitListener ttsListener;
@Override
public void onReceive(Context context, Intent intent) {
Log.d("MainActivity", "onReceive() fired!");
SharedPreferences preferences =
  PreferenceManager.getDefaultSharedPreferences(context.getApplicationContext()); int volumeLevel = 0;
 volumeLevel = preferences.getInt("volumeLevel",3);
Log.d("MainActivity", "volumeLevel : " + String.valueOf(volumeLevel));
AudioManager am = (AudioManager)context.getSystemService(Context.AUDIO_SERVICE);
am.setStreamVolume(am.STREAM_MUSIC, volumeLevel, 0);
messageBodyText = intent.getStringExtra("MESSAGE_BODY");
if (ttsListener == null) {
ttsListener = new TextToSpeech.OnInitListener() {
@Override
public void onInit(int status) {
}
};
}
if (tts == null) {
tts = new TextToSpeech(context, ttsListener);
}
tts.speak(messageBodyText, TextToSpeech.QUEUE_ADD, null, "2nd1");
}
}
This class is fairly straight forward and we will move back to the MainActivity code that calls it via the Intent in just a moment so you can see how it is called. But, first let's take a look at what we have here.
BroadcastReceiver onRecieve()
It is very easy to take some action when your BroadcastReceiver is invoked. You simply override the onReceive() method and the OS will let you know when the event has occurred. This is the code that will run when you new up the Intent and make a call to the BroadcastReceiver via the LocalBroadcastManager. You can look up more details of those basics, but let me add where this class has to be registered so you will understand how the system knows how to find this class.
AndroidManifest.xml
Whenever you add a BroadcastReceiver you also have to register the class with the system so it knows how to find the class. You do that via the AndroidManifest found in your project. Though I don't like to heave a bunch of code on readers I am going to show the entire AndroidManifest here because there are a couple of Android permissions that we also need to allow and you may as well see them now. I will also bold the portion of the TTSReceiver definition so you can see that.
Much of the AndroidManifest is generated by the Android Studio project template when you create your project.
="1.0"="utf-8"
<manifest xmlns:android="http://schemas.android.com/apk/res/android"
package="us.raddev.vext">
<uses-permission android:name="android.permission.RECEIVE_SMS" />
<uses-permission android:name="android.permission.READ_CONTACTS"/>
<application
android:allowBackup="true"
android:icon="@mipmap/ic_launcher"
android:label="@string/app_name"
android:supportsRtl="true"
android:theme="@style/AppTheme">
<activity android:name=".MainActivity">
<intent-filter>
<action android:name="android.intent.action.MAIN" />
<category android:name="android.intent.category.LAUNCHER" />
</intent-filter>
</activity>
<receiver android:name=".MsgReceiver">
<intent-filter>
<action android:name="android.provider.Telephony.SMS_RECEIVED"/>
</intent-filter>
</receiver>
<receiver android:name=".TTSReceiver">
<intent-filter>
<action android:name="us.raddev.vext.message" />
</intent-filter>
</receiver>
</application>
</manifest>
Android Permissions
Receive SMS
As you can see, the first two bolded lines are permissions that I've added. The first one allows our app to receive SMS messages. That means the user will be warned when installing the app that it will do that. If the user wants she can cancel the installation.
Read Contact Information
This app also needs to read the Contact information for getting the name of the user that is sending you a message.
If you look closely, you'll see that our MainActivity is also registered in the manifest (.MainActivity).
TTSReceiver Registers An Action
You can also see that the TTSReceiver registers an action named "us.raddev.text.message" This is the action we will be adding to the Intent so that when we broadcast the action will fire.
When the action fires, the onReceive() method will run and we can run our code.
When the onReceive() method event occurs we do the following:
Read the Volume Level from Preferences
SharedPreferences preferences =
PreferenceManager.getDefaultSharedPreferences(context.getApplicationContext()); int volumeLevel = 0;
volumeLevel = preferences.getInt("volumeLevel",3);
We store the volume level in a variable so we can use it to set the volume level that the TextToSpeech engine will use.
Set AudioManager Volume Level
AudioManager am = (AudioManager)context.getSystemService(Context.AUDIO_SERVICE);
am.setStreamVolume(am.STREAM_MUSIC, volumeLevel, 0);
Read Passed In String : MESSAGE_BODY
messageBodyText = intent.getStringExtra("MESSAGE_BODY");
When we create our Intent (back in MainActivity onCreate() -- will show this code in a moment) we set a string on the Intent that we will reference with the name "MESSAGE_BODY". Here we grab that text and save it to a member variable named messageBodyText.
What Is This Text?
This is normally the body of the text message that has come in. However, since we are using this BroadcastReceiver for any of our calls to the TextToSpeech this is any text that we want to have spoken aloud.
Finally, we are ready to initialize the TextToSpeech so it will speak our text for us.
Initialize TextToSpeech
if (ttsListener == null) {
ttsListener = new TextToSpeech.OnInitListener() {
@Override
public void onInit(int status) {
}
};
}
if (tts == null) {
tts = new TextToSpeech(context, ttsListener);
}
You can see that we have to intialize TTSListener so we can use it to initialize the TextToSpeech object that it will actually speak the text. I store those objects in member variables so that TTS is initialized for the life of the app. However, I did run into some strangeness.
The Odd Things, Repeating Or Not Speaking
I ran into some issues when attempting to initialize the TextToSpeech. I found that if I made that first call in the onInit() method shown above (now commented because it should not be used) that the TextToSpeech would repeat phrases. It was very odd and represented a challenge because when I did not do that then TextToSpeech would not speak any of my text.
Workaround and It Works
I finally fixed this by initializing the TTS with a first call that requested it to speak an empty string. Yeah, it seems ridiculous, but I learned that others were having the odd repeating also. Read this StackOverflow for more info:
TextToSpeech.OnInitListener.onInit(int) being called continuously^
Once everything is initialized, we can call the speak() method and have it speak our text.
TextToSpeech Speak() Method
tts.speak(messageBodyText, TextToSpeech.QUEUE_ADD, null, "2nd1");
Once you have all of this in place it is so easy to do. Of course, you have to have the BroadcastReceiver set up or this won't work right. The speak() method takes three parameters that we should look at a bit more closely for understanding:
- messageBodyText : text the TTS will speak
- TextToSpeech.QUEUE_ADD : how to handle when multiple requests to speak are made - in our case we tell it to add each one to the queue and speak them when possible. You can also use QUEUE_FLUSH which will flush (cancel) the others and just speak the latest one.
- String : in our case I have added "2nd1" which is meaningless. This is just a string to identify the message.
Now that we've seen how the TTSReceiver (BroadcastReceiver) works, now we can better understand how to make a call to it. We make our first call with a blank string (as I said earlier) from the MainActivity.onCreate() method.
Here's how we create our Intent and make the call for the TTSReceiver to speak some text:
Intent intent = new Intent("us.raddev.vext.message");
intent.putExtra(MESSAGE_BODY,"" );
lbm.sendBroadcast(intent);
When we create our Intent we provide the name of the action that we want to take. Keep in mind that ".message" was arbitrarily chosen. It could've been "us.raddev.vext.elephant" if I had wanted to. :)
Next, we add our Extra (string) to the Intent and name it "MESSAGE_BODY". In this case the string we add is an empty string so it's not so exciting.
Broadcast Our Intent
Finally we call our LocalBroadcastManager and call the method sendBroadcast with our intent. When we do that the system finds the matching class (TTSReceiver) and the onReceive() method runs. It's that easy.
You can see very similar code is attached to to the speak button onclick listener. That way when the user types some text and clicks the button on the MainActivity she will hear it spoken.
speakButton.setOnClickListener(new View.OnClickListener() {
    public void onClick(View v) {
        String outText = textToSpeak.getText().toString();
        if (outText != null) {
            Intent intent = new Intent("us.raddev.vext.message");
            intent.putExtra(MESSAGE_BODY,outText );
            lbm.sendBroadcast(intent);
            Log.d("MainActivity", "Button click ended!");
        }
    }
});
I've bolded the important code above. You can see that the big difference here is that we get the text from the textToSpeak EditText control and we use that when we call putExtra on the Intent.
That's the string we retrieve in the TTSReceiver.onReceive() method so the TextToSpeech.speak() method knows what to speak.
How It All Works Makes More Sense Now
Now that we understand all of that, it will be much easier to understand what we will do when an SMS Text Message arrives. The only difference now is that our app will speak the words that are found in the SMS text message. How does it do that? The same way. The only additional thing is that we get the body text of the SMS and pass it to our TTSReceiver so it will speak it for us.
More BroadcastReceiver, Please
Receiving an SMS and obtaining the body text on Android is quite easy. It is much easier now that you understand a BroadcastReceiver because receiving the SMS is also done via a BroadcastReceiver. You can even Google how to do that. Look back at the AndroidManifest above and look for the text .MsgReceiver and you'll see where we've registered a class named MsgReceiver to run when an incoming SMS is received.
Here's what our MsgReceiver class looks like. Again, everything happens in the onReceive() method.
public void onReceive(Context context, Intent intent) {
if (lbm == null && ttsReceiver == null) {
lbm = LocalBroadcastManager.getInstance(context);
ttsReceiver = new TTSReceiver();
lbm.registerReceiver(ttsReceiver,new IntentFilter("us.raddev.vext.message"));
}
SmsMessage message = null;
String from = null;
message = GetMessage(intent);
from = message.getOriginatingAddress();
if (message == null){
message = GetMessage(intent);
}
from = message.getOriginatingAddress();
String body = message.getMessageBody();
Toast.makeText(context,body, Toast.LENGTH_SHORT).show();
long receivedDate = message.getTimestampMillis();
Date date = new Date(receivedDate);
DateFormat formatter = new SimpleDateFormat("MM/dd/yyyy - HH:mm:ss");
String formattedDate = formatter.format(date);
Uri lookupUri = Uri.withAppendedPath(ContactsContract.PhoneLookup.CONTENT_FILTER_URI,
Uri.encode(from));
Cursor c = context.getContentResolver().query(lookupUri, new String[]
{ContactsContract.Data.DISPLAY_NAME},null,null,null);
try {
Intent ttsIntent = new Intent("us.raddev.vext.message");
boolean isSuccess = c.moveToFirst();
if (isSuccess) {
String displayName = c.getString(0);
String ContactName = displayName;
Log.d("MainActivity", "ContactName : " + ContactName);
ttsIntent.putExtra(MESSAGE_BODY,"Incoming from " + ContactName );
}
else{
ttsIntent.putExtra(MESSAGE_BODY,"Incoming message");
}
lbm.sendBroadcast(ttsIntent);
lbm.unregisterReceiver(ttsReceiver);
}
catch (Exception e) {
}finally{
c.close();
}
Intent ttsIntent = new Intent("us.raddev.vext.message");
ttsIntent.putExtra(MESSAGE_BODY,body );
lbm.sendBroadcast(ttsIntent);
lbm.unregisterReceiver(ttsReceiver);
Log.d("MainActivity", "from : " + from);
Log.d("MainActivity", "body : " + body);
Log.d("MainActivity", "receivedDate : " + formattedDate);
}
You can probably simply read that code and the couple of comments and figure out what everything is doing.
However, let me give you a summary of what it does.
SMS MsgReceiver Summary
- Check member vars to see if they are already initialized (or if this is a first-time run).
- Call local method named
GetMessage() which gets the actual SMS message object. This method simply wraps some things because Android SMS has changed over versions. - Get some information we want to use from the SMS Message object (
originatingAddress, textBody) - Get Contact via
originatingAddress (from) -- if it exists - if contact exists request TTSReceiver to announce "Incoming from <contactname>"
- If contact doesn't exist, request TTSReceiver to announce "incoming message"
- Request
TTSReceiver to speak the text body.
That's it.
It's all that easy. Grab the code and try it on your Android phone. I think you'll really like it.
Fixing Permissions
Previously I had an issue where I wasn't requesting the permissions properly on Marshmallow (6.x) and beyond. I've researched how to do that and it is not much code to add.
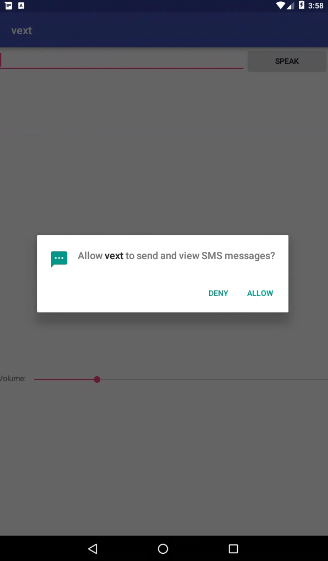
App First-Time Run
You add this code to your MainActivity so that when the user runs the app the first time she will be notified that the app is requesting the permissions and will have to respond to allow the permissions. Again, this will only occur if the app is running on Marshmallow or newer. The permissions are handled the regular way if it is on Lollipop or below.
Here's what it will look like to the user. In our case we need two permissions (RECEIVE_SMS and READ_CONTACTS) so the user is queried twice, once for each permission.
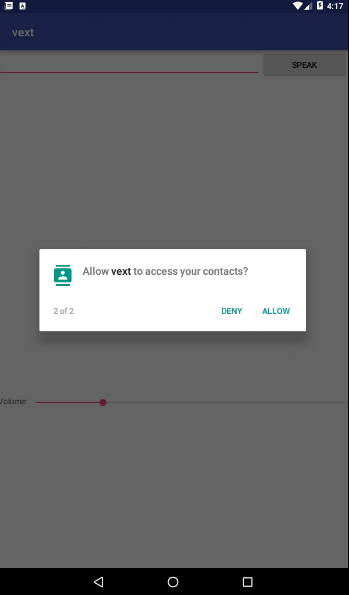
Refuse Either and Vext Won't Work
If the user refuses either then the Vext app won't work. That could be fixed by moving the read of the contacts out of the MsgReceiver class, but I'm not going to worry about that for now. For now, it is all or nothing. If the user runs the app without allow the permissions and an SMS text arrives, the app will simply crash. There's not warning that the perms aren't set up. This can be a bit confusing when developing Android apps so keep it in mind.
Here's the code that I added to the MainActivity to handle the permissions.
Permission Method
I added a new method I named requestAllPermissions() and I added a call at the top of the MainActivity.onCreate() method to insure the user is queried upon running the app the first time.
Here's the entire method that is very straight forward:
private void requestAllPermissions() {
    String permission = Manifest.permission.RECEIVE_SMS;
    String permission2 = Manifest.permission.READ_CONTACTS;
    int grant = ContextCompat.checkSelfPermission(this, permission);
    if ( grant != PackageManager.PERMISSION_GRANTED) {
        String[] permission_list = new String[2];
        permission_list[0] = permission;
        permission_list[1] = permission2;
        ActivityCompat.requestPermissions(this, permission_list, 2);
    }
}
All you do is set up a permission array of strings then add them to the ActivityCompat.requestPermissions() method and call that method. Once that code runs and the user accepts it, the app is all set up for those perms.
It's as easy as that.
History
Second version of article and code : 04/25/2017 added code to handle permissions properly on Android Marshmallow and beyond.
First version of article and code : 04/25/2017


 General
  News
News  Suggestion
  Question
  Bug
Bug  Answer
  Joke
Joke  Praise
  Rant
Rant  Admin
Admin 


