In this article, we learn how to create an ASP.NET Core 1 MVC application using Entity Framework Core 1.0.
Introduction
Entity Framework is an object-relational Mapper (ORM) that allows developers to work with a database using .NET objects. It eliminates the need for most of the data-access code that developers usually need to write. .NET Core comes with a new version of Entity Framework that is Entity Framework Core. EF core is a lightweight, cross platform version of Entity Framework. Most of the top-level APIs remain the same, so developers coming from Entity Framework 6.x will feel comfortable working with it but there are many features that are part of EF 6.x but not of EF core for example complex/value types, many-to-many relationship without join entity, last loading, etc. Some new features are introduced in EF Core that were missing in EF 66.x like shadow state property, table per type(TPT), alternates keys. In this article, we learn how to create an ASP.NET Core 1. MVC application using Entity Framework Core 1.0. We will create an EmployeeDetail project. In this project, we will display the list of all employees, details of any specific employee, update or delete record of an employee. Later, we will also add the features of sorting, searching operation.
Prerequisites
Before starting the project, we must have the following configuration:
- Visual Studio 2015 Update 3
- .NET Core
- SQL Server Management Studio
If you already have all this configuration, then it is great, otherwise configure all these requirements first.
Create an ASP.NET Core Application
Open Visual Studio and create a new ASP.NET Core project and name it as EmployeeDetail.
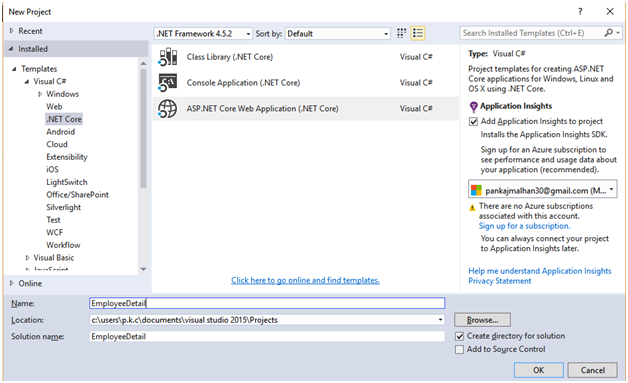
From templates section, select the Web Application template for the project and click on OK button.

After successful creation of the project, you will get the following project structure:
Now press F5 and run the application. When we run this application, we will get the following output:
This is the default screen that we get in our application. We don’t need this default screen, so remove unnecessary code from _layout and Index views.
Now go to _Layout partial view and replace content of page with the below code:
<!DOCTYPE html>
<html>
<head>
    <meta charset="utf-8" />
    <meta name="viewport" content="width=device-width, initial-scale=1.0" />
    <title>@ViewData["Title"] - EmployeeDetail</title>

    <environment names="Development">
        <link rel="stylesheet" href="~/lib/bootstrap/dist/css/bootstrap.css" />
        <link rel="stylesheet" href="~/css/site.css" />
    </environment>
    <environment names="Staging,Production">
        <link rel="stylesheet"
         href="https://ajax.aspnetcdn.com/ajax/bootstrap/3.3.6/css/bootstrap.min.css"
              asp-fallback-href="~/lib/bootstrap/dist/css/bootstrap.min.css"
              asp-fallback-test-class="sr-only"
              asp-fallback-test-property="position"
              asp-fallback-test-value="absolute" />
        <link rel="stylesheet" href="~/css/site.min.css" asp-append-version="true" />
    </environment>
    @Html.ApplicationInsightsJavaScript(TelemetryConfiguration)
</head>
<body>
    <div class="navbar navbar-inverse navbar-fixed-top">
        <div class="container">
            <div class="navbar-header">

                <a asp-area="" asp-controller="Home" asp-action="Index"
                 class="navbar-brand">EmployeeDetail</a>
            </div>

        </div>
    </div>
    <div class="container body-content">
        @RenderBody()
        <hr />
        <footer>
            <p>© 2017 - EmployeeDetail</p>
        </footer>
    </div>

    <environment names="Development">
        <script src="~/lib/jquery/dist/jquery.js"></script>
        <script src="~/lib/bootstrap/dist/js/bootstrap.js"></script>
        <script src="~/js/site.js" asp-append-version="true"></script>
    </environment>
    <environment names="Staging,Production">
        <script src="https://ajax.aspnetcdn.com/ajax/jquery/jquery-2.2.0.min.js"
                asp-fallback-src="~/lib/jquery/dist/jquery.min.js"
                asp-fallback-test="window.jQuery">
        </script>
        <script src="https://ajax.aspnetcdn.com/ajax/bootstrap/3.3.6/bootstrap.min.js"
                asp-fallback-src="~/lib/bootstrap/dist/js/bootstrap.min.js"
                asp-fallback-test="window.jQuery && window.jQuery.fn &&
                window.jQuery.fn.modal">
        </script>
        <script src="~/js/site.min.js" asp-append-version="true"></script>
    </environment>

    @RenderSection("scripts", required: false)
</body>
</html>
And also replace content of Index view with the following code:
@{
    ViewData["Title"] = "Home Page";
}

<div class="row">
   <div class="col-md-12">
       <h3>Employee Application</h3>
   </div>
</div>
After all the above changes, now our application will look like below:
Add Entity Framework Core Dependency
In our application, we will use the SQL Server for the database, so we need to install the Entity Framework for SQL Server. To use SQL Server, the package is Microsoft.EntityFrameworkCore.SqlServer. Now, we add the configurations of Entity Framework in project.
Open your Project.json file and add the following lines under dependency section.
"Microsoft.EntityFrameworkCore.SqlServer": "1.0.0",
    "Microsoft.EntityFrameworkCore.Tools": {
      "version": "1.0.0-preview2-final",
      "type": "build"
    },
In the next step, add the following line in "tools" section.
"Microsoft.EntityFrameworkCore.Tools": "1.0.0-preview2-final"
Using the Code
Create Entity Classes
After adding the dependencies for Entity Framework, let’s create Employee and Project entity classes. There will be many to one relationship b/w Employee and Project entity, that means one employee will handle only one project at a time but there can be more than one employee on a single project.
Employee Entity
Add an Employee class in Model folder and replace the code of Employee class with following code:
using System.ComponentModel.DataAnnotations;
using System.ComponentModel.DataAnnotations.Schema;
namespace EmployeeDetail.Models
{
    public class Employee
    {
        [Key]
        [DatabaseGenerated(DatabaseGeneratedOption.Identity)]
        public int EmployeeId { get; set; }
        public string EmployeeName { get; set; }
        public string Designation { get; set; }
        public string Skills { get; set; }
        public int ProjectId { get; set; }
        public Project Project { get; set; }
    } }
In the above code, EmployeeId property is the primary key for the Employee entity and it is also identity type. The ProjectId is foreign key and the corresponding navigation property is Project.
Project Entity
Now add another class in Model folder and name this class as Project, replace the code in this class with the following code:
namespace EmployeeDetail.Models
{
    public class Project
    {
        public int ProjectId { get; set; }
        public string ProjectName { get; set; }
        public DateTime StartDate { get; set; }
        public DateTime EndDate { get; set; }
    }
}
The ProjectId property is the primary key for this entity and other properties define the information about the project.
Add DbContext Class
The main class of any Entity Framework structure is DbCntext class. In this class, we define all the entities that are used to create the table in database. Now add another class in Model folder and name it as EmployeeContext. This class will be derived from System.Data.Entity.DbContext class. Replace the code in this class with the following code:
namespace EmployeeDetail.Models
{
    public class EmployeeContext: DbContext
     {
        public EmployeeContext(DbContextOptions<EmployeeContext> options) : base(options)
        {

        }
        public DbSet<Employee> Employee { get; set; }
        public DbSet<Project> Project { get; set; }
    }
}
In the above code, we defined two Dbset property for Employee and Project class. This property will create two tables in database and name will be the same as defined in Dbset property.
Register Context with Dependency Injection
After creating all entity and dbContext classes, now we add a service for Entity Framework such that any component that requires this service can be provided by the constructor. In our controller constructor, we use this service to get the context instance. Now open startup.cs and add the following code to ConfigureServices method.
services.AddDbContext<EmployeeContext>(options =>
        options.UseSqlServer(Configuration.GetConnectionString("DefaultConnection")));
In the above code, we register a service for DbContext, here DefaultConnection providing the connection string that is defined in our appsettings.json. Now open your appsettings.json file and add the following code. Replace the server name with your SQL Server name.
{
  "ApplicationInsights": {
    "InstrumentationKey": ""
  },
  "ConnectionStrings": {
    "DefaultConnection": "Server=******;Database=Employee;
     Trusted_Connection=True;MultipleActiveResultSets=true"
  },
  "Logging": {
    "IncludeScopes": false,
    "LogLevel": {
      "Default": "Debug",
      "System": "Information",
      "Microsoft": "Information"
    }
  }
}
Add Migration and Create Database
After we configure dbContext and entity classes, now we add the migration and using the Update-Database command, we will create our project database. So first add the migration. Open your "Package Manager Console", run "Add-Migration firstMigration" command. This command will add the Migrations folder in your project and first file in Migrations folder contains all information on how to create your database.
Now we run Update-Database command. This command take codes available in migration class and updates your database. In our case, this command creates an Employee database in SQL Server that contains all the tables and properties that we defined earlier in our model classes.
Now open your SQL Server, you will find that Employee database has been added:
Add Initial Data
Now our tables and database is ready. Let’s add some initial data into our tables.
Add Data into Project Table
INSERT INTO dbo.Project
(
          ProjectName,
    StartDate,
           EndDate
)
VALUES(        N'Lions',CAST('02/01/2017' as datetime),_
               CAST('04/05/2017' AS datetime) ),(          _
               N'OUP',CAST('08/09/2016' AS datetime),CAST('12/03/2017' AS datetime) ),
(        N'VMesh',CAST('12/04/2016' as date),CAST('04/01/2017'as date) ),_
(    N'IJFER Solution',CAST('01/03/2017' as datetime),CAST('05/01/2017' as datetime) )
Add Data into Employee Table
insert into Employee
(Designation,EmployeeName,ProjectId,Skills)
values('Developer','Raj Kumar',2,'C#,Asp.Net,MVC'),
('Mobile Developer','Ankur Verma',3,'Java, Android Studio, Xamarin'),
('Developer','Dheeraj Sharma',4,'C#,Asp.Net,MVC,AngularJS'),
('Developer','Dhramveer',3,'C#,Asp.Net,MVC,AngularJS,Node.js'),
('Mobile Developer','Shivam Kumar',5,'Java, Android Studio, Xamarin')
Now our database and application setup is ready, let’s start work on controllers and views section of application.
Employee List
After all configuration, now we start work on view section of our project. First, we create the Employee list and display some basic information of employees.
Add ViewModel
ViewModel in ASP.NET MVC is used to show only required information. ViewModel is also used to show data from two or more models. Now we add a ViewModel folder in project. Add a new folder in project and name it as ViewModels. After creating the viewModels folder, add a class in ViewModels folder. Right click on ViewModels folder and add a new class, name this class as Employee_Project. After creating the class, now paste the following code in this class.
public class Employee_Project
    {
        public int EmployeeId { get; set; }
        public string EmployeeName { get; set; }
        public string Designation { get; set; }
        public string Project { get; set; }
    }
In the above code, we added four properties, values for first three property will be received from Employee model and value of fourth property will be received from the Project model.
Now go to HomeController and paste the following code in Index method.
public async Task<IActionResult> Index()
        {
            List<Employee_Project> ilIst = new List<Employee_Project>();
            var listData = await (from emp in _context.Employee
                            join pro in _context.Project on emp.ProjectId
                                 equals pro.ProjectId
                            select new
                            {
                                emp.EmployeeId,
                                emp.EmployeeName,
                                emp.Designation,
                                pro.ProjectName
                            }
                          ).ToListAsync();
            listData.ForEach(x =>
            {
                Employee_Project Obj = new Employee_Project();
                Obj.EmployeeId = x.EmployeeId;
                Obj.Designation = x.Designation;
                Obj.EmployeeName = x.EmployeeName;
                Obj.Project = x.ProjectName;
                ilIst.Add(Obj);
            });

            return View(ilIst);
        }
In the above lines of code, we create an asynchronous method. Asynchronous programming is the default mode of ASP.NET Core. Asynchronous programming provides a mechanism to write the code in non-blocking mode. A server has limited numbers of threads, in high load situation if all the threads are blocked and a new request is arrived on server, then result will be block and stop to response. To overcome all these situations. .NET Core comes with an asynchronous programming method where we can write code for .NET Core MVC and EF core in asynchronous way. Result will be highly responsive and non-blocking server application. So during this project, we will try to write the code in asynchronous way.
In the above code, we use four keywords async, Task<IActionResult>, await and ToListAsync, all these keywords are used to make a method asynchronous.
- The
async keyword is used to define a method as asynchronous, this keyword tells the compiler to generate callbacks for parts of the method body and to automatically create the Task<IActionResult> object that is returned. Here, Task<IActionResult> defines the return type of an asynchronous method as IActionResult. - The
await keyword represents ongoing work, the asynchronous method in which await is used must be modified by the async keyword and await keyword tells the compiler to wait till the execution of a expression written in await. - The
ToListAsync keyword is asynchronous version of ToList method and tries to execute the expression in asynchronous way.
In the above code, we create an asynchronous index method. In the first line of code, List<Employee_Project> ilIst, we create a list of Employee_Project ViewModel type. Using Linq query, we get EmployeeId, EmployeeName, Designation, ProjectName information about all employees and add these value in iList object using ForEach method. In the last line of code, we returned this iList to view(return View(ilIst)).
After Index method in controller, now open Index view and paste the following code in Index view.
@model IEnumerable<EmployeeDetail.ViewModels.Employee_Project>

@{
    ViewData["Title"] = "Index";
}

<div class="row">
    <div class="col-md-12">
        <h3>Employee Application</h3>
    </div>
</div>
<div class="row">
    <div class="table-responsive">
        <table class="table">
            <thead>
                <tr>
                    <th>
                        @Html.DisplayNameFor(model => model.EmployeeName)
                    </th>
                    <th>
                        @Html.DisplayNameFor(model => model.Designation)
                    </th>
                    <th>
                        @Html.DisplayNameFor(model => model.Project)
                    </th>
                    <th>
                        Action
                    </th>
                </tr>
            </thead>
            <tbody>
                @foreach (var item in Model)
            {
                    <tr>
                        <td>
                            @Html.DisplayFor(modelItem => item.EmployeeName)
                        </td>
                        <td>
                            @Html.DisplayFor(modelItem => item.Designation)
                        </td>
                        <td>
                            @Html.DisplayFor(modelItem => item.Project)
                        </td>
                        <td>

                            <a asp-action="Detail" asp-controller="Home"
                               asp-route-Empid="@item.EmployeeId"
                                class="btn btn-primary">
                             Detail</a>
                            <a asp-action="Edit" asp-controller="Home"
                               asp-route-Empid="@item.EmployeeId"
                               class="btn btn-success">
                                Edit
                            </a>
                            <a asp-action="Delete" asp-controller="Home"
                               asp-route-Empid="@item.EmployeeId"
                               class="btn btn-danger">
                                Delete
                            </a>
                        </td>
                    </tr>
            }
        </table>
    </div>
</div>
<div class="row">
    <div class="col-md-12">
        <a asp-action="NewEmployee" asp-controller="Home">
            <button type="button" id="submit" class="btn btn-warning">
             Add Employee</button>
        </a>
    </div>

</div>
In index view, we get the IEnumerable object of Employee_Project ViewModel and create a list of all employees. For each employee entry, we will add Edit, Delete and Detail option. Using Edit option, we will redirect to a page where we can edit the information of employee, using Delete option, we can delete any existing employee and using Detail option, we can get all information about an employee. We also added an Add Employee button using that we can add a new employee entry. Code of Index method and Index view will create the below screen:
Add New Employee
Home page of our application contains Add Employee button, on click of this button, a new screen will open where we can add a new employee entry. Now create NewEmployee method in Home controller and paste the following code in this method:
public async Task<IActionResult> NewEmployee()
        {
            List<Project> project_ = new List<Project>();
            var Project = await (from data in _context.Project
                           select new
                           {
                               ProjectId = data.ProjectId,
                               ProjectName = data.ProjectName
                           }).ToListAsync();
            Project.ForEach(x =>
            {
                Project pro = new Project();
                pro.ProjectId = x.ProjectId;
                pro.ProjectName = x.ProjectName;
                project_.Add(pro);
            });

            return View(project_);
        }
In the above code, we create an asynchronous method (NewEmployee), and in this method, we are getting the list of all projects and return this list to AddEmployee view. On view page using this list, we create a dropdown list that contains name of all projects. Now right click on View folder and add a new view, name this view as AddEmployee. Now paste the following code in this view.
<style>
    .hidedata {
        padding-top: 50px;
    }
</style>
<div class="row">

    <div class="col-md-12">
        <div class="col-md-8 col-lg-offset-4">
            <h3>Enter Employee Details</h3>
            </div>
        @{
            List<SelectListItem> items=new List<SelectListItem>();

            foreach (var data in Model)
            {
                items.Add(new SelectListItem()
                {
                    Value = Convert.ToString(data.ProjectId),
                    Text = data.ProjectName
                });
            }
        }
        @using (@Html.BeginForm("AddEmployee","Home",FormMethod.Post))
        {
        <div class="row hidedata" id="hidDiv">
            <div class="col-md-6 col-lg-offset-3">
                <form class="form-horizontal">
                    <div class="form-group">
                        <label for="EmployeeName" class="col-sm-4 control-label">
                         Employee Name:</label>
                        <div class="col-sm-8">
                            <input type="text" class="form-control"
                             name="EmployeeName" placeholder="Employee Name">
                        </div>
                    </div>
                    <div class="form-group">
                        <label for="Designation" class="col-sm-4 control-label">
                         Designation:</label>
                        <div class="col-sm-8">
                            <input type="text" class="form-control"
                             name="Designation" placeholder="Designation">
                        </div>
                    </div>
                    <div class="form-group">
                        <label for="Skills" class="col-sm-4 control-label">
                         Skills:</label>
                        <div class="col-sm-8">
                            <input type="text" class="form-control"
                             name="Skills" placeholder="Employee Name">

                        </div>
                    </div>
                    <div class="form-group">
                        <label for="ProjectId" class="col-sm-4 control-label">
                         Project:</label>
                        <div class="col-sm-8">
                            @Html.DropDownList("ProjectId", items,
                            "---Select---", new { @class = "form-control" })

                        </div>
                    </div>

                    <div class="form-group">
                        <div class="col-sm-offset-4 col-sm-8">
                            <button type="submit" class="btn btn-info">Submit</button>
                        </div>
                    </div>
                </form>
            </div>
        </div>
        }
        </div>
</div>
In the above codes, we created a list of SelectListItem type and bind all the values of projects in this list that we retrieved from controller. Using Html.BeginForm html helper, we created an html form. In this form, we created three textboxes for EmployeeName, Designation and Skills property and a dropdown for the Projects. In this dropdown, we bind list values that we created earlier.
In @Html.BeginForm, we define the action and controller name, method of form is POST type. When we submit this form, all field values will submit to AddEmployee action of Home controller.
Now, add the following code in Home controller.
[HttpPost]
        public IActionResult AddEmployee(IFormCollection form)
        {
            Employee Emp = new Employee();
            Emp.EmployeeName = form["EmployeeName"].ToString();
            Emp.ProjectId = int.Parse(form["ProjectId"].ToString());
            Emp.Skills = form["Skills"].ToString();
            Emp.Designation = form["Designation"].ToString();
            _context.Employee.Add(Emp);
            _context.SaveChanges();
            return RedirectToAction("Index");

        }
Here, we created AddEmployee action. Remember that we have already an action with AddEmployee name but type of this action is POST and takes a parameter of IFormCollection type. This parameter contains values of all controllers that are present in form section of NewEmployee view. In POST method of AddEmployee, we get value of all controllers from IformCollection object. This object contain values in form of key-value pairs. After fetching out all the values from IFormCollection object, we assign these values to Employee object and add this employee object to _context.Employee using add method. After adding the new employee, we redirect the control to Index action.
Get Employee Details
In index view, we display the list of all employees and each employee entry also contains Detail button.
Using this button, we can get all information of an employee. Actually, this button is anchor tag and this anchor tag contains controller and action name. So when we click on this anchor tag, it will redirect to Detail action of Home controller . We want to display the information of a particular employee so we need to pass the employeeId to our action. In anchor tag, we also define the asp-route-Empid attribute, this attribute will add a EmpId parameter to URL string.
<a asp-action="Detail" asp-controller="Home"
                               asp-route-Empid="@item.EmployeeId"
                                class="btn btn-primary">
                             Detail</a>
Let’s add a Details action in Home controller and paste the following code in this action:
public async Task<IActionResult> Detail(int Empid)
        {
            EmployeeDetails Empobj = new EmployeeDetails();
            var EmpDeatils =  await (from emp in _context.Employee
                              join pro in _context.Project on
                                   emp.ProjectId equals pro.ProjectId
                              where emp.EmployeeId==Empid
                              select new EmployeeDetails
                              {
                                EmployeeId=  emp.EmployeeId,
                                EmployeeName= emp.EmployeeName,
                               Designation= emp.Designation,
                                 Skills= emp.Skills,
                                ProjectName= pro.ProjectName,
                               StartDate= pro.StartDate,
                                 EndDate= pro.EndDate
                              }
                          ).FirstAsync();

            return View(EmpDeatils);
        }
In the above code, we create an asynchronous action. This action takes an EmpId parameter that we passed from the index view. Using this EmpId, we get all information about that particular employee and return to the Detail view. In the first line of code, we created an object of EmployeeDetails class, here EmployeeDetails is a ViewModel. We need to create a ViewModel because we want to display personal and project level information of an employee. This information is related to more than one entity. So, right click on ViewModels folder, add a new class and name this class as EmployeeDetails. After creating the class, paste the following code into this class.
namespace EmployeeDetail.ViewModels
{
    public class EmployeeDetails
    {
        public int EmployeeId { get; set; }
        public string EmployeeName { get; set; }
        public string Designation { get; set; }
        public string Skills { get; set; }
        public string ProjectName { get; set; }
        public DateTime StartDate { get; set; }
        public DateTime EndDate { get; set; }
    }
}
In EmployeeDetail ViewModel, we define all the properties that we will display on details page. After working on controller and ViewModels, now we add a new views to Home folder. Right click on Home folder and add a new view and name this view as Details. After creating the view, now paste the following code into view:
@model EmployeeDetail.ViewModels.EmployeeDetails
@{
    ViewData["Title"] = "Index";
}
<style>
    .row {
        line-height: 30px;
        font-size: 16px;
    }
</style>
<div class="row">
    <div class="col-md-12">
        <h3>Employee Details</h3>
    </div>
</div>

<div class="row">
    <div class="col-md-3"><b>Employee Name:</b></div>
    <div class="col-md-3">@Model.EmployeeName</div>
</div>
<div class="row">
    <div class="col-md-3"><b>Designation:</b></div>
    <div class="col-md-3">@Model.Designation</div>
</div>

<div class="row">
    <div class="col-md-3"><b>Skills:</b></div>
    <div class="col-md-3">@Model.Skills</div>
</div>
<div class="row">
    <div class="col-md-3"><b>ProjectName:</b></div>
    <div class="col-md-3">@Model.ProjectName</div>
</div>
<div class="row">
    <div class="col-md-3"><b>Start Date:</b></div>
    <div class="col-md-3">@Model.StartDate.Date</div>
</div>
<div class="row">
    <div class="col-md-3"><b>End Date:</b></div>
    <div class="col-md-3">@Model.EndDate.Date</div>
</div>
Detail view will display the personal and project level information of an employee. For example, when we click on Detail button for Dheeraj Sharma employee, we will redirect to Detail page and the following result will be displayed.
Update Employee Details
In employee listing page, we added an Edit button for each employee. When any user clicks on this button, it will redirect to Edit action of the HomeController and we are passing the EmployeeId as parameter.
<a asp-action="Edit" asp-controller="Home"
                               asp-route-Empid="@item.EmployeeId"
                               class="btn btn-success">
                                Edit
                            </a>
Now add the following code in HomeController.
public async Task<IActionResult> Edit(int Empid)
        {
            EmployeeInfo empData = new EmployeeInfo();
            var empObj= await
                 _context.Employee
                .Where(x => x.EmployeeId == Empid)
                .FirstAsync();

            empData.EmployeeId = empObj.EmployeeId;
            empData.EmployeeName = empObj.EmployeeName;
            empData.Skills = empObj.Skills;
            empData.Designation = empObj.Designation;
            empData.ProjectId = empObj.ProjectId;
            var projectObj = _context.Project;

           await projectObj.ForEachAsync(x=>{
                empData.list.Add(new SelectListItem()
                { Text = x.ProjectName, Value = x.ProjectId.ToString() });
            });

            return View(empData);
        }
In the above code, we created an asynchronous action and return type of action is Task<IActionResult>. In the first line of code, we are creating the object of EmployeeInfo class. We insert the employee details and a list of SelectListItem type in this object. Now right click on Models folder, add a new class and name this class as EmployeeInfo. Now paste the following code in this class:
public class EmployeeInfo
    {
        public int EmployeeId { get; set; }
        public string EmployeeName { get; set; }
        public string Designation { get; set; }
        public string Skills { get; set; }
        public int ProjectId { get; set; }

        public List<SelectListItem> list = new List<SelectListItem>();
    }
This class will be used as Model class for our Edit view. In this class, we added some property and List of SelectListItem type. This list holds all the project names.
In next lines of Edit action, we fetched out the employee details and project list and bind all these values to empData object of EmployeeDetails class and in the last line, we returned this object to view.
After that, now right click on Views folder, add a new view and name this view as Edit and paste following code into this view.
<style>
    .hidedata {
        padding-top: 50px;
    }
</style>
<div class="row">

    <div class="col-md-12">
        <div class="col-md-8 col-lg-offset-4">
            <h3>Edit Employee Details</h3>
        </div>

        @using (@Html.BeginForm("Edit", "Home", FormMethod.Post))
        {
            <div class="row hidedata" id="hidDiv">
                <div class="col-md-6 col-lg-offset-3">
                    <form class="form-horizontal">
                        <div class="form-group">
                            <label for="EmployeeName"
                             class="col-sm-4 control-label">Employee Name:</label>
                            <div class="col-sm-8">
                                <input type="text" class="form-control"
                                 value="@Model.EmployeeName" name="EmployeeName"
                                 placeholder="Employee Name">
                            </div>
                        </div>
                        <div class="form-group">
                            <label for="Designation"
                             class="col-sm-4 control-label">Designation:</label>
                            <div class="col-sm-8">
                                <input type="text" class="form-control"
                                 value="@Model.Designation" name="Designation"
                                 placeholder="Designation">
                            </div>
                        </div>
                        <div class="form-group">
                            <label for="Skills" class="col-sm-4 control-label">
                             Skills:</label>
                            <div class="col-sm-8">
                                <input type="text" class="form-control"
                                 value="@Model.Skills" name="Skills"
                                 placeholder="Employee Name">

                            </div>
                        </div>
                        <div class="form-group">
                            <label for="ProjectId" class="col-sm-4 control-label">
                             Project:</label>
                            <div class="col-sm-8">
                                @Html.DropDownList("ProjectId",
                                 new SelectList(Model.list,"Value",
                                 "Text",Model.ProjectId) ,
                                 "---Select---", new { @class = "form-control" })
                            </div>
                        </div>
                       <input type="hidden" name="EmployeeId"
                        value="@Model.EmployeeId"/>
                        <div class="form-group">
                            <div class="col-sm-offset-4 col-sm-8">
                                <button type="submit"
                                 class="btn btn-info">Submit</button>
                            </div>
                        </div>
                    </form>
                </div>
            </div>
        }
    </div>
</div>
The above HTML code creates an html form, in this form, we added some controller. In the initial state, values of all these controllers are filled with the Model data that we returned from the Edit action.
After any modification, when we submit all the changes, it will redirect to Edit action of Home Controller. Now add the following code in your HomeController.
[HttpPost]
        public IActionResult Edit(IFormCollection form)
        {
            Employee emp = new Employee();
            emp.EmployeeId = int.Parse(form["EmployeeId"]);
            emp.Designation = form["Designation"];
            emp.EmployeeName = form["EmployeeName"];
            emp.ProjectId = int.Parse(form["ProjectId"]);
            emp.Skills = form["Skills"];
            _context.Entry(emp).State =
            Microsoft.EntityFrameworkCore.EntityState.Modified;
            _context.SaveChanges();
            return RedirectToAction("Index");
        }
In the above code, we get all the information from IformCollection object and adding these information in Employee object. Using this Employee object, we are updating the state of Employee and saving all these changes to the database.
Delete Employee Entry
In Employee listing page, we have an option to delete any employee entry. When we click on Delete button, it will redirect to Delete action of Home controller. We are also passing the Empid parameter that contains EmployeeId to whom we want to delete.
<a asp-action="Delete" asp-controller="Home"
                               asp-route-Empid="@item.EmployeeId"
                               class="btn btn-danger">
                                Delete
                            </a>
Now, add the following code in your HomeController.
public IActionResult Delete(int Empid)
        {
            Employee Emp;
            Emp = _context.Employee.Where(x => x.EmployeeId == Empid).First();
            _context.Employee.Remove(Emp);
            _context.SaveChanges();
            return RedirectToAction("Index");
        }
In the above line of codes, according to EmployeeId value, we are getting the Employee object and remove this employee from dbContext and save all the changes to database. In short form, all the above code deletes the employee entry and saves all the changes in database.
Add Search Box
Now we add search functionality in our project, for this we will add a textbox and search button. We perform the searching on Employee name and project name. Replace the below code with code of your Index view.
@model IEnumerable<EmployeeDetail.ViewModels.Employee_Project>
@{
    ViewData["Title"] = "Index";
}

<div class="row">
    <div class="col-md-12">
        <h3>Employee Application</h3>
    </div>
</div>
<div class="row">
    <div class="col-md-12">
        <form asp-action="Search" >
            <div class="form-actions no-color">
                <p>
<input type="text" name="searchText" value="@ViewData["searchText"]" />
                    <input type="submit" value="Search" class="btn btn-primary" /> |
                    <a asp-action="Index">Show All</a>
                </p>
            </div>
        </form>
    </div>
</div>
<div class="row">
    <div class="table-responsive">
        <table class="table">
            <thead>
                <tr>
                    <th>
                        @Html.DisplayNameFor(model => model.EmployeeName)
                    </th>
                    <th>
                        @Html.DisplayNameFor(model => model.Designation)
                    </th>
                    <th>
                        @Html.DisplayNameFor(model => model.Project)
                    </th>
                    <th>
                        Action
                    </th>
                </tr>
            </thead>
            <tbody>
                @foreach (var item in Model)
            {
                    <tr>
                        <td>
                            @Html.DisplayFor(modelItem => item.EmployeeName)
                        </td>
                        <td>
                            @Html.DisplayFor(modelItem => item.Designation)
                        </td>
                        <td>
                            @Html.DisplayFor(modelItem => item.Project)
                        </td>
                        <td>

                            <a asp-action="Detail" asp-controller="Home"
                               asp-route-Empid="@item.EmployeeId"
                                class="btn btn-primary">
                             Detail</a>
                            <a asp-action="Edit" asp-controller="Home"
                               asp-route-Empid="@item.EmployeeId"
                               class="btn btn-success">
                                Edit
                            </a>
                            <a asp-action="Delete" asp-controller="Home"
                               asp-route-Empid="@item.EmployeeId"
                               class="btn btn-danger">
                                Delete
                            </a>
                        </td>
                    </tr>
            }
        </table>
    </div>
</div>
<div class="row">
    <div class="col-md-12">
        <a asp-action="NewEmployee" asp-controller="Home">
            <button type="button" id="submit" class="btn btn-warning">
             Add Employee</button>
        </a>
    </div>
</div>
For searching functionality, we added a form section. In this form, we have a textbox, when we insert some text in textbox and click on Search button, it will redirect to Search action of HomeController.
<form asp-action="Search" >
            <div class="form-actions no-color">
                <p>
<input type="text" name="searchText" value="@ViewData["searchText"]" />
<input type="submit" value="Search" class="btn btn-primary" /> |
                    <a asp-action="Index">Show All</a>
                </p>
            </div>
        </form>
Now in HomeController, add the following code:
public async Task<IActionResult> Search(IFormCollection form)
     {
         if (form["searchText"].ToString() != "")
         {
             List<Employee_Project> ilIst = new List<Employee_Project>();
             var listData = await(from emp in _context.Employee
                                  join pro in _context.Project on
                                  emp.ProjectId equals pro.ProjectId
                                  where emp.EmployeeName.Contains
                                  (form["searchText"].ToString())
                                  ||
                                  pro.ProjectName.Contains
                                  (form["searchText"].ToString())
                                  select new
                                  {
                                      emp.EmployeeId,
                                      emp.EmployeeName,
                                      emp.Designation,
                                      pro.ProjectName
                                  }
                           ).ToListAsync();
             listData.ForEach(x =>
             {
                 Employee_Project Obj = new Employee_Project();
                 Obj.EmployeeId = x.EmployeeId;
                 Obj.Designation = x.Designation;
                 Obj.EmployeeName = x.EmployeeName;
                 Obj.Project = x.ProjectName;
                 ilIst.Add(Obj);
             });

             return View("Index",ilIst);
         }
         else
         {
             return RedirectToAction("Index");
         }
     }
In the above code, we creates a Search action of asynchronous type. In this action, we use the IFormCollection object to get the value of search textbox. If values textbox is not empty, then we perform the Contains operator in Linq query that is equal to the like operator of SQL. This LINQ query return all the Employee whose EmployeeName or project name contains the text that we inserted into textbox.
We have also a Show All option. Using this option, we can get list of all the employees.
Add Sorting Functionality
After adding the search functionality, now we will add data sorting option in employee list. We will perform the sort operation on Employee name. By default, sorting order will be ascending. So add order by emp.EmployeeName ascending line in index action where we are getting the list employees.
This command sorts the data in ascending order according to the Employees name.
Add the following lines of code in EmployeeName header of table:
<a asp-action="Sort" asp-route-sortOrder="@ViewData["sortOrder"]">
    <img src=@("/images/"+(ViewData["sortOrder"]!=null?ViewData
     ["sortOrder"]:"ascending")+".png") />
                        </a>
In the above code, we added an image and we will show the ascending.png image for ascending order sorting and descending.png images for the descending order sorting. Now add two images for up and down arrow in your images folder and renamed these images to descending.png and ascending.png. We will use these images to indicate the sorting order.
Now add Sort action in HomeController and copy the following code in Sort action.
public async Task<IActionResult> Sort(string sortOrder)
            {
            List<Employee_Project> ilIst = new List<Employee_Project>();

            if (sortOrder == "ascending" || sortOrder == null)
            {
                ViewData["sortOrder"] = "descending";
               var listData = await (from emp in _context.Employee
                                      join pro in _context.Project
                                      on emp.ProjectId equals pro.ProjectId

                                      orderby emp.EmployeeName descending
                                      select new
                                      {
                                          emp.EmployeeId,
                                          emp.EmployeeName,
                                          emp.Designation,
                                          pro.ProjectName
                                      }

                              ).ToListAsync();
                listData.ForEach(x =>
                {
                    Employee_Project Obj = new Employee_Project();
                    Obj.EmployeeId = x.EmployeeId;
                    Obj.Designation = x.Designation;
                    Obj.EmployeeName = x.EmployeeName;
                    Obj.Project = x.ProjectName;
                    ilIst.Add(Obj);
                });

                return View("Index", ilIst);
            }
            else
            {
                ViewData["sortOrder"] = "ascending";
                var  listData = await (from emp in _context.Employee
                                      join pro in _context.Project
                                      on emp.ProjectId equals pro.ProjectId

                                      orderby emp.EmployeeName ascending
                                      select new
                                      {
                                          emp.EmployeeId,
                                          emp.EmployeeName,
                                          emp.Designation,
                                          pro.ProjectName
                                      }
                                      ).ToListAsync();
                listData.ForEach(x =>
                {
                    Employee_Project Obj = new Employee_Project();
                    Obj.EmployeeId = x.EmployeeId;
                    Obj.Designation = x.Designation;
                    Obj.EmployeeName = x.EmployeeName;
                    Obj.Project = x.ProjectName;
                    ilIst.Add(Obj);
                });

                return View("Index", ilIst);
            }
        }
According the value of sortOrder parameter, we will perform the orderBy clause. When value of sortOrder parameter is ascending or null, then we will sort the employee list in descending order and show the descending.png image.
In else statement, we perform the sorting of the list in "ascending" order and show the ascending.png image.
History
- 13th March, 2017: Initial version
Pankaj Kumar Choudhary loves Microsoft and Database technologies. He has experience on several database technology like SQL Server, MySQL, Oracle, MongoDB, PostgreSQL . He has knowledge of several technology like Asp.Net MVC, Entity Framework , Android, Php, AngularJS, Node.js, Angular2, React, Ionic and Android.


 General
  News
News  Suggestion
  Question
  Bug
Bug  Answer
  Joke
Joke  Praise
  Rant
Rant  Admin
Admin 


