Prerequisites
Basic understanding of HTML, CSS, JavaScript are required. Though prior knowledge of Angular JS version 1.x helps in comparative study and quick learning of Angular 2, a programmer new to this technology can also get started with Angular 2 without dependency on Angular 1.x.
Introduction
Angular 2 is not just a version upgrade but is a complete rewrite of Angular 1.x to improve the performance and make the code more modular and maintainable.
In Angular 2, application is comprised of a set of Components and set of Services that provide functionality to those Components. Figure shows the anatomy of Angular 2 application.
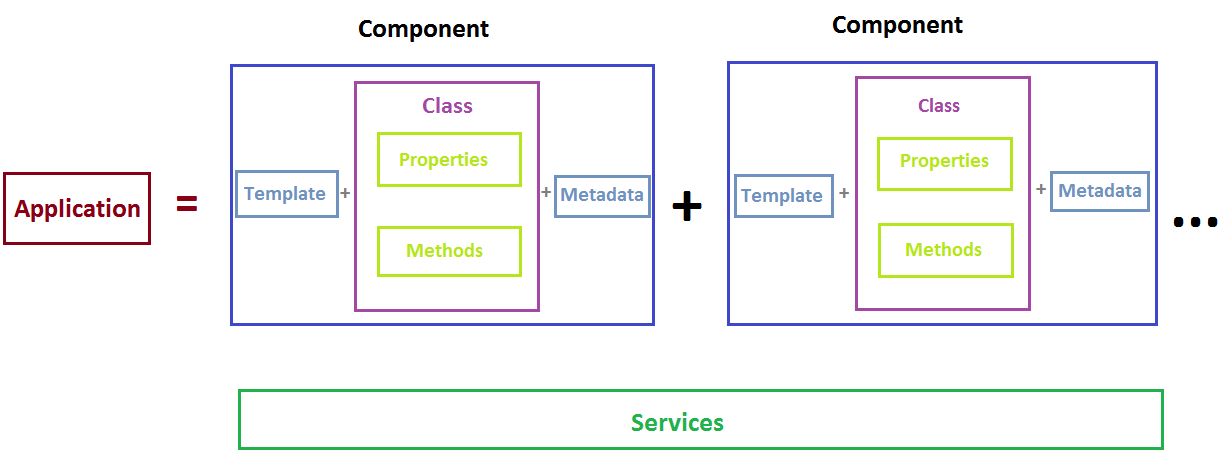
So, What is a Component?
Each Component is comprised of a Template, Class and Metadata.
- Template is the HTML for the user interface fragment defining the view of the application.
- A Class has properties for use in the view and methods which performs actions for the view, responding to events. That is, Class is associated with the view.
- Metadata, provides the additional information of Component to Angular. It is this metadata that identifies the Class as Angular Component.
Don't worry, if this doesn't make sense at this stage, we will see an example on it in our upcoming article. First, let us understand basics of Typescript and then set up environment for building Hello World application in Angular 2.
Introduction to TypeScript
Typescript is the open source language and superset of JavaScript. It must be transpiled or say compiled to plain JavaScript for the browser to execute it. By writing code in Typescript, we get strong typing and other new productivity features of it.
Strongly typed mean, every variable, function type has a data type.
For example:
| Typescript | JavaScript |
var num : number = 5;
|
var num = 5;
|
var name : string = "hello";
|
var name = "hello";
|
var name = 10;
|
var name = 10;
|
var someData : any = [1, 2, 3];
|
var someData = [1, 2, 3];
|
function square (num : number) : number{
    return num *  num;
}
|
function square( num ) {
    return num * num;
}
|
More on typescript can be practiced on Typescript playground which is free. The transpiled typescript code into Javascript can also be seen here.
For more details on what is new in Typescript, please refer to https://github.com/Microsoft/TypeScript/wiki/What's-new-in-TypeScript.
Steps to Set Environment to Develop Angular2 Application
Step 1
Required IDE - Visual Studio 2013/15 with Typescript plugin or Visual Studio Code or Webstorm or Eclipse.
Step 2
Download and Install NodeJS from https://nodejs.org/en/download/ (select .msi based on system configuration). This helps in installing packages or dependency files for our application through npm.
Step 3
Create a folder for application say ‘Angular2-Sample’. Now we need to add the files systemjs.config, tsconfig.json, typings.json, package.json file.
You can get the content of these files from https://angular.io/docs/js/latest/quickstart.html.
For quick start, placing the content of files below.
Content of Package.json 1 file:
{
  "name": "angular2-sample",
  "version": "1.0.0",
  "scripts": {
    "start": "tsc && concurrently \"npm run tsc:w\" \"npm run lite\" ",
    "lite": "lite-server",
    "postinstall": "typings install",
    "tsc": "tsc",
    "tsc:w": "tsc -w",
    "typings": "typings"
  },
  "license": "ISC",
  "dependencies": {
    "@angular/common":  "2.0.0-rc.1",
    "@angular/compiler":  "2.0.0-rc.1",
    "@angular/core":  "2.0.0-rc.1",
    "@angular/http":  "2.0.0-rc.1",
    "@angular/platform-browser":  "2.0.0-rc.1",
    "@angular/platform-browser-dynamic":  "2.0.0-rc.1",
    "@angular/router":  "2.0.0-rc.1",
    "@angular/router-deprecated":  "2.0.0-rc.1",
    "@angular/upgrade":  "2.0.0-rc.1",
    "systemjs": "0.19.27",
    "core-js": "^2.4.0",
    "reflect-metadata": "^0.1.3",
    "rxjs": "5.0.0-beta.6",
    "zone.js": "^0.6.12",
    "angular2-in-memory-web-api": "0.0.11",
    "bootstrap": "^3.3.6"
  },
  "devDependencies": {
    "concurrently": "^2.0.0",
    "lite-server": "^2.2.0",
    "typescript": "^1.8.10",
    "typings":"^1.0.4"
  }
}
The key "dependencies" in the above json data includes all those modules which need to be installed on npm install command. The other modules which are required only at the time of development goes under "devDependencies" key.
Content of tsConfig.json 2 file:
{
  "compilerOptions": {
    "target": "es5",
    "module": "commonjs",
    "moduleResolution": "node",
    "sourceMap": true,
    "emitDecoratorMetadata": true,
    "experimentalDecorators": true,
    "removeComments": false,
    "noImplicitAny": false
  }
}
Content of typings.json 3 file:
{
  "globalDependencies": {
    "core-js": "registry:dt/core-js#0.0.0+20160317120654",
    "jasmine": "registry:dt/jasmine#2.2.0+20160505161446",
    "node": "registry:dt/node#4.0.0+20160509154515"
  }
}
Content of systemjs.config.js 4:
(function(global) {
var map = {
'app': 'app',
'@angular': 'node_modules/@angular',
'angular2-in-memory-web-api': 'node_modules/angular2-in-memory-web-api',
'rxjs': 'node_modules/rxjs'
};
var packages = {
'app': { main: 'main.js', defaultExtension: 'js' },
'rxjs': { defaultExtension: 'js' },
'angular2-in-memory-web-api': { main: 'index.js', defaultExtension: 'js' },
};
var ngPackageNames = [
'common',
'compiler',
'core',
'http',
'platform-browser',
'platform-browser-dynamic',
'router',
'router-deprecated',
'upgrade',
];
function packIndex(pkgName) {
packages['@angular/'+pkgName] = { main: 'index.js', defaultExtension: 'js' };
}
function packUmd(pkgName) {
packages['@angular/'+pkgName] = { main: pkgName + '.umd.js', defaultExtension: 'js' };
};
var setPackageConfig = System.packageWithIndex ? packIndex : packUmd;
ngPackageNames.forEach(setPackageConfig);
var config = {
map: map,
packages: packages
}
System.config(config);
})(this);
An alternate way to create the package.json file manually is through Command Line Interface. From the command prompt, navigate to project folder ‘Angular2-Sample’, and run ' npm init ' command.
On executing this command, it will prompt few questions like name, description, etc. Enter required details or press enter and continue. On completion, it will create a package.json file in the directory. The json content can also be changed later manually.
Step 4
From command prompt, navigate to project folder ‘Angular2-Sample’ which contains package.json file and execute the command npm install. On successful installation, two folders, i.e., node_modules, typings folder will be created and contains the dependent modules required for Angular 2 application (These modules are based on dependencies mentioned in package.json file).
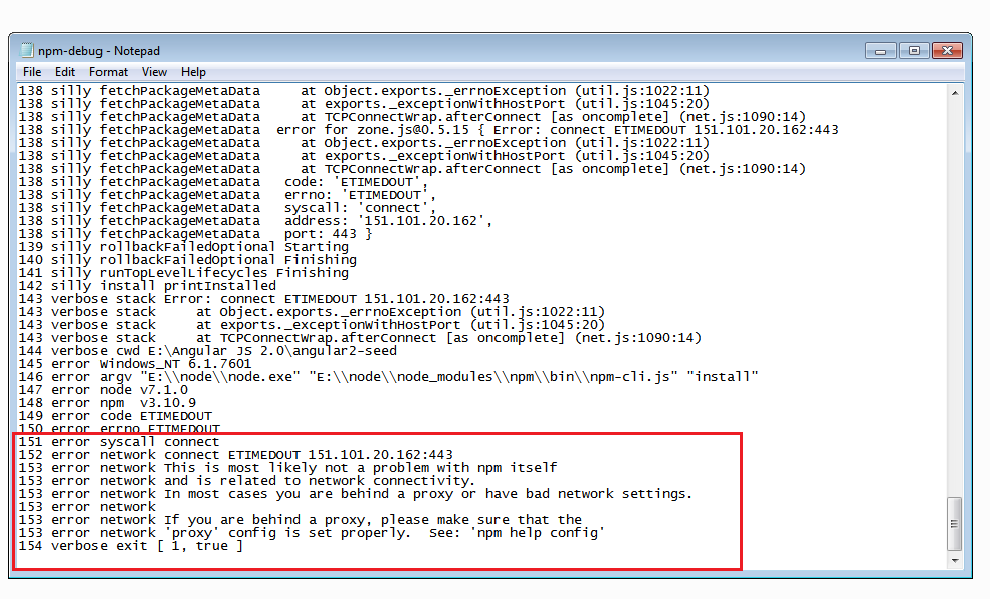
To install npm, make sure that you are not on limited internet access. Proxy network also blocks successful installation of required modules.
If the installation is unsuccessful, you can see the error message in the npm log file created in project folder.
Refer to the error message in screenshot of npm log file below:
Till the stage, we have made the environment ready, by adding required dependency files and getting the required angular2 modules based on dependencies mentioned in package.json file.
In our next article, 'Getting Started with Angular2 - Part 2' , we will see how to write a simple 'Hello World' application and then add features to it.
References
This member has not yet provided a Biography. Assume it's interesting and varied, and probably something to do with programming.


 General
  News
News  Suggestion
  Question
  Bug
Bug  Answer
  Joke
Joke  Praise
  Rant
Rant  Admin
Admin 


