Introduction
This is the article I wanted to find when I first began creating my custom setup. The information that I could find was broken in pieces and spread over the World Wide Web. I could only rely on parts of the algorithm and it took my precious time to figure out the actual business flow. That's why I finally decided to write this synthesis. The battle is in the custom actions and user interface sections. How do I configure a UI dialog and how can I hook the information entered in one of these dialogs to a piece of code that will do the custom configuration I want, based on this information?????
Here is an easy way to do this:
The main flow
Step 1
The best practice is to create a brand new assembly for creating personal customized steps while running the installer, namely InstallHelper-s.
Step 2
Choose your strategy:
Strategy 1
Create a console application project (I named it as InstallHelperVers1) and expect customized values in the args[] array of InstallHelperVers1 main entry point:
[STAThread]
static void Main(string[] args)
{
string sz1 = args[0];
string sz2 = args[1];
Console.WriteLine("First option = " + sz1);
Console.WriteLine("Second option = " + sz2);
}
Build the project and add it to the file system section. Add a custom action by choosing the InstallHelperVers1application. Open the Properties window of the newly added assembly and fill in the arguments section using "[" and "]" characters. The custom dialog field values are as follows:
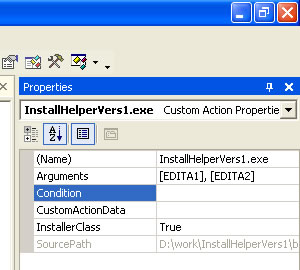
where EDITA1 and EDITA2 are what you previously configured in the custom dialog textboxes in the Properties window at the Edit1Property and Edit2Property. You can leave the rest of the properties with their default values.
Results: While installing, InstallHelperVers1 will be executed with the mentioned arguments.
Strategy 2
Create a class library application project (I named it as InstallHelperVers2). Add a new item and choose an Installer class:

Override the OnBeforeInstall event or a more suitable event to serve your interest. Here is the MSDN example of how to do it:
using System;
using System.Collections;
using System.ComponentModel;
using System.Configuration.Install;
[RunInstaller(true)]
public class MyInstallerClass: Installer
{
public MyInstallerClass() :base()
{
this.Committed += new InstallEventHandler(MyInstaller_Committed);
this.Committing += new InstallEventHandler(MyInstaller_Committing);
}
private void MyInstaller_Committing(object sender, InstallEventArgs e)
{
Console.WriteLine("");
Console.WriteLine("Committing Event occured.");
Console.WriteLine("");
}
private void MyInstaller_Committed(object sender, InstallEventArgs e)
{
Console.WriteLine("");
Console.WriteLine("Committed Event occured.");
Console.WriteLine("");
}
public override void Install(IDictionary savedState)
{
base.Install(savedState);
}
public override void Commit(IDictionary savedState)
{
base.Commit(savedState);
}
public override void Rollback(IDictionary savedState)
{
base.Rollback(savedState);
}
public static void Main()
{
Console.WriteLine("Usage : installutil.exe Installer.exe ");
}
}
Expect customized values in the Context.Parameters.Keys array. Build the project and add it to the file system section. Add a custom action by choosing the InstallHelperVers2 application. Open the Properties window for the newly added assembly and fill in the CustomActionData section using the "[" and "]" characters to specify a field and a "/" character to specify each parameter. The custom dialog field values are as follows:
where e1 and e2 are the keys you address from your Installer class: string firstEdit = Context.Parameters["e1"];, and EDITA1 and EDITA2 are what you have previously configured in the custom dialog textboxes in the Properties window at the Edit1Property and Edit2Property, as you can see below:
If you want to see the parameters (typed or customized) that are available for use, use this code:
foreach (string keyValue in Context.Parameters.Keys)
{
  Console.WriteLine(keyValue + " = " + Context.Parameters[keyValue]);
}
It is highly important in this case to set the InstallerClass to TRUE. You can leave the rest of the properties with their default values.
Results: While installing, InstallHelperVers2 will be executed. Spot the Installer class and execute whatever is overridden in your Installer class.
Strategy 3
Repeat the steps from Strategy 2 with a few changes: Create InstallHelperVers3 as a simple Windows application project. Add an Installer class into this project. Forget all about setup dialogs and use the minimum possible dialogs in the setup project, the main and recommended ones are: Welcome dialog and installation folder dialog (and maybe customer information dialog).
For the rest of your customized steps, just follow the flow given below:
- Create a
try … catch … transaction in your Installer class; use the catch section to rollback installation if everything goes wrong. - Create a simple Windows Forms in your InstallHelper project that respects the setup main flow (Back and Previous buttons, Commit methods, etc.).
- Invoke these forms from inside the
try section. - Don't use any parameters when invoking this build during installation as you have transferred the whole business inside the InstallHelper.
Results: While installing, InstallHelperVers3 will be executed. Spot the Installer class and execute whatever is overridden in your Installer class, and that is your own setup flow.
That's it! As simple as that! From now on, use your imagination to complicate this scenario.
Good luck!
This member has not yet provided a Biography. Assume it's interesting and varied, and probably something to do with programming.


 General
  News
News  Suggestion
  Question
  Bug
Bug  Answer
  Joke
Joke  Praise
  Rant
Rant  Admin
Admin 


