The ESP 8266-12 won't last long on a batteries; it uses 80 mA per hour. So to use it for last-lasting battery-powered sensors, it's necessary to put it in sleep mode and, furthermore, use a stand-alone version without all the development board components. So, this post will be about how to program a stand-alone ESP 8266-12.<> Pre-requisites! I'll be using these components:
- @ A standard ESP8266-12 on a breakout-board such as the one shown
- @ A FT232RL USB to TTL serial adapter, for programming
- @ A 3v battery (I use a CR123a) for powering the ESP826612
- @ The Arduino IDE - I'm using version 1.6.12 for this tutorial
The following requirements should be met:
- @ The FT232RL is recognized by the PC and shows as a virtual COM port.
- @ All connections, including those on the The ESP 8266-12 on the breakout-board, are solid and conduct power as they should.
- @ The battery holds at least 2.8v of power.
- @ The ESP core-libraries have been imported into the Arduino IDE.
Connect the components as per the following pictures:
It's important that the GPIO 0 pin is connected to ground - that's the signal to the ESP8266-12 that it's about to be programmed.
I have found it's also important to power the ESP off and then on again before programming it from the Arduino IDE.
Having connected the above, we can move to the Arduino IDE. From the ESP-examples - File=>Examples=>ESP - load a basic sketch. Now head to the 'Tools' menu and ensure the below settings:
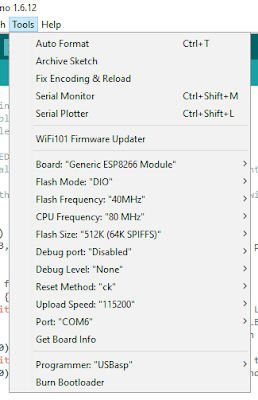
Again, remember to do a power-cycle of the ESP 8266-12 before programming it.
Given the above, it should be a simple matter of hitting 'Upload' and the Arduino IDE should program - 'flash' - the ESP8266-12.
Please note that the above it what works for me. Your USB-to-TTL module may be different, your PC may need a different upload speed, so on and so forth. You'll need to experiment a bit - as did I - if the above doesn't work straight away.
In a further blog-post I'll then document how to run the ESP - including bringing it in and out of deep sleep - after having programmed it.
This member has not yet provided a Biography. Assume it's interesting and varied, and probably something to do with programming.


 General
  News
News  Suggestion
  Question
  Bug
Bug  Answer
  Joke
Joke  Praise
  Rant
Rant  Admin
Admin 


