Introduction
I wrote a short blog recently on discovering the virtues of the build tools within Team Foundation Services (TFS) 2015 (also referred to as vNext). As I stated in that article, I have not previously been overly keen on the build tools within TFS. That was until I started using the build tools in TFS 2015. I have been very pleasantly surprised by the levels of integration with different build tools and version control platforms. Whereas previous versions of TFS build tools only really supported the Microsoft ecosystem, the new build tools that ship with TFS 2015 provide support for a huge variety of different platforms and tools.
The aim of this article is to provide an introduction to anyone looking to use the build tools in TFS 2015, or for anyone looking to extend their current usage of TFS beyond merely using it as a version control system (VCS).
To keep this article nice and straight-forward I'll create a simple build process for a web site that then publishes that web site to a test server. Hopefully this should provide sufficient information to take these ideas and expand them for your own particular build process.
Background
It is assumed that the reader has some basic knowledge of Team Foundation Services and of the basic principles of building software.
Getting Started
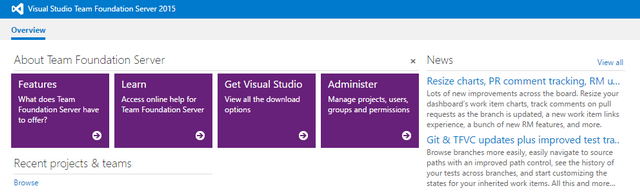
First of all you'll need to open your TFS 2015 home page in your browser of choice. The URL should be similar to http://tfsroot:8080/tfs and you ought to see something similar to the screenshot below. This is the TFS 2015 dashboard.
Select the desired project you want to build and you will be presented with the TFS project dashboard similar to the screenshot below.

By clicking the BUILD menu item from the top menu you open the Build Explorer dashboard. It is from here where you will create your build for the currently selected project.
Creating our build process
The first thing you'll notice about TFS 2015 is the sheer number of supported build platforms and tools. This can make setting up your first build rather confusing. As stated earlier, to keep things nice and simple, we will create a build for a simple web site that also publishes that web site to a test server.
To get started, click on the plus (+) sign below the menu to create our build. When you do so you wil be presented with a dialog like the one below. Select the Visual Studio option and click OK. This option is used to select the type of project you intend to build. If you are a Visual Studio developer and building a Visual Studio solution then this will be the option you select. In this example we are building an ASP.NET web project so we will select the Visual Studio option.
Note however the options for Xamarin build templates. Obviously you would select one of these if you were building a Xamarin solution. Also note the Xcode option if using a Mac.
Once you have selected the Visual Studio build option then you will see the Build menu. There are menu items for configuring the different parts of the build including the necessary build steps, the version control repository we want to connect to (with options for both Team Foundation Services and Git), any required build numbers, the build history and how the build should be triggered i.e. by Continuous Integration and / or on a scheduled basis.
We'll go through the menu items one at a time, so let's start with the Repository menu item. This allows us to configure the version control repository that our build process will use. Without a repository we don't have anything to build so this seems as good a place as any to start.
Configuring the Repository
The TFS 2015 build process predominantly supports two repository types. Either Team Foundation Version Control or Github, although there is also support if you use Subversion for your repository. For the purposes of this article I will be using Team Foundation Version Control. Select the appropriate value for Repository type as necessary.
Select the name of the repository that this build should use in the Repository name field.
Select whether to Clean the repository as part of the build process. Setting this to true empties out the checkout folder before the code is fetched from the repository. Set this value to false if you want an incremental build process which may improve the performance of your build process by negating the need to fetch the entire repository each time a build is invoked. The option to Clean can also be set for Visual Studio projects on the Build tab if using the Visual Studio Build or MSBuild options (more on this later).
The Mappings is where you define what folders should be included / excluded from the build process. To include a folder it should be defined as a Map. To exclude a folder from the build process it should be defined as a Cloak. For example you may want to Cloak your documentation folder so that it is not part of the build process.
Building the solution
The Build menu item is the place where we configure the steps our build will execute. It's important to understand that there are likely to be several build steps involed in building a solution, especially if we want to publish that solution. It can be a daunting task when initially faced with a blank build with no steps defined, especially when there are many different build steps to choose from.
As can be seen from the screenshot below there is an overwhelming choice of build steps to choose from. An explanation of each one of these is beyond the scope of this article, suffice to say that there will likely be an appropriate option whatever your particular build environment consists of.
Note that on the left you can select the type of build step you are interested in e.g. Build, Test, Package, Deploy etc. The default is Build but if you want to deploy or unit test your solution then there are other options available that will cater for those.
When building a Visual Studio solution there are two key options available to us (remember we are keeping things simple for now). The Visual Studio Build and the MSBuild. The Visual Studio Build does exactly the same as if you were in Visual Studio and right clicked on your solution and selected the Build Solution option from the context menu. This is obviously nice and simple and builds the solution with little complexity. One key difference is that this option sets the Visual Studio version number by automatically passing the /p:VisualStudioVersion on your behalf. This ensures a greater likelihood that your build will be successful. Use this option if you want a simple build that will succeed.
The MSBuild option allows a greater degree of flexibility and doesn't supply any default parameters to the build process. Therefore only the parameters you supply will be used by the build. This option is useful when you have a specific requirement and want to be in complete control of the build process.
What I intend to do for this article is to use both options. The Visual Studio build will allow us to quickly and easily build our solution with a minimum of fuss. Then we'll use the MSBuild option to supply specific parameters for publishing the solution.
So let's start by clicking on the Add build step... selecting the Visual Studio Build option and clicking the Add button to the right. We should now be presented with an empty Visual Studio Build step as in the screenshot below.
Supply the neccessary information for your build. This will differ depending on the specific requirements of your build but see an example of the sort of information that can be entered below. It should be fairly straight-forward to work out what information is required where if you have worked with a build process previouly, especially if you have previous knowledge of MSBuild.
- Solution - supply the name of the solution you want to build. This can be selected using the picker control that will open the currently selected solution.
- MSBuild Arguments - add any options here that you require. These are the same arguments that you would add as if you were running MSBuild from the commandline. For example specify any Targets, Properties etc as required. In the screenshot I have specified the
Clean and Rebuild targets. - Platform - select the platform your build requires e.g.
x86, x64 or any cpu. - Configuration - Set this to
release, debug or a custom platform as necessary. - Clean - Tick this option to force the build to fetch the entire contents of the repository for every build. Or to put it another way, untick this option to force an incremental build. The latter may improve performance.
- Enabled - this is a useful option if you want to quickly disable a step in your build script without having to delete it. This is useful if you want to diagnose a problem with your build and want to isolate a particular step, or if you are configuring your build for the first time and want to test specific parts of it along the way.
- Continue on Error - Tick this option to keep running the build even if an error occurs in this step
- Always Run - Tick this option to ensure that this step is always run even if errors are encountered in another step
Publishing the solution
The next step after we have built our solution is to publish it. To do this we need to add another step to our build process. We will use the MSBuild step to accomplish this. Although we could accomplish this using another Visual Studio Build step I want to use a different build step for demonstration purposes.
Click on the Add build step... selecting the MSBuild option and clicking the Add button to the right.
We should now be presented with an empty MSBuild step as in the screenshot below. You should note that the options are identical as for the previous Visual Studio Build step.
As the options are identical I won't repeat their definitions again (see further up). But it's worth repeating that the Visual Studio version is not passed to the MSBuild step via /p:VisualStudioVersion as it is with the previous Visual Studio Build step.
When publishing a solution we need to identify which project will be published. It is this project that we need to enter as the solution name for the build step.
The key information we need to enter are the MSBuild Arguments. As we are now publishing the project rather than building it, then we need to specify the targets of /t:Publish,package. This creates the neccesary build articles that can then be published to a test server for testing.
Although not specified in the screenshot for clarity, another MSBuild Arguments that I found useful included /p:AutoParameterizationWebConfigConnectionStrings=false. This was because by default the TFS 2015 build parameterises the web.config for different environments e.g. production, development etc. Adding this argument to the build script disables this behaviour.
If you look in the following folder you will see your published build articles.
{{Solution}} folder\obj\{{Platform}}\{{Configuration}}\Package\PackageTmp\
- Solution folder - is the folder where your project resides as entered via Solution
- Platform - the value you entered for Platform
- Configuration - the value you entered for Configuration
For example C:\TFSRoot\MySolution\MyProject\obj\any cpu\release\Package\PackageTmp\
At this point we have published build articles that can be deployed to a location of our choice e.g. to a test server. We can do this by adding another step to our build process.
Click on the Add build step... selecting the Publish Build Artifacts option and clicking the Add button to the right.
TFS 2015 can publish our build artifacts to either the Server or a File Share.
- Server - a folder under the root TFS folder will be created called artifacts (if it doesn't already exist) with a further sub-folder underneath named after the Artifact Name you specify e.g. C:\TFSRoot\artifacts\myprojectartifacts
- File Share - a file share anywhere on your network and which must be specified using a UNC path e.g. \\myshare\mypublishfolder\
There is nothing to stop you from creating multiple publish build steps. Create a Server based build step that creates a copy of the published build articles on the server, then create a File Share build step that copies the published build articles to your test web server.
Specifying a build number
Under the General menu item is where you specify the Build number format for your build. By default this will be a unique integer. So leave blank to invoke the default behaviour. To specify a different build number then use the Build number format to do so. You can use any combinaiton of tokens, variables and underscore characters.
As with MSBuild you will need to prefix variables and tokens using the $ symbol and enclosing the variable / token in braces e.g. $(BuildID)is an internal immutable ID assigned to each build.
Example tokens
- $(BuildDefinitionName) - the name of the build definition
- $(BuildID) - an internal immutable ID
- $(TeamProject) - the team project name
- $(SourceBranchName) - name of the branch e.g. master
Example variables
- $(Build.BuildNumber) - the name of the completed build
- $(Build.DefinitionVersion) - the version of the build definition
- $(Build.Repository.Name) - the name of the repository
- $(Build.DefinitionName) - the name of the build definition
Here is a very useful article on managing version numbers in TFS 2015.
Enabling Continuous Integration
The last step is to enable Continuous Integration so that our build steps are triggered each time there is a check-in to the repository. This is simply a matter of ticking the Continuous Integration (CI) checkbox on the Triggers menu.
Alternatively you can also configure scheduled builds. For example you may only want to deploy to your test server out of hours or run your unit tests hourly (if they take considerable time to execute) and only run the build steps with each check-in. You can configure as many different builds as necessary, and each build can have as many steps as necessary to achieve the required goals.
To run your build process without having to wait for a check-in, simply click on the Queue build... menu item that appears below the menu. This will add your build to the build queue and run it at the next available opportunity.
Next Steps
Up to this point we have created a build process that builds and publishes a web project with each check-in. So each time a developer checks-in some code, we automatically build it and publish it to our test server. That's very powerful, and all achieved with a minimum of fuss or difficulty. What else can we do with our build?
You can customise your build by using Powershell scripts or command-line scripts if you want to copy your published articles to a specific web server. You can employ FTP to achieve this for example. A good FTP client that I have used previously as it can be automated from build scripts easily is WinSCP.
You could extend your build by adding any of the following.
- unit tests and / or automated tests
- setup / tear down a database
- configure release management builds e.g. staging and production builds
- configure additional build agents to scale up your build process
Summary
That's all there is to it. TFS 2015 is a highly customisable, flexible build system that can integrate with many different build tools and platforms. There is a great deal more that you can do with TFS 2015 than has not been covered in this article. Hopefully this has given you sufficient information for you to create your own builds and extend them beyond what I have covered here. Feel free to leave a comment if you would like me to further elaborate on anything within this article.
I am a professional software engineer and technical architect with over twenty years commercial development experience with a strong focus on the design and development of web and mobile applications.
I have experience of architecting scalable, distributed, high volume web applications that are accessible from multiple devices due to their responsive web design, including architecting enterprise service-oriented solutions. I have also developed enterprise mobile applications using Xamarin and Telerik Platform.
I have extensive experience using .NET, ASP.NET, Windows and Web Services, WCF, SQL Server, LINQ and other Microsoft technologies. I am also familiar with HTML, Bootstrap, Javascript (inc. JQuery and Node.js), CSS, XML, JSON, Apache Cordova, KendoUI and many other web and mobile related technologies.
I am enthusiastic about Continuous Integration, Continuous Delivery and Application Life-cycle Management having configured such environments using CruiseControl.NET, TeamCity and Team Foundation Services. I enjoy working in Agile and Test Driven Development (TDD) environments.
Outside of work I have two beautiful daughters. I am also an avid cyclist who enjoys reading, listening to music and travelling.


