Any weight-lifters reading this blog? If you are trying to combine technology with your daily weight-lifting exercise, look no further. Today, I’ll show you how to recognize a weight-lifting bar and display its distance from the floor using Kinect. This way, you’ll be able to track your progress and check how great you are performing, day after day. Here is a video of what we are going to accomplish after finishing this tutorial — please keep in mind that I’m an engineer, not a body-builder!
Cool, huh? Let’s see how to implement it in code…
Prerequisites
Video & Source Code
As usual, I’m providing you with the complete source code, as well as a demo video.
The Bar Detection Algorithm
The heart of our algorithm is the BarDetectionEngine class. This class encapsulates all of the required details I’m going to cover below. I am not going to present the complete source code, since it’s more than 500 lines of C# code. I am rather going to explain the thought process and the logic behind the code.
Kinect can recognize human body joints out-of-the-box. Body tracking is built-in to the SDK. However, there is no built-in way to recognize physical objects (like weight-lifting bars). So, how are we going to tackle this?
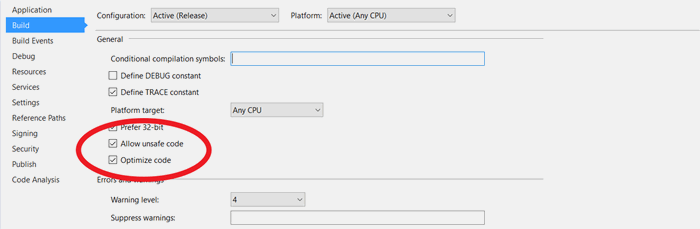
Kinect is, primarily, a depth processor. A depth processor can accurately specify the distance between any physical point in the 3D space and the device! To detect the bar, we simply need to find the depth points that it’s constituted of. As I described in my introductory article, the Depth frame is just a collection of raw distance values. It’s expressed as a 512×424 array of floating-point numbers. To increase the performance of the application, I’ll be using pointers, so remember to enable the “unsafe code” capability from the Visual Studio options:
In short, the algorithm consists of the following steps:
- Get the array of the raw depth data
- Get the array of the body-index data
- Detect the position of the Hand joints
- Find the depth points that have the same distance to the hand joints
- Exclude the depth points that belong to the body
- Smooth the values and set thresholds
- Process the resulting points to calculate the distance/height/angle of the bar
Step 1 – Get the Array of the Raw Depth Data
Traditional object tracking is accomplished by processing RGB color images. Kinect offers an incredible means to understand the environment. This means is called “depth processor”. Using its laser sensor, Kinect can provide us with a point cloud of 512×424 points, along with the horizontal distance between each point and the sensor plane.
Each point of the depth array is nothing but a raw distance value (measured in millimeters).
To track the bar, we’ll need to detect the points that have a similar distance to the hands.
Here’s how we can access the depth array:
using (var depthFrame = frame.DepthFrameReference.AcquireFrame())
{
    if (depthFrame != null)
    {
        depthFrame.CopyFrameDataToArray(_depthData);
    }
}
Step 2 – Get the Array of the Body-index Data
The Kinect SDK provides us with a handy frame source: BodyIndex. BodyIndexFrames specify which of the aforementioned depth points belong to a human body! Combining the Depth and BodyIndex frames, we can extract the distance of every point that belongs to a person.
Accessing the body-index data throught C# code is pretty simple:
using (var bodyIndexFrame = frame.BodyIndexFrameReference.AcquireFrame())
{
    if (bodyIndexFrame != null)
    {
        bodyIndexFrame.CopyFrameDataToArray(_bodyIndexData);
    }
}
Step 3 – Detect the Position of the Hand Joints
Detecting the position of the player’s hands is straightforward, too. If you want to learn more about joint tracking using Kinect, follow my previous tutorial.
var handLeft = body.Joints[JointType.HandLeft].Position;
var handRight = body.Joints[JointType.HandRight].Position;
Step 4 – Find the Depth Points that have the Same Distance to the Hand Joints
So, we now have the position (X, Y, Z) of the hands in the 3D space. We also know the Z distance of every point within our field of view! Since the weight-lifting bar is grabbed by the hands, its points would be close to the hand points. So, we’ll loop through the depth array and find those points that have a similar Z-distance.
ushort depth = depthData[depthIndex];
Step 5 – Exclude the Depth Points that Belong to the Body
Even though the above code should work, there is one major issue: when the bar is very close to the body, the algorithm picks depth points that belong to the chest, hips, or shoulders! Obviously, these points do not belong to the bar. That’s exactly why we need the body-index frame! The body-index frame determines whether a specific point belongs to the body or not. As a result, we can exclude the points that belong to the body and keep the rest of them. That’s the code that does the trick:
if (bodyIndexData[depthIndex] != 0xff)
{
}
Step 6 – Smooth the Values and Set Thresholds
Optionally, we can smooth the values and specify minimum/maximum distances or bar rotations. In my code, I have set a threshold of 25 degrees bar rotation.
Step 7 – Process the Resulting Points to Calculate the Distance/Height/Angle of the Bar
Since we have the depth points that belong to the bar, we can now calculate its length by taking the leftmost and rightmost points. We can use Coordinate Mapper to find the coordinates of the points in the 2D color space, too.

And, this is it, folks. You can explore the source code to see how I’m visualizing the bar and how I measure various other properties. The purpose of this tutorial is to showcase the power of processing raw depth frames using Kinect SDK v2.
Using the BarDetectionEngine
All of the above functionality has been encapsulated into a single class – BarDetectionEngine. You can use the BarDetectionEngine as follows:
var barDetectionEngine = new BarDetectionEngine
(sensor.CoordinateMapper, colorWidth, colorHeight, depthWidth, depthHeight);
barDetectionEngine.BarDetected += BarDetectionEngine_BarDetected;
barDetectionEngine.Update(depthData, bodyIndexData, body);
private void BarDetectionEngine_BarDetected(object sender, BarDetectionResult e)
{
if (e != null)
{
var center = e.Trail;
var height = e.BarHeight;
var length = e.barLength;
var left = e.Minimum;
var right = e.maximum;
}
}
“Wait! Do I Need A Weight Lifting Bar to Try This?”
Well, not really. You do not need to have a weight lifting bar in your house or office. An ordinary broomstick would do the job just fine!
‘Til the next time, keep Kinecting!
The post Detect a Weight-Lifting Bar using Kinect appeared first on Vangos Pterneas.


 General
  News
News  Suggestion
  Question
  Bug
Bug  Answer
  Joke
Joke  Praise
  Rant
Rant  Admin
Admin 


