Introduction
It has been a while since my last article here on CodeProject. Recently, I decided to do a new article and hopefully someone can find it useful.
In this article, you will see how you can create an application that will allow you to build a world similar to Minecraft. Of course, we are not going to build the whole application, but I will give you enough juice to get the ball rolling and that you can built on top of.
Basically, we are going to create a virtual environment where users can build stuff using cubes! It is really as simple as that. Very similar to how kids use blocks in the real-world to create fun structures, you will be able to do so in a virtual world.
The figure above should give you an idea of what we are trying to achieve here.
Background
The idea of coming up with this project came to me while I was thinking about a project for a lower division computer graphics course. It is a relatively simple idea/concept to program and a good hands-on programming exercise for the students.
You will need to be familiar with the Unity Game Engine and the C# language. I will not be covering the basics of either one! If you have never used or heard of Unity, I have a 10 Part Article Series that cover the basics, here is the link to Part 1. I suggest you start over there!
Concepts and or Topics that you will learn in this article:
- GameObjects
- Prefabs
- Textures and Materials
- Normal Vectors
- Basic User Interface
- Lights and Camera
Using the Code
Before we start, you will need to get Unity. You can download it from www.unity3d.com.
You can get the installer for both Windows and Mac operating systems. Everything in this article will be applicable to both platforms. The main difference would be the keyboard access shortcuts, other than that, everything else should be the same.
Unity Package: code
The Concept
Now that we have the basic stuff out of the way, we can start discussing what we want to achieve and how to go about it. At least, one way of going about it. Here are some of the items we need to think about:
- Placing Objects using the mouse
- Changing the Texture/Material of the Object
- Ability to move the camera so we can view the environment from different angles
Seems pretty easy. Let's take a look at see how we can start implementing them.
Representing the Blocks
We need to somehow represent the objects we want to place in the world and or interact with. For this to happen, we need to create a geometric model of the object that we want to represent, as well as give it some material, to represent the color or texture we will apply to the geometry.
We will use a Unit Cube as our model. It is one of the simplest 3D shapes to represent and work with.

A cube is composed of 8 vertices, 6 faces and 12 triangles. Here is a great link to get the basics of the terminology down.
In order to successfully represent our cube, we need what is called a Mesh Filter. The geometry and all of the relationships between each vertex and edge, edge and face are stored in here. Technically, it has some more important data that we will be looking at later on.
We also need a way to position our cube in the 3D world.
Each object in a scene is a GameObject. Regardless of what they represent, models, lights, cameras, etc., they are GameObjects. Each GameObject has a Transform Component that is very important in the placement of the GO in the 3D world. The Transform component contains three Vectors that are each a representation of the following:
Next, we need a way to color the cube. This is done through the Mesh Renderer and the Material that is associated with the cube. When you create a cube primitive in Unity, it configures the GameObject with the basic components that will allow it to render as cube.
There is one last component that you should be aware of, and that is the Collider. This is used by the engine to detect collisions. You will see how we will be using this later on.
Creating a Prefab and Applying Default Material
Now that you have a basic understanding of a GameObject. We will need a Prefab that can be used to instantiate at runtime for the placement of our blocks. The best way to show this is through some screenshots.
In the figure above, you will see the Unity IDE. The main things you should be concerned with is the creation of a Prefab. In order to create a Prefab, you simply select the GameObject that is representing the Cube from the Hierarchy Window, and dragging it over to the Projects Window under your Asset folder. A Prefab is a basically a saved instance of your GameObject at that particular time. We will be using this Prefab to dynamically generate the blocks that we want to place into our world.
If you take the time and look at the high-resolution of the figure above, you will visually see how each one of the components we have discussed are shown.
NOTE: I encourage you to take the time and read the 10 Part Series Articles if you have no Unity experience.
Textures and Materials
For simplicity, we are going to use three textures/materials that can be applied to the cube during instantiation. These could be any textures. For demonstration purposes, I will be using the following three:
You can simply download these textures, or use your own to create three unique materials. To create a material, you will need to right-click in the Projects Window and from the Pop-up Window select Create Material. Give the material asset a unique name, and associate a texture with the Texture attribute of the Albeido property.
You will need to perform this step for each texture/material.
Game / App Logic
Now that you have the basics setup, it is time to start doing the fun part! We need to create some C# code to put everything together.
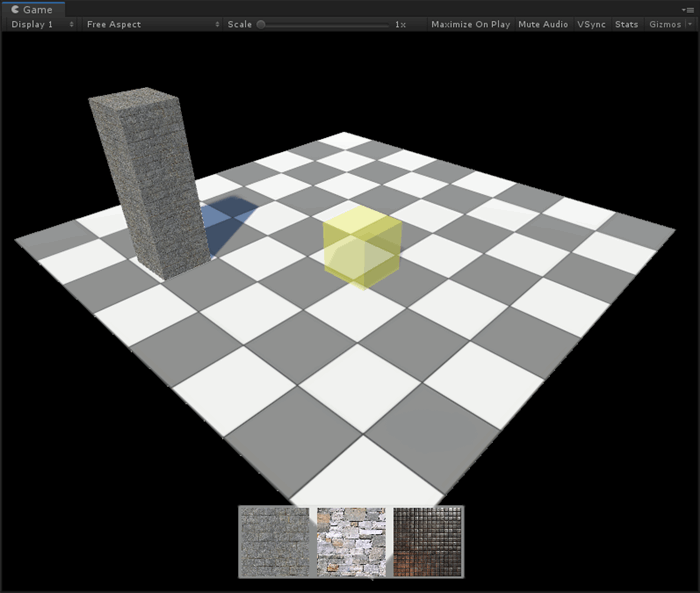
To start out, we would need to have a floor or a base. This will be used to place our initial blocks and it will be kind of like the platform to start building our blocks. The floor I have illustrated here in the figure is positioned at <0,0,0> and has a scale of <10,0.1,10>. The transparent yellow block is a visual indicator that loops back to the user and tells him or her where the block will be placed based on the mouse position. I have also applied a checker texture which has not been provided.
Here is the code that will enable you to perform what you see in the figure above:
bool realTimeHit =
Physics.Raycast(Camera.main.ScreenPointToRay(Input.mousePosition),
out realTimeHitInfo);
if (realTimeHit)
{
{
if (realtimeCube == null)
{
realtimeCube = GameObject.CreatePrimitive(PrimitiveType.Cube);
realtimeCube.name = "TempCube";
realtimeCube.layer = 2;
realtimeCube.AddComponent<Rigidbody>().useGravity = false;
realtimeCube.AddComponent<BlockCollision>();
realtimeCube.GetComponent<Renderer>().material =
transparentMaterial;
realtimeCube.GetComponent<Renderer>().material.color =
new Color(1, 1, 0, 0.5f);
realtimeCube.transform.position =
new Vector3(realTimeHitInfo.point.x,
realTimeHitInfo.point.y + (0.5f),
realTimeHitInfo.point.z);
}
else
{
if(realTimeHitInfo.transform.tag.Equals("Base"))
{
realtimeCube.GetComponent<Renderer>().material.color =
new Color(1, 1, 0, 0.5f);
realtimeCube.transform.position =
Vector3.Lerp(realtimeCube.transform.position,
new Vector3(realTimeHitInfo.point.x,
realTimeHitInfo.point.y + (0.5f),
realTimeHitInfo.point.z),
Time.deltaTime * 10);
}
else
{
realtimeCube.GetComponent<Renderer>().material.color =
new Color(0, 1, 0, 0.5f);
if (realTimeHitInfo.normal == new Vector3(0, 0, 1))
{
realtimeCube.transform.position =
new Vector3(realTimeHitInfo.transform.position.x,
realTimeHitInfo.transform.position.y,
realTimeHitInfo.point.z + (0.5f));
}
if (realTimeHitInfo.normal == new Vector3(1, 0, 0))
{
realtimeCube.transform.position =
new Vector3(realTimeHitInfo.point.x + (0.5f),
realTimeHitInfo.transform.position.y,
realTimeHitInfo.transform.position.z);
}
if (realTimeHitInfo.normal == new Vector3(0, 1, 0))
{
realtimeCube.transform.position =
new Vector3(realTimeHitInfo.transform.position.x,
realTimeHitInfo.point.y + (0.5f),
realTimeHitInfo.transform.position.z);
}
if (realTimeHitInfo.normal == new Vector3(0, 0, -1))
{
realtimeCube.transform.position =
new Vector3(realTimeHitInfo.transform.position.x,
realTimeHitInfo.transform.position.y,
realTimeHitInfo.point.z - (0.5f));
}
if (realTimeHitInfo.normal == new Vector3(-1, 0, 0))
{
realtimeCube.transform.position =
new Vector3(realTimeHitInfo.point.x - (0.5f),
realTimeHitInfo.transform.position.y,
realTimeHitInfo.transform.position.z);
}
if (realTimeHitInfo.normal == new Vector3(0, -1, 0))
{
realtimeCube.transform.position =
new Vector3(realTimeHitInfo.transform.position.x,
realTimeHitInfo.point.y - (0.5f),
realTimeHitInfo.transform.position.z);
}
}
}
}
}
else
{
if (realtimeCube)
Destroy(realtimeCube);
}
}
else
{
if (realtimeCube)
Destroy(realtimeCube);
}
The code above might seem confusing, but trust me, most of the complexity is being handled under the hood! Let's breakdown and understand again the concept and then look at the code to connect the two.
The first thing we need to do is take the mouse position from screen-space and convert that 2D coordinate and convert it into world-space which is in 3D. Next, we need to create a ray that will be generated from the newly computed 3D coordinate and cast it into the world at a given distance. This is done by what's called Raycasting:
Physics.Raycast(Camera.main.ScreenPointToRay(Input.mousePosition), out realTimeHitInfo);
This function uses the physics engine to generate a ray from a point in space to another point in space, and it stores the data that it collects in an object of type RaycastHit as an out parameter, i.e., realTimeHitInfo. The actual function returns a boolean variable indicating if the raycast collided with anything in the world, this boolean value is stored in realTimeHit variable.
If this happens to be true, we then extract the object we detected/collided with that have been stored in realTimeHitInfo variable. The next thing we do is determine if we have our temporary cube instantiated, if not, we go ahead and instantiate the cube primitive and assign the basic properties.
if (realtimeCube == null)
{
    realtimeCube = Instantiate(buildingBlockPref);
    realtimeCube.name = "TempCube";
    realtimeCube.layer = LayerMask.NameToLayer("RealTime");
    realtimeCube.AddComponent<BlockCollision>();
    realtimeCube.GetComponent<Renderer>().material = transparentMaterial;
    realtimeCube.GetComponent<Renderer>().material.color = new Color(1, 1f, 0, 0.5f);
    realtimeCube.transform.position =
        new Vector3(realTimeHitInfo.point.x,
                    realTimeHitInfo.point.y + (0.5f),
                    realTimeHitInfo.point.z);
}
The else clause will use the mouse pointer and move the transparent cube to the new position. If you happen to be pointing on the base, it will place it at the specified position where we are coliding with the base. If you happen to be colliding with an existing block, you will need to determine face/side you are colliding with. This is done by calculating or getting the Normal Vector which will determine which face you are colliding with. Using this information, you will adjust the placement of your block to snap on the face accordingly.
else
{
    realtimeCube.GetComponent<Renderer>().material.color = new Color(0, 1, 0, 0.5f);
    if (realTimeHitInfo.normal == new Vector3(0, 0, 1))
    {
        realtimeCube.transform.position =
            new Vector3(realTimeHitInfo.transform.position.x,
                        realTimeHitInfo.transform.position.y,
                        realTimeHitInfo.point.z + (0.5f));
    }
    if (realTimeHitInfo.normal == new Vector3(1, 0, 0))
    {
        realtimeCube.transform.position =
            new Vector3(realTimeHitInfo.point.x + (0.5f),
                        realTimeHitInfo.transform.position.y,
                        realTimeHitInfo.transform.position.z);
    }
    if (realTimeHitInfo.normal == new Vector3(0, 1, 0))
    {
        realtimeCube.transform.position =
            new Vector3(realTimeHitInfo.transform.position.x,
                        realTimeHitInfo.point.y + (0.5f),
                        realTimeHitInfo.transform.position.z);
    }
    if (realTimeHitInfo.normal == new Vector3(0, 0, -1))
    {
        realtimeCube.transform.position =
            new Vector3(realTimeHitInfo.transform.position.x,
                        realTimeHitInfo.transform.position.y,
                        realTimeHitInfo.point.z - (0.5f));
    }
    if (realTimeHitInfo.normal == new Vector3(-1, 0, 0))
    {
        realtimeCube.transform.position =
            new Vector3(realTimeHitInfo.point.x - (0.5f),
                        realTimeHitInfo.transform.position.y,
                        realTimeHitInfo.transform.position.z);
    }
    if (realTimeHitInfo.normal == new Vector3(0, -1, 0))
    {
        realtimeCube.transform.position =
            new Vector3(realTimeHitInfo.transform.position.x,
                        realTimeHitInfo.point.y - (0.5f),
                        realTimeHitInfo.transform.position.z);
    }
}
The most important part of the code above is the direction of the normal vector. We technically need to check for six of them, one for each face. Once this is determined, then we will reposition the realtimeCube position to snap the face we have collided with.
That's pretty much it. We will use the left mouse click button for the permanent placement of the block in the world.
That can be done by the following code snipet:
if (Input.GetMouseButtonUp(0))
{
#region Screen To World
RaycastHit hitInfo = new RaycastHit();
bool hit
= Physics.Raycast(Camera.main.ScreenPointToRay(Input.mousePosition),
out hitInfo, 50, applyMask);
if (hit)
{
if (Explode)
{
var t = hitInfo.transform.GetComponent<TriangleExplosion>();
StartCoroutine(t.SplitMesh(true));
return;
}
var cube = Instantiate(buildingBlockPref);
cube.tag = "MyCube";
cube.name = $"Cube{index}"; index++;
cube.AddComponent<TriangleExplosion>();
cube.GetComponent<BoxCollider>().isTrigger = true;
cube.GetComponent<Renderer>().material = blockMaterial;
BlockHistory.Add(cube);
cube.transform.position =
new Vector3(hitInfo.point.x,
hitInfo.point.y+0.5f,
hitInfo.point.z);
#region HIDE
if (hitInfo.transform.tag.Equals("Base"))
{
cube.transform.position =
new Vector3(hitInfo.point.x,
hitInfo.point.y + (0.5f),
hitInfo.point.z);
}
#region HIDE
else
{
if (hitInfo.normal == new Vector3(0, 0, 1))
{
cube.transform.position =
new Vector3(hitInfo.transform.position.x,
hitInfo.transform.position.y,
hitInfo.point.z + (0.5f));
}
if (hitInfo.normal == new Vector3(1, 0, 0))
{
cube.transform.position =
new Vector3(hitInfo.point.x + (0.5f),
hitInfo.transform.position.y,
hitInfo.transform.position.z);
}
if (hitInfo.normal == new Vector3(0, 1, 0))
{
cube.transform.position =
new Vector3(hitInfo.transform.position.x,
hitInfo.point.y + (0.5f),
hitInfo.transform.position.z);
}
if (hitInfo.normal == new Vector3(0, 0, -1))
{
cube.transform.position =
new Vector3(hitInfo.transform.position.x,
hitInfo.transform.position.y,
hitInfo.point.z - (0.5f));
}
if (hitInfo.normal == new Vector3(-1, 0, 0))
{
cube.transform.position =
new Vector3(hitInfo.point.x - (0.5f),
hitInfo.transform.position.y,
hitInfo.transform.position.z);
}
if (hitInfo.normal == new Vector3(0, -1, 0))
{
cube.transform.position =
new Vector3(hitInfo.transform.position.x,
hitInfo.point.y - (0.5f),
hitInfo.transform.position.z);
}
}
#endregion
#endregion
}
else
{
Debug.Log("No hit");
}
#endregion
}
That's all you need for the placement of the blocks in our little world!
Basic User Interface
Lastly, we need to have a way to change or select our materials. This will be done by the simple three button selection at the bottom of the screen.
Each button will call the following function on the OnClick event. You can pass basic parameters to determine which material to change to.
public void ChangeMaterial(Button button)
{
    selectedMaterialIndex = Convert.ToInt32(button.name.Last().ToString()) - 1;

    blockMaterial = availableMaterials[selectedMaterialIndex];

    if (OnMaterialChanged != null)
        OnMaterialChanged(blockMaterial);
}
That's all there is to it.
Points of Interest
This is a simple project that can be extended to become a cool little utility for your own game ideas. Some items that you should try to extend are:
- Editing the blocks after you place them
- Extending the base to have more space
- Saving your block design for the next session
All of the three bullet points should be pretty easy to implement, and very functional for an application.
History
- 5th December, 2019: Initial publication. Basics of block placement.


 General
  News
News  Suggestion
  Question
  Bug
Bug  Answer
  Joke
Joke  Praise
  Rant
Rant  Admin
Admin 


