Introduction
This article provides a quick-start guide for Windows kernel mode filter driver development.
The sample filter driver explained in this article uses pass-through mechanism where I/O requests are forwarded to lower level driver without any processing.
Background
This article is for developers who are writing Windows kernel filter driver for the first time and want to experiment this filter with "Simple WDM Loopback Driver"already written.
Using the Code
As with other drivers, filter driver also has initialization entry point DriverEntry.
1 DriverEntry Routine
We will not discuss much about function parameters as it is already discussed earlier in "Simple WDM Loopback Driver" article. Refer to "loopback.aspx".
1.1 Setting Dispatch Routines
Practically, filter driver to be developed for a particular function/class driver is not written by us. Mostly it is a third party driver. Sticking to this fact in mind, we need to specify passthrough functionality for all the operations and then override it with the one which we are interested in.
for (ulIndex = 0; ulIndex <= IRP_MJ_MAXIMUM_FUNCTION; ulIndex++) {
pDriverObject->MajorFunction[ulIndex] = LBKFltPassThrough;
}
pDriverObject->MajorFunction[IRP_MJ_CREATE] = LBKFltCreate;
pDriverObject->MajorFunction[IRP_MJ_CLOSE] = LBKFltClose;
pDriverObject->MajorFunction[IRP_MJ_WRITE] = LBKFltWrite;
pDriverObject->MajorFunction[IRP_MJ_READ] = LBKFltRead;
Then we need to actually build the device stack.
1.2 Creating Filter Device
First, we need to create a device object in DriverEntry say LOOPBACKFLT. Creating unnamed device also works. Then, we need to stack our device over LOOPBACK device using the following alternatives.
The following code is common for all the 3 alternatives described below:
RtlInitUnicodeString(&devNameFlt, L"\\Device\\LOOPBACKFLT");
RtlInitUnicodeString(&symLinkNameFlt, L\\DosDevices\\LBKFLT);
RtlInitUnicodeString(&devName, L"\\Device\\LOOPBACK");
status = IoCreateDevice( pDriverObject,
sizeof(DEVICE_EXTENSION),
&devNameFlt,
FILE_DEVICE_UNKNOWN,
0, FALSE,
&pDevObj );
if (!NT_SUCCESS(status)){
goto cleanup_failure;
}
1.3 Attaching It to a Loopback Device
As already mentioned, there are 3 alternatives as given below...
1.3.1 Alternative 1
IoAttachDevice is easy to use but has a limitation that the device you want to filter should be named.
status = IoAttachDevice(pDevObj, &devName, &(pDevExt->pTargetDeviceObject));
if(status != STATUS_SUCCESS){
DbgPrint("IoAttachDevice failed with error = 0x%0x\n", status);
goto cleanup_failure;
}
1.3.2 Alternative 2
With this alternative, we need to get the device pointer by specifying device name to IoGetDeviceObjectPointer. IoGetDeviceObjectPointer routine returns a pointer to the top object in the named device object's stack and a pointer to the corresponding file object, if the requested access to the objects can be granted. In this case, it returns a pointer to LOOPBACK device as it is the top-most device in the device stack.
Then, we need to attach our device to device stack using IoAttachDeviceToDeviceStack.
status = IoGetDeviceObjectPointer( &devName, FILE_ALL_ACCESS, &pFileObject, &(pLBKdev));
if(status != STATUS_SUCCESS){
DbgPrint("IoGetDeviceObjectPointer failed with error = 0x%0x\n", status);
goto cleanup_failure;
}
ASSERT(pLBKdev);
DbgPrint("%wZ Device Object Pointer 0x%0x\n", &devName, pLBKdev);
ObReferenceObject(pLBKdev);
pDevExt->pTargetDeviceObject = IoAttachDeviceToDeviceStack( pDevObj, pLBKdev);
if(pDevExt->pTargetDeviceObject){
DbgPrint("Attached to loopback device successfully\n");
status = STATUS_UNSUCCESSFUL;
goto cleanup_failure;
}else{
DbgPrint("Attaching to loopback device failed\n");
}
1.3.3 Alternative 3
This is the same as alternative 2, except it uses IoAttachDeviceToDeviceStackSafe instead of IoAttachDeviceToDeviceStack.
Unlike IoAttachDeviceToDeviceStack, IoAttachDeviceToDeviceStackSafe has an additional parameter, AttachedToDeviceObject, which the filter driver uses to pass the address of the SourceDevice object's AttachedToDeviceObject field. IoAttachDeviceToDeviceStackSafe updates this field while holding the I/O system database lock. Because it holds this lock, IoAttachDeviceToDeviceStackSafe avoids a race condition that could otherwise occur if the SourceDevice object received an IRP before its AttachedToDeviceObject field was updated.
I would prefer to use alternative 3.
status = IoGetDeviceObjectPointer
( &devName, FILE_ALL_ACCESS, &pFileObject, &(pLBKdev) );
if(status != STATUS_SUCCESS){
DbgPrint("IoGetDeviceObjectPointer failed with error = 0x%0x\n", status);
goto cleanup_failure;
}
ASSERT(pLBKdev);
DbgPrint("%wZ Device Object Pointer 0x%0x\n", &devName, pLBKdev);
ObReferenceObject(pLBKdev);
status = IoAttachDeviceToDeviceStackSafe(pDevObj, pLBKdev, &pDevExt->pTargetDeviceObject);
if(status != STATUS_SUCCESS){
DbgPrint("IoGetDeviceObjectPointer failed with error = 0x%0x\n", status);
goto cleanup_failure;
}
IoAttachDeviceToDeviceStack, IoAttachDeviceToDeviceStackSafe are used in plug-play driver where from AddDevice entry point, we get lower device object and not device name.
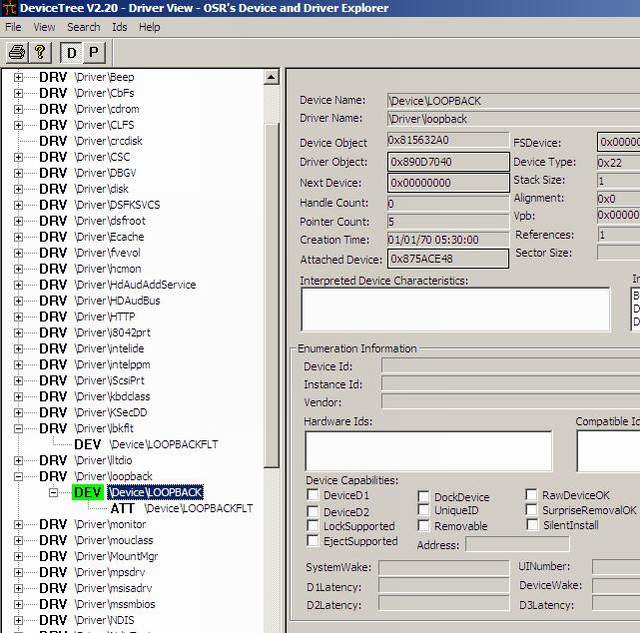
1.4 DeviceTree View
After loading the Loopback driver and Loopback filter driver, you can view the device stack using DeviceTree as below:
1.5 WinObj View
Creation of symbolic link for LOOPBACKFLT is optional. However, in the sample code I have created it. This is required if your user mode needs to communicate with filter driver.
After loading the Loopback driver and Loopback filter driver, you can view the symbolic links using WinObj as below:

2 Generic Pass Through Dispatch Implementation
It passes the IO request to lower device in the stack without any modification.
IoSkipCurrentIrpStackLocation makes the lower driver to use the same stack location that filter driver received.
NTSTATUS LBKFltPassThrough( IN PDEVICE_OBJECT pDevObj, IN PIRP pIrp)
{
PDEVICE_EXTENSION pDevExt = (PDEVICE_EXTENSION) pDevObj->DeviceExtension;
DbgPrint("LBFlltPassThrough was called \n");
IoSkipCurrentIrpStackLocation(pIrp);
return IoCallDriver(pDevExt->pTargetDeviceObject, pIrp);
}
Create dispatch routine is implemented as pass through except some debugging information is printed.
There are couple of other ways on how an IRP is handled in a filter driver explained below.
3 Write Pass Through Dispatch Implementation
Write dispatch implementation is again similar to pass though except some information is captured from IO_STACK_LOCATION. However, in this code, we are not making use of captured information.
We are testing read and write with NULL terminated string. If you want to test with writing binary data, remove STRING_TESET_MODE definition. Otherwise, it may crash the system.
NTSTATUS LBKFltWrite(IN PDEVICE_OBJECT pDevObj,IN PIRP pIrp)
{
PDEVICE_EXTENSION pDevExt = (PDEVICE_EXTENSION) pDevObj->DeviceExtension;
PIO_STACK_LOCATION pIrpStack = IoGetCurrentIrpStackLocation( pIrp );
PREADWRITE_IO_CONTEXT Context = NULL;
DbgPrint("LBKFltWrite was called \n");
Context = ExAllocatePoolWithTag(NonPagedPool,
sizeof(READWRITE_IO_CONTEXT), LBKFLT_TAG_NPAGED);
if(NULL == Context){
DbgPrint("Memory allocation failure for read io context \n");
pIrp->IoStatus.Status = STATUS_INSUFFICIENT_RESOURCES;
pIrp->IoStatus.Information = 0;
IoCompleteRequest(pIrp, IO_NO_INCREMENT);
return STATUS_INSUFFICIENT_RESOURCES;
}
Context->liOffset = pIrpStack->Parameters.Write.ByteOffset;
Context->ulLength = pIrpStack->Parameters.Write.Length;
#ifdef STRING_TESET_MODE
DbgPrint("Data = %s\n", pIrp->AssociatedIrp.SystemBuffer);
#endif /* STRING_TESET_MODE */
IoSkipCurrentIrpStackLocation(pIrp);
ExFreePoolWithTag(Context, LBKFLT_TAG_NPAGED);
return IoCallDriver(pDevExt->pTargetDeviceObject, pIrp);
}
4 Read Pass Through Dispatch Implementation
Read dispatch implementation is again similar to pass though as we are not modifying the IO request except some information is captured from IO_STACK_LOCATION. However, in this code, we are not making use of captured information.
As this is read operation, we can't capture the data read in dispatch routine. It should be captured when lower driver finishes processing the request. For this, we are setting a completion routine using IoSetCompletionRoutine. Completion routine is called when lower driver completes the request.
With this sample code, I have explained how the IO context is passed from dispatch routine to completion routine.
The code is basically for understanding purposes and doesn't handle IRP pending and few other cases.
NTSTATUS LBKFltRead(IN PDEVICE_OBJECT pDevObj, IN PIRP pIrp)
{
PDEVICE_EXTENSION pDevExt = (PDEVICE_EXTENSION) pDevObj->DeviceExtension;
PIO_STACK_LOCATION pIrpStack = IoGetCurrentIrpStackLocation( pIrp );
PREADWRITE_IO_CONTEXT Context = NULL;
DbgPrint("LBKFltRead was called \n");
Context = ExAllocatePoolWithTag
(NonPagedPool, sizeof(READWRITE_IO_CONTEXT), LBKFLT_TAG_NPAGED);
if(NULL == Context){
DbgPrint("Memory allocation failure for read io context \n");
pIrp->IoStatus.Status = STATUS_INSUFFICIENT_RESOURCES;
pIrp->IoStatus.Information = 0;
IoCompleteRequest(pIrp, IO_NO_INCREMENT);
return STATUS_INSUFFICIENT_RESOURCES;
}
Context->liOffset = pIrpStack->Parameters.Read.ByteOffset;
Context->ulLength = pIrpStack->Parameters.Read.Length;
IoCopyCurrentIrpStackLocationToNext(pIrp);
IoSetCompletionRoutine( pIrp,
ReadIoCompletion,
Context,
TRUE, TRUE, TRUE );
return IoCallDriver(pDevExt->pTargetDeviceObject, pIrp);
}
NTSTATUS ReadIoCompletion( IN PDEVICE_OBJECT pDevObj, IN PIRP pIrp, IN PVOID Context )
{
PREADWRITE_IO_CONTEXT pCtx = (PREADWRITE_IO_CONTEXT)Context;
UNREFERENCED_PARAMETER(pDevObj);
if(NT_SUCCESS(pIrp->IoStatus.Status)){
ExFreePoolWithTag(pCtx, LBKFLT_TAG_NPAGED);
#ifdef STRING_TESET_MODE
DbgPrint("Data = %s\n", pIrp->AssociatedIrp.SystemBuffer);
#endif /* STRING_TESET_MODE */
}
return STATUS_SUCCESS;
}
How to Install and Use Sample Filter
The given sample code is built by using the DDK console. If DDK is installed, open the DDK build console, and go to project HOME directory. Build the driver by using build –cEZ.
Also, build Simple WDM Loopback Driver and test application.
Once the drivers are built, then it should be copied to the $WINDOWS$\system32\drivers folder.
Install the Loopback driver as mentioned in the "Simple WDM Loopback Driver" article "loopback.aspx".
OR
If you do not want your machine to be restarted to test the driver, run the following commands:
- To install loopback driver run
sc create loopback binPath= %systemroot%\system32\drivers\loopback.sys type= kernel
- To start loopback driver run
sc start loopback
- To install loopback filter driver run
sc create lbkflt binPath= %systemroot%\system32\drivers\lbkflt.sys type= kernel
- To start loopback driver
sc start lbkflt
- The driver is now ready to communicate with a user application. Run the user application, Testor.exe. It will be in the Testor executable folder in "Simple WDM Loopback Driver" sample source code.
You will get the following output in DebugView.
DbgView Snapshot
- To stop LBKFLT driver
sc stop lbkflt
- To stop loopback driver
sc stop loopback
Tools Used
DeviceTree - http://www.osronline.com/article.cfm?article=97 DbgView - http://technet.microsoft.com/en-us/sysinternals/bb896647.aspx WinObj - http://technet.microsoft.com/en-us/sysinternals/bb896657.aspx
History
This is the first version. I will be posting a few more Windows samples in the future.
This member has not yet provided a Biography. Assume it's interesting and varied, and probably something to do with programming.


 General
  News
News  Suggestion
  Question
  Bug
Bug  Answer
  Joke
Joke  Praise
  Rant
Rant  Admin
Admin 


