Introduction
In Part VII we will complete the layout for our document form by adding our final control, the DataGridView for our Item collection. We will also give our DataGridView a context menu to handle deleting, and copy/paste functions.
DataGridView
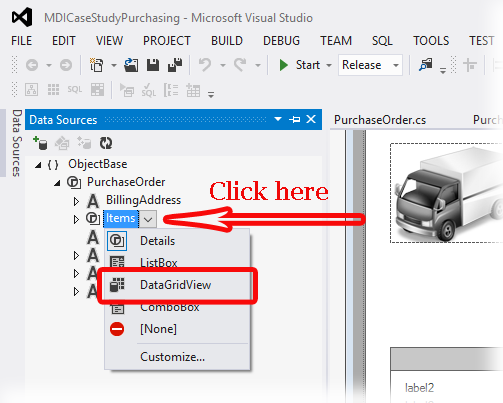
First, in the Data Sources tool panel, let's change the control type for PurchaseOrder->Items to DataGridView by clicking the drop down for the Items property, and selecting DataGridView. Then drag Items on the document Form, and a DataGridView will be created, along with an itemsDataBindingSource, which you can see in the non-dispaly asset area

So at this point you pretty much have everything you need if you wanted to enter products manually, we could move on to copy/paste, undo/redo, and printing. However, we are not going to be using manual product entry. Instead, we will have a set collection of items that are available to order. In the future we will handle how to get them onto the document, but for now, we will just make a few items in our constructor for sample data. However, let's first finish constructing our data grid to our liking. First, size it so that the left is even with the left of the vendor address panel, the right is even with the right of the shipping address panel, and the bottom is a nice even margin equal with the side margin, and the top is a nice margin below the address panels, like so
Next, we don't want the user to be able to add or delete directly, or reorder columns, or resize rows (we will allow resize of columns). So set the following properties
- AllowUserToAddRows = False
- AllowUserToDeleteRows = False
- AllowUserToOrderColumns = False
- AllowUserToResizeCoumns = True
- AllowUserToResizeRows = False
- AutoSizeColumnsMode = Fill
The last property, AutoSizeColumnsMode, determines how the DataGridView intelligently sizes the columns. Choosing Fill will cause the entire width of the DataGridView to be filled with the columns, having them resized based on a property of the Column, which is currently equal for all 4, so they will be equally spaced. Let's also get rid of the RowHeader by setting RowHeadersVisible to False. Now let's edit the Columns, click the "..." button beside columns, and a collection edit box will open, allowing us to edit the properties of our columns. First, lets reorder them using the up/down arrows, so that we have PurchaseQuantity, ProductNumber, Description, Cost. Next, find the FillWeight property for each column, this is the property that governs how the grid auto sizes the columns. Set PurchaseQuantity and Cost to 30, set ProductNumber to 50, and leave Description at 100. The header text "PurchaseQuantity" wil be a bit to lengthy for our column width, so let's change the HeaderText of PurchaseQuantity to just "Quantity". Lasty, for the Cost column, find the DefaultCellStyle property, and click the "..." edit button. This will launch another window. Find the Format property, and again click the "..." edit button to launch the format edit window. Choose "Numeric". Also, in the DefaultCellStyle set the Alignment to "TopRight". Finally, set the BackColor of the DataGridView to Window.
Now let's add a few items to the collection in our PurchaseOrder constructor. Add these lines at the end of the constructor method
Item item = new Item();
item.ProductNumber = "100001";
item.Description = "Product Number 1";
item.Cost = 1.5;
item.PurchaseQuantity = 100;
_items.Add(item);
item = new Item();
item.ProductNumber = "100002";
item.Description = "Product Number 2";
item.Cost = 2.5;
item.PurchaseQuantity = 200;
_items.Add(item);
item = new Item();
item.ProductNumber = "100003";
item.Description = "Product Number 3";
item.Cost = 3.5;
item.PurchaseQuantity = 300;
_items.Add(item);
Now you can open the application, and create a new document, and see what the form looks like now, with the three items added.
ContextMenu
Next, let's create a context menu for our items data grid. This context menu will have 2 selections for now, but we will expand it in the future. First, from the tools panel, drag a new ContextMenu onto our form, and name it itemGridMenu. Then, using the menu editing tools, create 3 menu items, "Select All", "-" to create a divider line, and "Delete".
Now for the ContextMenuStrip property of the DataGridView, choose itemGridMenu. Now you can run the app, and see that when you right click the grid, you get the context menu. However, it needs some cleaning up. First of all, we need to have the menu act a bit intelligently, so that it selects the row that is clicked, and we want to control the ability to use the menu items based on which cells, if any, are clicked. We will accomplish this with two events, the MouseDown event of the DataGridView and the Opening event of the ContextMenuStrip. With the DataGridView selected, click the little lightning bolt icon in the properties panel to access the events, and double click to create a handler for the MouseDown event. Then with the itemGridMenu selected, double click the Opening event to create its handler.
With the MouseDown event we will respond to where the user clicks, and adjust the selection accordingly. First, in the properties window, for the Select All and Delete menu items, set their Enabled property to False. This way they will always be disabled, unless we decide to enable them. Now for the MouseDown event. Here we will determine if the mouse click was the right click, and if so we will change the selected row to the one containing the clicked cell. Your handler should look like
private void itemsDataGridView_MouseDown(object sender, MouseEventArgs e)
{
    if (e.Button == System.Windows.Forms.MouseButtons.Right)
    {
        int rowIndex = this.itemsDataGridView.HitTest(e.X, e.Y).RowIndex;
        if (rowIndex >= 0 && rowIndex < itemsDataGridView.Rows.Count)
        {
            selectAllToolStripMenuItem.Enabled = true;
            deleteToolStripMenuItem.Enabled = true;
            DataGridViewRow clickedRow = this.itemsDataGridView.Rows[rowIndex];
            if (!this.itemsDataGridView.SelectedRows.Contains(clickedRow))
            {
                foreach (DataGridViewCell c in clickedRow.Cells)
                {
                    if (c.Selected)
                    {
                        foreach (DataGridViewCell sC in this.itemsDataGridView.SelectedCells)
                        {
                           sC.OwningRow.Selected = true;
                        }
                        return;
                    }
                }
                this.itemsDataGridView.ClearSelection();
                clickedRow.Selected = true;
            }
        }
        else
        {
            this.itemsDataGridView.ClearSelection();
            selectAllToolStripMenuItem.Enabled = true;
            deleteToolStripMenuItem.Enabled = false;
        }
    }
}
This handler checks to see if a cell is selected, and if so sets it's entire row to selected. This will allow you to select a range of cells, then right click to have all contained rows selected.
Next, with the Opening event we will decide which, if any, menu items will be usable, and set them to enabled. Select All will basically always be functional, unless the form contains no items. Delete will only be functional if one or more item rows are selected. Here is what your Opening handler should look like
private void itemGridMenu_Opening(object sender, CancelEventArgs e)
{
    selectAllToolStripMenuItem.Enabled = _purchaseOrder.Items.Count > 0;
    deleteToolStripMenuItem.Enabled = itemsDataGridView.SelectedRows.Count > 0;
}
Next, let's handle the Select All menu item. In design view, with the itemGridMenu selected, double click the Select All menu item to create the click handler. We'll make a call to a new method we will create called SelectAll()
private void selectAllToolStripMenuItem_Click(object sender, EventArgs e)
{
    SelectAll();
}
Then our SelectAll() method should look like
public void SelectAll()
{
     foreach(DataGridViewRow r in itemsDataGridView.Rows) r.Selected = true;
}
Now let's handle the Select All menu item in our main MDIForm. We want this button to only be enabled if a form is active, and the active form has items, because we are going to use this button to select all items, and not any of the other UI elements. So for this to work, we want to control the Enabled property of the Select All menu item in 2 places, in the OnMdiChildActivate method, and in the purchaseOrderForm_Changed method. First, in the OnMdiChildActivate method, add the following line to first disable the Select All button
private override void OnMdiChildActivate(EventArgs e)
{
     .....
     selectAllToolStripMenuItem.Enabled = false;
     .....
}
Then in the if (this.ActiveMdiChild != null) block, add the line
if (this.ActiveMdiChild != null)
{
     .....
     selectAllToolStripMenuItem.Enabled = activeChildForm.PurchaseOrder.Items.Count > 0;
}
Now, with in Design View for MDIForm, double click the Select All menu item to create its handler
private void selectAllToolStripMenuItem_Click(object sender, EventArgs e)
{
if(this.ActiveMdiChild != null)
{
PurchaseOrderForm activeChildForm = this.ActiveMdiForm as PurchaseOrderForm;
activeChildForm.SelectAll();
}
}
Lastly, let's get the Delete function working. First, let's write a public method in our PurchaseOrder class that will handle the actual deletion of items in it's items collection. This delete function will take an ItemCollection containing the items we wish to delete. We need to remember, we need to call the OnChanging method BEFORE actually deleting, and call the OnChanged method after. The reasoning for this will become more clear as we get to our section on Undo / Redo functionality. Here is what our DeleteItems(ItemCollection deleteItems) method in our PurchaseOrder class should look like
public void DeleteItems(ItemCollection deleteItems)
{
    OnChanging(new PurchaseOrderChangingEventArgs());

    foreach (Item i in deleteItems) _items.Remove(i);

    OnChanged(new PurchaseOrderChangedEventArgs());
}
Next we need to create a public method in our PurchaseOrderForm class that will delete all selected items in the DataGridView. This method will be called by our context menu item, and also from the MDIForm when delete functions are needed. Here is what your DeleteSelectedItems() method in PurchaseOrderForm should look like
public void DeleteSelectedItems()
{
    ItemCollection deleteItems = new ItemCollection();
    foreach (DataGridViewRow r in itemsDataGridView.SelectedRows)
    {
        deleteItems.Add(_purchaseOrder.Items[r.Index]);
    }
    if (deleteItems.Count > 0) _purchaseOrder.DeleteItems(deleteItems);
}
With the itemGridMenu selected in Design View, double click the Delete menu item to create its click handler, and for this handler we simply call the DeleteSelected() method
private void deleteToolStripMenuItem_Click(object sender, EventArgs e)
{
    DeleteSelectedItems();
}
So that's it. Part VII is complete, and our form is finished. In future installments we will add some items to our Form, but for now we have the basics. Next we will implement Cut/Copy/Paste, as well as Undo/Redo functionality.
Points of Interest
History
- 11/27/2015 - Orginal publish date
- 11/30/2015 - Added MDIForm Select All to article
This member has not yet provided a Biography. Assume it's interesting and varied, and probably something to do with programming.


