Introduction
This article describes a new alternative approach for automated testing of user interfaces. Traditional approaches try to test the UI from the outside looking in. This approach tests the UI from within the application itself. By testing from inside the application, you have direct access to the actual forms and controls. These tests can be written in the language the development team is familiar with like .Net/C#/VB.Net. They are run using NUnit or any other unit testing framework. For this article I will refer to NUnit. This new approach for writing tests allows an application's UI to be tested using techniques very similar to those used to write unit tests.
Background
A background in WinForm's UI programming using C# is useful since all of the examples use this. This approach can be applied to WPF UI applications since the techniques are the same. It would be helpful if you are already familiar with traditional approaches to automating UI testing and the shortcoming that come with them. This includes 3rd party testing tools. Knowledge of the Microsoft Automation Framework is also helpful.
If looking for a keystroke recorder/playback solution this is not for you.
An Alternative Approach to Automated UI Testing for Agile Teams
Here are the goals that were used when coming up with this approach:
- These tests should be coded in the same languages as the application. Languages like: C#, VB.Net, etc.
- It must be low cost which means no additional tools should be required. The tools should be the same tools you are already using. Tools like: Visual Studio, NUnit, etc.
- The tests should be able to be run using NUnit. If you are already writing unit tests you already have a tool like this. No need to write your own test runner. If not, you can download the NUnit runner at no cost.
- The tests are built using compile time binding to the application code. If a class or a control is deleted the tests will fail at compile time. This is huge step towards making the tests more robust.
- The production code should require minimal modifications to support these automated tests. Small safe changes to the production code are acceptable.
- The tests should be able to be run in debug or release mode on anyone's machine.
- The tests should NOT be shipped with the product.
Architecture
Traditional approaches try to test from outside the application. This approach involves opening up your application to be tested from the inside. This is a mind shift but it is what makes this approach so powerful. It is also what allows it to address the shortcomings of traditional approaches.
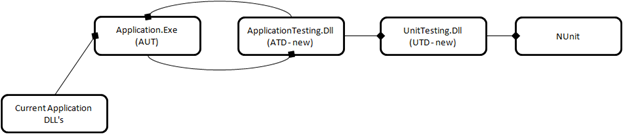
Here is how you can open up your application for testing:
- The Application Under Test (AUT) dynamically loads a newly defined Application Testing DLL (ATD).
- The ATD references (in project references) the AUT. If this sounds like a circular dependency that's because it is. This handled by having the AUT dynamically load the ATD. The ATD is only loaded if it exists which means you don't have to ship the ATD with your production code. Don't worry, the AUT simply loads and initializes the ATD it doesn't use it for anything else. Instead the ATD uses the forms and classes inside the AUT when running the tests.
- The AUT calls and initializes the ATD after it loads it.
- In the initialization code the ATD opens a WCF (or a .Net remoting, I will use WCF) channel that can be called from a unit test run by NUnit.
- This channel exposes testing methods through an interface. Since this ATD is loaded (dynamically) by the AUT it is running inside the AUT's process space. Therefore it has full access to the main form and all of the child forms.
- Tests are written in the ATD and they control the UI directly. These tests can push buttons, click menu items, enter data on forms, close forms, and validate the data. All this can be done using the actual classes and controls. You no longer have to find a control by a hard coded name.
- A Unit Test DLL (UTD) is created and it connects through a WCF channel to the ATD.
- Thin wrappers are written as [Test] methods in the UTD that call the actual tests in the ATD. This allows us to use NUnit as our test runner.
- Note: NUnit can't load the ATD directly because the ATD must be loaded by the AUT in order for it to run in the application's process space as mentioned before.
- That's it!
The following diagram shows the high level architecture.
The Application Under Test (AUT)
For this article I created a simple WinForm’s application (this same approach can be used for a WPF application) to manage contacts. It has three buttons: Add, Modify, and Delete. It also has a menu option of "File|Save". The sample application has all of the code needed to create the application and run the tests for all of the options.

Dynamically Loading the Testing Dll
The method DynamicallyLoadTestingDllIfPresent is called from the application’s load event handler. This method checks to see if the application testing dll is present. If it is it loads an initializes it.
private static void DynamicallyLoadTestingDllIfPresent()
{
...
try
{
System.Diagnostics.Trace.WriteLine( @"Test dll found. Attempting load.");
Assembly loadedDLL = Assembly.LoadFrom(testingDll);
Type t = loadedDLL.GetType("ContactManager.Testing.AppTestingDLLInitialization");
Activator.CreateInstance(t);
System.Diagnostics.Trace.WriteLine(@"Successfully loaded the testing dll.");
}
...
}
Opening Up the Application for Testing
This is the unique part of this approach. Since you want to control your forms and controls directly you will need to have access to them in your test code. You could make all the controls and methods that you need for testing public. But this would pollute the public namespace and it doesn't seem right to make members public just for testing. However you do need access to these controls and methods. Another possible approach would be to use reflection. You can access private members with reflection, there are plenty of examples on the web; here is one of them. However, using reflection is not straightforward and it has some of the same problems as conventional approaches, like having to hard code control names, which should be avoided.
This sample creates a nested class as a member of each form that is being accessed. Since the nested class takes the outer class as a parameter it has full access to all of the private methods and properties of the outer class. See the section "Adding the test enabling code to a form" This solves several problems:
- All of the methods and properties of the form are accessible to the test methods written in the nested class. This includes public, protected, and private members.
- The public namespace doesn't get polluted with members that are written with testing in mind.
- When accessing these members you have to go through the nested class, called Testing. This is a reminder that you are accessing methods that were only intended for automated tests.
- It serves as a reminder to the person writing code in the nested class that any UI access needs to be protected with a call to BeginInvoke or Invoke. See the section "BeginInvoke or Invoke that is the question".
What's the downside:
- One additional property "Testing" is added to the public namespace.
- These methods can be accessed by production code, even though that is NOT the intent. You could prevent this from happening by conditionally compiling this code out but that has problems of its own. I prefer to leave these methods in the production code and verify they aren't used in production some other way. Other approaches won't be investigated here.
- You are modifying the production code even if it is safe (since it is in the nested class that doesn't get created until it is called for the first time) and has a low footprint (you don't need a lot of this code since most of the test code goes in ATD).
BeginInvoke or Invoke that is the question
Here are a few a facts you need to know about Windows programming in order to write these tests:
- There is 1 and only 1 UI thread for a Windows Application.
- Any UI modification MUST be done on UI thread. This includes things like:
- Setting the text for an edit box.
- Selecting an item in a listbox.
- Pressing a Button
- etc.
- If you are running on a background thread and you want to modify the UI you need to get onto the UI thread to do it.
- There are two ways to get onto the UI thread from a background thread:
- BeginInvoke - this is an asynchronous call therefore the calling thread doesn't wait for the call to complete.
- Invoke - this is a synchronous call, therefore the calling thread is blocked and waits for the call to complete.
- Note, the sample application has two extension methods: UseBeginInvokeIfRequired and UseInvokeIfRequired that make it easier to get onto the UI thread. See the sample code for details.
Knowing when you have to use BeginInvoke or Invoke and which one to use is probably the trickiest part of writing these tests. Here are some rules of thumb that should serve you well:
- If you are NOT modifying the UI use the background thread.
- Use BeginInvoke if you are performing an operation that has side effects like opening or closing a form. This can be triggered by toolbar button, a menu item, or a button on a form. This is needed because there are a lot of additional messages that get generated when performing these actions. If you are in a blocking call you can end up in a deadlock situation.
- Use Invoke if you need to modify or access a UI control's value like: setting the text of a textbox, checking a radio button, selecting an item in a list view.
- Since calls to Invoke are synchronous it makes writing your tests easier because you don't have to deal with waiting for the call to complete before calling your next line of test code.
Adding the test enabling code to a form
This code shows how the AddModifyContactForm was extended. In order to open the form up for testing the following code was added to the AddModifyContactForm.Testing.cs file using the partial class keyword. A separate file was used to keep a clean separation between the production code and the test code. Notice the testing methods were added to the nested class called Testing. Note the same technique was used for the ContactManagerForm see the sample code for details.
namespace ContactManager
{
public partial class AddModifyContactForm
{
private NestedTestCode _testing;
public NestedTestCode Testing
{
get { return _testing ?? (_testing = new NestedTestCode(this)); }
}
public class NestedTestCode
{
private readonly AddModifyContactForm _outerClass;
public NestedTestCode(AddModifyContactForm outerClass)
{
if (outerClass == null) throw new ArgumentNullException();
_outerClass = outerClass;
}
public void SetData(ContactRow contactRow)
{
_outerClass.UseInvokeIfRequired(() =>
{
_outerClass.textBoxName.Text = contactRow.Name;
if(contactRow.Gender == ContactRow.GenderType.Male)
_outerClass.rbMale.Checked = true;
else
_outerClass.rbFemale.Checked = true;
});
}
public void PushCancelButton()
{
_outerClass.UseBeginInvokeIfRequired(_outerClass.buttonCancel.PerformClick);
}
public void PushSaveButton()
{
_outerClass.UseBeginInvokeIfRequired(_outerClass.buttonSave.PerformClick);
}
}
}
}
The Application Testing DLL (ATD)
The Application Testing DLL (ATD) is where the bulk of the testing code lives. The ATD contains all of the procedural step by step test code. Refer to the sample app for all of the details.<o:p>
Initialization - Dynamically Loading and Initializing the ATD
The method DynamicallyLoadTestingDllIfPresent which lives in the AUT must be called when the AUT starts. This method looks for the presence of the ATD. If it finds the dll it loads it dynamically. Then it dynamically creates an instance of the class AppTestingDLLInitialization which is in the ATD. The class AppTestingDLLInitialization has a static constructor that gets called the first time an instance of this class is created (see Dynamically Loading the ATD) to allow it to be initialized. This class in turn creates a single instance of the WCFConnection class which opens the WCF interface for testing.
Test Methods Interface
Every test you want to call from NUnit needs to be added to the test method interface. This interface currently has four methods for the four tests in the sample. Here is an example:
namespace ContactManager.Testing
{
    [ServiceContract]
    public interface IWCFConnection
    {
        [OperationContract]  void TEST_Create_Contact();
        …
    }
}
Procedural Test Code
The class, ContactManagerTests.cs, contains all of the procedural tests. These tests contain code that tests the UI in a step by step process. This is where the bulk of the test code is written. Below is the code for the Create Contact test. This is a good example of what a test looks like. Helper methods like FindFormOfType and WaitUntilFormCloses are implemented in the base class TestsBase. See the sample code for details.
internal void TEST_Create_Contact()
{
Setup("TEST_Create_Contact");
System.Diagnostics.Trace.WriteLine("Create 5 contacts in a row");
for (int index = 0; index < 5; index++)
{
System.Diagnostics.Trace.WriteLine("Find the main application form");
var app = FindFormOfType<ContactManagerForm>();
System.Diagnostics.Trace.WriteLine("Press the add button");
app.Testing.AddButton_PerformClick();
System.Diagnostics.Trace.WriteLine("Wait until the add modify form is displayed");
var itemForm = FindFormOfType<AddModifyContactForm>();
System.Diagnostics.Trace.WriteLine("Create the test data to use to create the contact");
string name = string.Format(@"Item {0} Added by Test Code", index + 1);
ContactRow contactRow = new ContactRow {Name = name, Gender = ContactRow.GenderType.Male};
System.Diagnostics.Trace.WriteLine("Set the data on the form");
itemForm.Testing.SetData(contactRow);
System.Diagnostics.Trace.WriteLine("Press the save button and wait for the form to close");
WaitUntilFormCloses(itemForm, itemForm.Testing.PushSaveButton);
System.Diagnostics.Trace.WriteLine("Verfiy that the contact was added correctly");
ContactRow itemInDS = DataStore.Instance.GetContactById(itemForm.Contact.ID);
Assert.IsNotNull(itemInDS);
Assert.IsTrue(itemInDS.Name == itemForm.Contact.Name);
Assert.IsTrue(itemInDS.Gender == itemForm.Contact.Gender);
}
}
Using NUnit to run the tests
The Unit Test Dll (UTD), UnitTests.Dll, is the dll that is loaded by NUnit. The tests written here are very small. All they do is call the test that was implemented on the testing interface and made accessible through the WCF channel. Each test class (there is only one in this sample) needs to open a channel in order to call the tests and they need to close the channel when they are done. Here is an example of what a test looks like:
        [TestCase]
        public void CreateContact()
        {
            RunTest(_proxy.TEST_Create_Contact);
        }
Handling Errors
When a test fails in the ATD an exception is thrown and eventually caught by the by the RunTest method in the UTD. A few conversions are needed for this to work correctly, see the sample code for the details. This causes the test to be marked as failed in NUnit. This may not be robust enough for real world applications. If a test fails you can't guarantee the state of the AUT. A more robust (but outside the scope of this sample) solution would be to kill the AUT and restart it if a test failed. In order to do this you would need to know where to run the AUT from. In the real world it is assumed you would know where to load run your application from.
A Word about Logging
In order to keep things simple in this example, I have used System.Diagnostics.Trace.WriteLine(). In a real world application these statements would likely be Log.Write statements. Adding logging at every step of the test will make debugging the tests and the code much easier to do.
Running the Tests
Now for the fun part, seeing the tests run. Here is what you need to do:
- Download the demo or download the source code and build it on your machine.
- Run the sample application in debug or release mode.
- Open the UnitTests.Dll with the NUnit runner. If you don't have a runner you can download NUnit.
- At this point you should have the application open and the UnitTests.dll loaded in a runner like this:
- In NUnit press the run button.
- All of the tests should run very quickly and you should now see this:
Pros and Cons to this Approach
Pros:
- Low Cost - this approach can be used with the tools you already own like Visual Studio and open source tools like NUnit. Traditional approaches require expensive tools that you may not already own.
- Ease of Use - for a developer that already knows .Net it is a lot easier to write these tests than it is to learn a new tool and code in a different language like Delphi script. That said, you need people who are comfortable with high-level languages, and preferably familiar with the application code, to write these tests.
- Career Path - when you write tests this way you are writing code. If you and/or your team have bought into writing unit and integration tests this is really no different. This makes it much easier to get developers to be willing to participate in writing these tests. Also for a technical QA Automation engineer interested and willing to work in .Net these tests open up more doors.
- Stability - these tests are more stable than traditional tests for a lot of reasons:
- They can be written by the person who wrote the code at the time the code is written (or at a later date but at the same time is more efficient).
- Simple changes like moving controls, deleting controls, changing the text on a control, or adding a layout panel can break traditional tests at run time. These changes don't break tests written this new way or if they do (i.e. a control is deleted from a form) the compiler will tell you the test is broken at the time of the change.
- And many more...
- If a test fails during a nightly run, a developer or scrum team member can try the exact same test at their desk. If something in the product has changed that caused the test to break, the developer can fix the code and/or the test, and verify that the test now runs before checking in the changes. If the test only fails on the nightly run the developer knows it is an environmental issue and can troubleshoot the problem on the nightly run machine. Again the test can be re-run using tools the developer already knows.
Cons:
- Ease of Use - Your team must be comfortable with high-level languages. A deep understanding of the code being tested is helpful since you will be accessing the classes and controls directly.
- Career Path - If you and/or your team feels that UI testing is someone else's job, this approach may not be for you.
- Dealing with threading issues - knowing when and how to get onto the UI thread from a background thread can be tricky even for seasoned developers. In order to use this approach you have to do deal with UI threading issues (see "BeginInvoke or Invoke that is the question" above).
- Who can write them - automation engineers who use scripting languages or record and playback technologies are not likely to write these tests. If your automation team has a .Net skill set and/or an interest in learning these technologies this could be a Pro instead of a Con.
Summary
Agile teams need an effective way to test the UI. In Mike Cohn's post "The forgotten layer of the test automation pyramid" he says you want 0-10% of our tests to be UI tests. Even at this low percentage you still need an effective way to write them. Traditional tools don't leverage the skill sets of the Agile team members are expensive to buy and hard to maintain. This approach leverages the skill sets of the team members and it allows the team to own the quality for their features at the time they are written.
History
First Draft.
I am a Principal Software Engineer with experience working on a variety of object oriented projects. I have been heavily involved in the UI design and implementation on many of these projects.
Specialties:
- GUI design
- GUI implementation of WPF/Xaml applications using C#
- GUI implementation of WinForms applications using C#
- Object Oriented application development
- Middle Tier
- Database


 General
  News
News  Suggestion
  Question
  Bug
Bug  Answer
  Joke
Joke  Praise
  Rant
Rant  Admin
Admin 


