In this article, you will see demonstrations of a full-fledged application project focused on adding, updating, and deleting data on modal dialogs or inline tables using the AngularJS and Web API, plus advanced custom input validations and other features.
Update Notice (17 June, 2018)
The source code of the sample application with AngularJS 1.5x components and TypeScript is available for downloading. Please go to the SM.Store.Client.Web/Scripts/appConfig.ts file to change the value of the apiBaseUrl to your Web API address. You don’t have to do any additional configurations when you run the updated sample application with the Visual Studio 2015 Update 3 or Visual Studio 2017 (and above). If you are interested in the new sample application written in Angular, please read my article, Angular Data CRUD with Advanced Practices of Reactive Forms, and download the source code files there.
Introduction
One of my previous articles shows accessing and displaying server-side paginated data sets with AngularJS and Web API. In this post, I extend the topic and enhance the sample application with the CRUD (Create, Read, Update, and Delete) data operations. Although the new sample application and discussions in the article mainly emphasize adding, updating, and deleting data, reading data should always be involved in loading and refreshing data sets before and after data changing processes . Important features presented in the article and sample application include:
- Adding and updating data items using modal dialogs
- Inline adding and updating multiple data rows in tables
- Deleting multiple data records in tables
- Dynamically refreshing displays after submitting data changes
- Input data validations in custom, inline, and on-blur styles
- Active pattern for executing commands
- Dirty warning when leaving the current page for Angular SPA internal and external redirections
- Full Web API application and code to facilitate the CRUD workflow although the details of the Web API are not described in the article
These major libraries and tools are used in the sample application:
- AngularJS 1.2.6 (updated version 1.5.8)
- Bootstrap 3.1
- ngTable
- ngExDialog
- Web API 2.2
- .NET Framework 4.5
- Entity Framework 6.1
- SQL Server 2012 or 2014 LocalDB
- Visual Studio 2013 or 2015 with IIS Express (updated version: Visual Studio 2015 Update 3 or above)
Setting and Running Sample Application
The downloaded source contains two separate Visual Studio solutions for Web API and client website, respectively. Each will be opened with a Visual Studio instance.
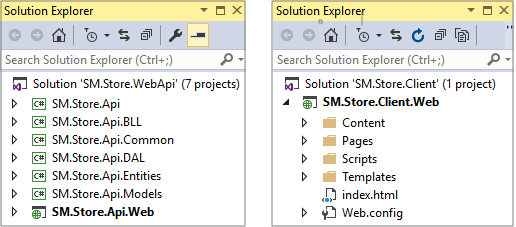
Here are the instructions to set up and run SM.Store.WebApi solution:
-
The sample application connects to the SQL Server LocalDB 2014 by default. If you use the 2012 version, you need to enable the connectionString for it in the web.config file.
-
Rebuild the SM.Store.WebApi solution, which automatically downloads all configured libraries from the NuGet. You need to have an active Internet connection from your local machine.
-
Make sure the SM.Store.Api.Web as the startup project and than press F5. This will start the IIS Express and the Web API host site, automatically create the database in your LocalDB instance, and populate tables with all sample data records.
-
A test page in the Web API project will be rendered, indicating that the Web API data provider is ready to use. You can leave the page minimized.
-
If you do not need to step into the Web API code in the debugging mode when running the test client website, you can simply start the IIS Express every time for the Web API after the above initial setup by executing this line in the Command Prompt:
If you build the SM.Store.WebApi solution with the Visual Studio 2013:
"C:\Program Files\IIS Express\iisexpress.exe" /site:SM.Store.Api.Web"
If you build the SM.Store.WebApi solution with the Visual Studio 2015 or above (replace the [WebApiSolutionPath] with that in your local drive):
"C:\Program Files\IIS Express\iisexpress.exe" /site:SM.Store.Api.Web
/config:"[WebApiSolutionPath]\SM.Store.WebApi\.vs\config\applicationhost.config"
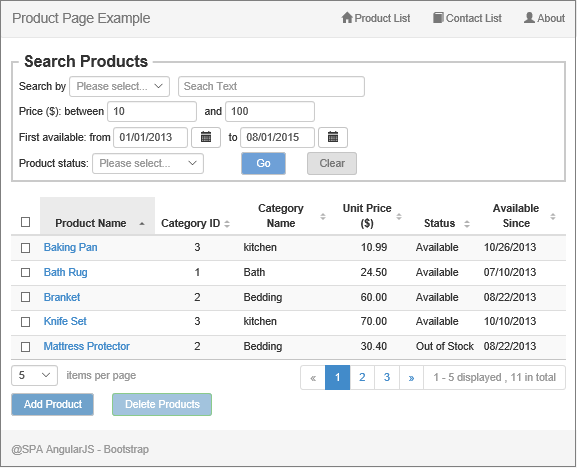
Since there is only one project in the SM.Store.Client.Web solution and the project sets the index.html as the start page, you just need to open the solution from the Visual Studio and press F5 to run it. The Product List page is shown by default and displays the paginated data items in a table. Adding and updating data using modal dialogs on this page will be discussed in the next section.
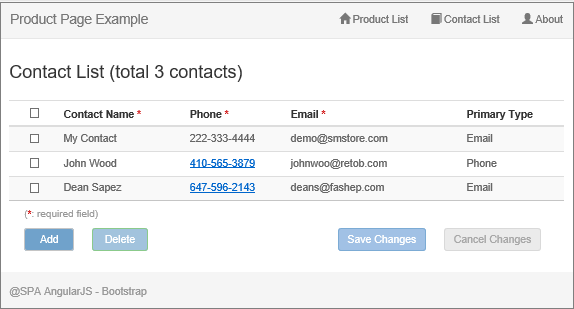
Selecting the Contact List top menu item will open the page with data records filled in a table. The inline table editing feature is implemented on this page, which will be shown in the section later.
Using Data Form on Modal Dialogs
Managing data using a data form on a separate page or modal dialog is very common, especially for situations that require the data being kept as read-only in the display table or grid. This design is good for more complex table or grid structures, such as paginated, grouped, or even hierarchical data sets. The previously created AngularJS modal dialog, ngExDialog, can be easily used for data adding and updating operations as the view template can be customized and AJAX calls for the data are fully supported. Audiences can look into the details of the basic implementations and code for the ngExDialog from my previous article if interested.
On the Product List page, the existing data editing mode is initiated by clicking the Product Name link text from the table's column, passing the existing product ID value as the parameter id, opening the modal dialog, and then obtaining the data from the AJAX call. Clicking the Add button on the bottom of the page will pass undefined value for the id and open the modal dialog with an empty data form. The parameter object for opening the data form dialog includes the beforeCloseCallback property that executes the refreshGrid function before closing the modal dialog to refresh the added or updated data records in the main table.
$scope.paging.openProductForm = function (id) {
$scope.productId = undefined;
if (id != undefined) {
$scope.productId = id;
}
exDialog.openPrime({
scope: $scope,
template: 'Pages/_product.html',
controller: 'productController',
width: '450px',
beforeCloseCallback: refreshGrid
});
};
Here shows the example of the Update Product modal dialog screen.
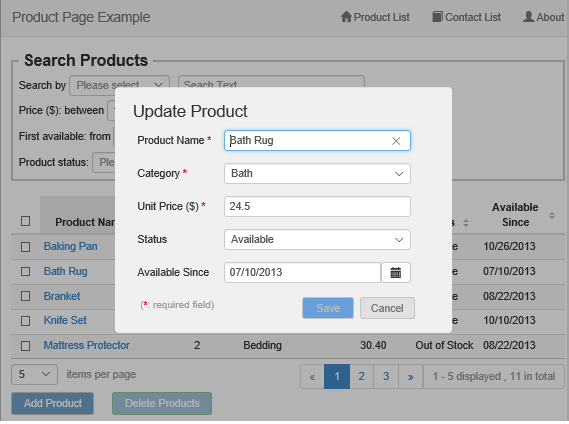
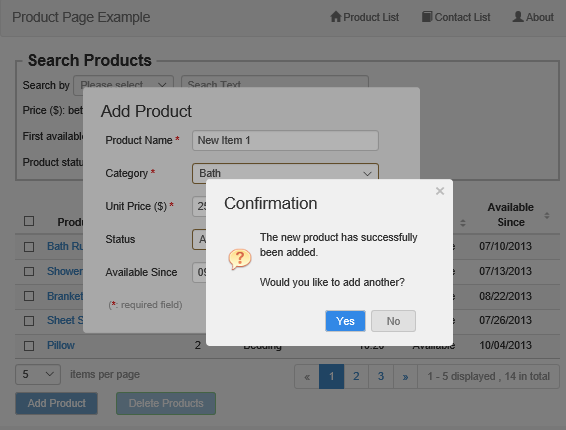
While editing and saving existing data on an open dialog is a single-record based process, adding and saving new data, however, can repeatedly be performed on the same data form dialog for multiple records before refreshing the data table. This feature is achieved by clearing up the previous data values for all input fields after submitting the current record. The user can respond to the confirmation dialog for weather to continuously add new data items or not.
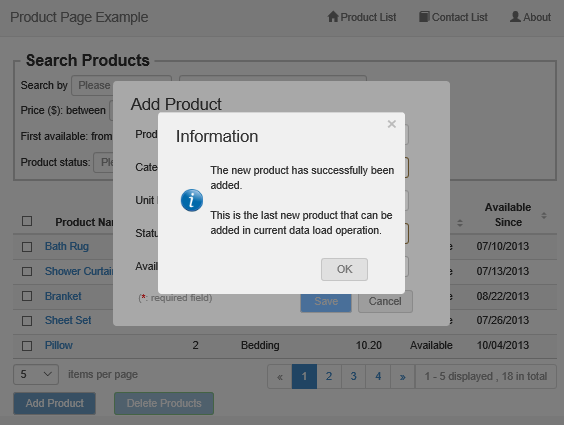
You can also specify the maximum number of records that can be added before refreshing the data table with the value of the maxAddPerLoad vairable. When the pre-set value (10 by default) is reached, the dialog will inform the user of the last new record that will be added.
Note that the data submission from the page and calling the database from the Web API are still single-record based in the current implementation although it's possible to accumulate the repeatedly added new data items and submit an array of the new data records with a single database call.
When adding new products, the $scope.newProductIds array is created to cache the product ID values returned from the responses of Web API for adding new data items into the database. There are two purposes for using this array of data. One is to track the number of added records. The other is for retrieving a set of newly added data records with which the table will be refreshed. The user can then clearly review what new data rows have been added.
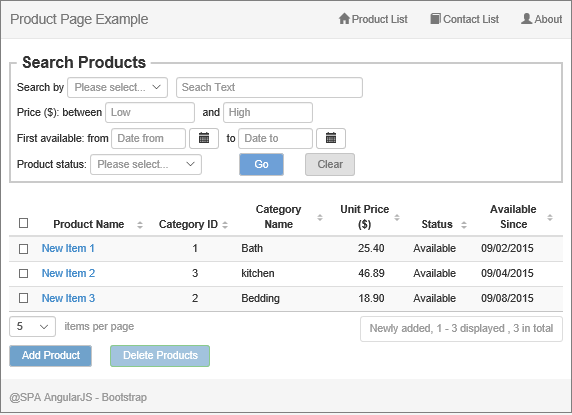
Refreshing the table with added data rows requires obtaining different data set other than the regular filtered and paginated data set. The process calls the same Web API method, GetProductList_P() by passing the $scope.newProductIds array in the JSON object. The method in the Web API controller then redirects the call to retrieve newly added data records based on the values in the $scope.newProductIds array list.
The code in AngularJS controller is as follows:
if ($scope.newProductIds.length > 0) {
filterJson.json += "\"NewProductIds\": " + JSON.stringify($scope.newProductIds) + ", "
$scope.newProductIds = [];
}
else {
...
}
The code in the Web API controller is as follows:
[Route("~/api/getproductlist_p")]
public ProductListResponse Post_GetProductList([FromBody] GetProductsBySearchRequest request)
{
. . .
if (request.NewProductIds != null && request.NewProductIds.Count > 0)
{
IList<Models.ProductCM> rtnList = bs.GetProductListNew(request.NewProductIds);
resp.Products.AddRange(rtnList);
}
else
{
. . .
IList<Models.ProductCM> rtnList = bs.GetProductList(request.searchParameters);
resp.Products.AddRange(rtnList);
}
return resp;
}
Inline Data Editing in Tables
With the AngularJS's two way data binding feature, inline editing operations on a data table can be more effective and elegant. Contrary to many UI layouts in which arrays of same buttons, hyperlinks, or icons are placed in columns for adding, editing, and submitting operations on rows, the Contact List page of the sample application shows much more precise user interfaces to perform inline adding or updating multiple rows for a single request submission.
The page has these status settings:
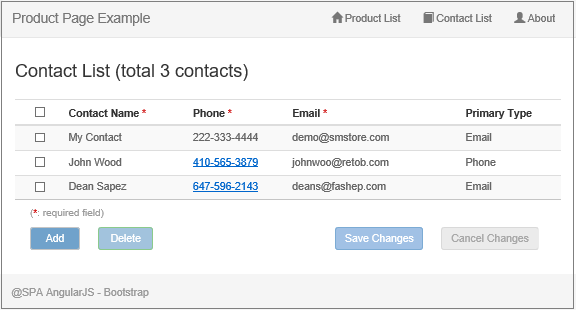
- Read: This is the default status whenever the data is initially loaded or refreshed. It can also be the intermediate status between the Add and Edit status settings. The below screenshot is the same as shown in the previous section Setting and Running Sample Application but displayed here again for easy comparisons to the subsequent Edit and Add statues.
- Edit: Selecting any existing data row by checking the checkbox will enable all input fields in the row. Multiple rows can be selected for the editing. The user can either edit and submit the field values or cancel the changes.

- Add: Clicking the Add button, when it's enabled, under the table, each time will append one empty row for new data entry. The Add and Edit status settings exist mutual-exclusively in that any data operation should either be completed or cancelled before switching to the other status.
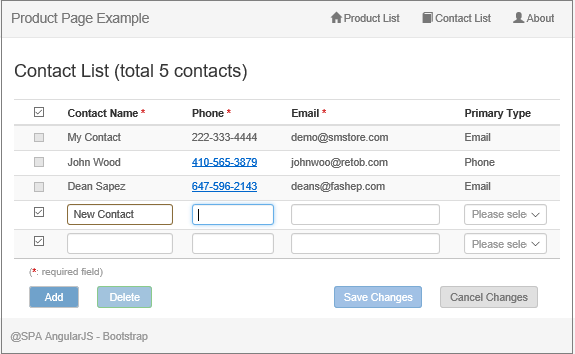
Below are important variables or structures related to controlling and tracking those status settings.
-
maxEditableIndex: the position to separate the newly added data records from the existing data records for editing. Any index number larger than this indicates that the item is a new data record.
-
$scope.checkboxes.items: an array for checkbox items. The important point is that the checkbox array size and item positions should be identical to those of the contactList array. The index numbers of both arrays are one-to-one linked although the checkbox field in the data table is not a member of the contactList.
-
$scope.model.contactList_0: a deep copy of the main data list populated during the initial data loading. It's the base data records used for checking dirty status and reverting data changes. The $dirty property of the form reflects changes other than the real data records in the form, such as checkbox value changes, thus cannot be used for checking whether the main data list is dirty or not.
-
$scope.rowDisables: an integer array that temporarily caches index numbers of existing row checkbox items disabled in the Add status.
-
$scope.addRowCount: a number for tracking added new rows. The number greater than 0 indicates the Add status.
-
$scope.editRowCount: a number for tracking the existing rows for editing. The number greater than 0 indicates the Edit status.
-
$scope.isAddDirty: if true, any data has been entered to any newly added row.
-
$scope.isEditDirty: if true, any change has been made in any existing row.
The code for the Contact List page uses the custom flags, $scope.isAddDirty and $scope.isEditDirty, rather than the AngularJS built-in form.$dirty. The reason is that any value change in checkboxes that are irrelevant to real data items will make the form.$dirty to true.
The code for adding a new row to the table is straightforward. It also includes the logic for limiting the maximum number of newly added item rows. The default $scope.maxAddNumber = 10 is set in the controller level.
$scope.addNewContact = function () {
if ($scope.addRowCount + 1 == $scope.maxAddNumber) {
exDialog.openMessage({
scope: $scope,
title: "Warning",
icon: "warning",
message: "The maximum number (" + $scope.maxAddNumber + ")
of added rows for one submission is approached."
});
}
var newContact = {
ContactID: 0,
ContactName: '',
Phone: '',
Email: '',
PrimaryType: 0
};
$scope.model.contactList.push(newContact);
$scope.model.contactList_0.push(angular.copy(newContact));
seqNumber += 1;
$scope.checkboxes.items[maxEditableIndex + seqNumber] = true;
$scope.addRowCount += 1;
};
The code logic regarding the checkboxes is somewhat complex. It will enable the Edit status, or cancel either Edit or Add status, settings. The $scope.listCheckboxChange() function performs main operations when selecting or unselecting a row by checking or unchecking the checkbox.
$scope.listCheckboxChange = function (listIndex) {
if ($scope.checkboxes.items[listIndex]) {
$scope.editRowCount += 1;
}
else {
if (listIndex > maxEditableIndex) {
if (dataChanged($scope.model.contactList[listIndex],
$scope.model.contactList_0[listIndex])) {
exDialog.openConfirm({
scope: $scope,
title: "Cancel Confirmation",
message: "Are you sure to discard changes and remove this new row?"
}).then(function (value) {
cancelAddRow(listIndex);
}, function (forCancel) {
undoCancelRow(listIndex);
});
}
else {
cancelAddRow(listIndex);
}
}
else {
if (dataChanged($scope.model.contactList[listIndex],
$scope.model.contactList_0[listIndex])) {
exDialog.openConfirm({
scope: $scope,
title: "Cancel Confirmation",
message: "Are you sure to discard changes and cancel editing for this row?"
}).then(function (value) {
cancelEditRow(listIndex, true);
}, function (forCancel) {
undoCancelRow(listIndex);
});
}
else {
cancelEditRow(listIndex);
}
}
}
if ($scope.addRowCount > 0 && $scope.editRowCount == 0)
$scope.checkboxes.topChecked = true;
else if ($scope.addRowCount == 0 && $scope.editRowCount > 0)
$scope.checkboxes.topChecked = !hasUnChecked();
};
Cancelling an edited row is done by copying back the object item from the base data array and deducting the number 1 from the $scope.editRowCount.
var cancelEditRow = function (listIndex, copyBack) {
if (copyBack) {
$scope.model.contactList[listIndex] =
angular.copy($scope.model.contactList_0[listIndex]);
}
$scope.editRowCount -= 1;
};
Cancelling an added new row results in removal of the row. However, an issue would be raised when removing any row that is not in the last position of the array. If doing so, the remaining row positions and index numbers could be shift forward in the data item array, causing the data item misallocated. To resolve the issue, any added new row, if cancelled, will still be kept in the array but marked as undefined. The corresponding data binding iteration will exclude those row items having the undefined value.
The code in the cancelAddRow() function handles all possible situations for correctly removing row items:
var cancelAddRow = function (listIndex) {
if (listIndex == $scope.checkboxes.items.length - 1) {
for (var i = listIndex; i > maxEditableIndex; i--) {
$scope.model.contactList_0.splice(i, 1);
$scope.model.contactList.splice(i, 1);
$scope.checkboxes.items.splice(i, 1);
if (i == maxEditableIndex + 1) {
$scope.addRowCount = 0;
seqNumber = 0;
}
else {
$scope.addRowCount -= 1;
if ($scope.model.contactList[i - 1] != undefined) {
break;
}
}
}
}
else {
$scope.model.contactList_0[listIndex] = undefined;
$scope.model.contactList[listIndex] = undefined;
$scope.checkboxes.items[listIndex] = undefined;
$scope.addRowCount -= 1;
}
};
The corresponding ng-if checker is added into the tr tag for ng-repeat operation in the contactList.html:
<tr ng-repeat="item in $data" ng-if="$data[$index] != undefined">
The cancellation actions can further be treated differently based on the stages of data workflow.
-
Pristine stage in which data or empty item is loaded, or input box is focused, but no data value is entered or changed. Conditions for this case are "$scope.addRowCount > 0 and $scope.isAddDirty == false" for the Add status and "$scope.editRowCount > 0 and $scope.isEditDirty == false" for the Edit status. The cancellation in this stage should be performed silently without any confirmation process.
-
Dirty stage in which any added or changed data value exits in any input field. Conditions for this case are "$scope.isAddDirty == true" for the Add status and "$scope.isEditDirty == true" for the Edit status. The confirmation dialog box is shown, which allows the user to choose if proceeding in the cancellation or stepping back onto the previous screen.
The Add or Edit status for all working rows can also be cancelled at once by either clicking the Cancel Changes button to call the $scope.cancelChanges() function or unchecking the checkbox in the column header (top-checkbox) to call the $scope.topCheckboxChange() function. The former will cancel operations on all working rows whether the rows are all selected or not. The latter performs cancel operations only when all rows are selected for the current status. Both clicking button and unchecking top-checkbox actions will call the cancelAllAddRows() function when in the Add status or the cancelAllEditRows() function when in the Edit status. Audiences can view the code details of these functions from the downloaded source.
Deleting Data Rows in Tables
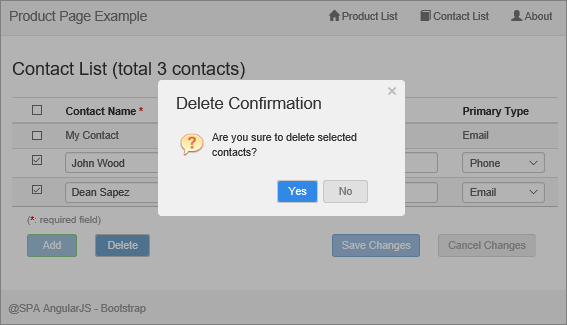
Deleting data rows can always be performed with inline and multi-row styles. Selecting any row by checking the checkbox will enable the deleting operation and generate an array containing selected product ID values. The code will then call the Web API method with the deleteProducts data service. As common rules, a delete operation always needs to be confirmed before it can proceed.
$scope.deleteContacts = function () {
var idsForDelete = [];
angular.forEach($scope.checkboxes.items, function (item, index) {
if (item == true) {
idsForDelete.push($scope.model.contactList[index].ContactID);
}
});
if (idsForDelete.length > 0) {
var temp = "s";
var temp2 = "s have"
if (idsForDelete.length == 1) {
temp = "";
temp2 = " has";
}
exDialog.openConfirm({
scope: $scope,
title: "Delete Confirmation",
message: "Are you sure to delete selected contact" + temp + "?"
}).then(function (value) {
deleteContacts.post(idsForDelete, function (data) {
exDialog.openMessage({
scope: $scope,
message: "The " + temp2 + " successfully been deleted."
});
$scope.tableParams.count($scope.tableParams.count() + 1);
}, function (forCancel) {
exDialog.openMessage
($scope, "Error deleting contact data.", "Error", "error");
});
});
}
};
The deleting confirmation dialog and underlying screen when calling the above function looks like this:
Input Data Validations
AngularJS provides scope based form and element validation-control objects to facilitate the input validations and inline message display. We refer these to "scope form object" and "scope element object" to avoid confusing with the DOM form object and DOM element object. The sample application uses the ngValidator, a custom validation directive originally downloaded from the GitHub, but with tremendous modifications for extended functionality. The validation process in the sample application is triggered whenever any input field is out of the focus, so called on-blur event type of validation although other event types are also available in the directive, such as on-dirty and on-submit. You can find that the on-blur validations are more natural and user-friendlier. The code logic in the ngValidator is not the main focus of discussions in this article. Audiences can browse the ngValidator code in the directives.js for details if interested.
The Update/Add Product modal dialog is implemented with the validations for the text, currency number, and date input fields. Here are the attribute settings for the Unit Price field as a typical example.
<input type="text" class="form-control"
       id="txtUnitPrice" name="txtUnitPrice"
       data-ng-model="model.Product.UnitPrice"
       validate-on="blur"
       clear-on="focus"
       required required-message="'Price is required'"
       number invalid-number-message="'Invalid number'"
       max-number="10000" max-number-message="'Price cannot exceed $10,000'"
       message-display-class="replace-label-dent"
       ng-focus="setDrag(true);setVisited('txtUnitPrice')"
       ng-blur="setDrag(false)" >
All error messages are displayed in the inline style for both the single record form on modal dialogs and inline table adding/editing page.

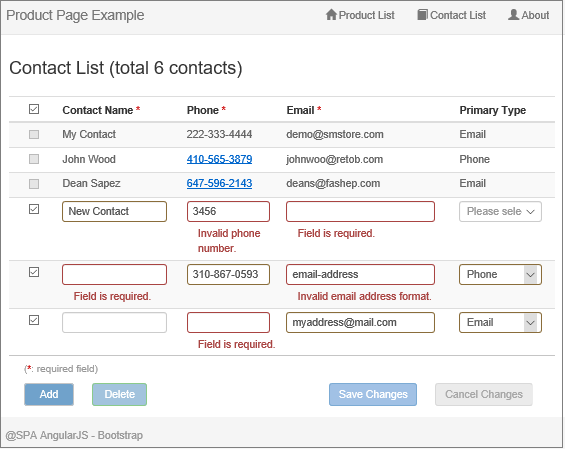
The dirty fields are also indicated by the border with amber color. This is achieved by setting the has-warning CSS class for the parent div elements of the input element.
<div class="form-group" ng-class="{'has-warning' : productForm.txtUnitPrice.$dirty}">
For the inline adding/editing table, there is a major issue when setting validations for each row. The AngularJS can only create a single scope element object for an entire column in the table. It doesn't support generating scope element objects dynamically for each input field element iterated with the ng-repeat, especially when elements are lately activated and visible by the edit-enabling actions, such as selecting a row. The resolution is to make a shallow copy of the AngularJS original scope element object for the element in the row when the row is being selected. The newly generated scope element object needs to have the row index number as a suffix for the object name . The sample application uses the directive setNameObeject for this purpose.
.directive('setNameObject', function ($timeout) {
return {
restrict: 'A',
link: function (scope, iElement, iAttrs, ctrls) {
var name = iElement[0].name;
var baseName = name.split("_")[0];
var scopeForm = scope[iElement[0].form.name];
scope.$watch(scopeForm, function () {
$timeout(function () {
if (scopeForm[name] != undefined) {
scopeForm[baseName + '_' + scope.$index] = scopeForm[name];
scopeForm[baseName + '_' +
scope.$index].$name = baseName + '_' + scope.$index;
}
});
});
}
};
})
When selecting multiple rows to start the Edit status on the Contact List page, multiple scope element objects for each validation-required field are added into the scope form object. The below screenshot shows the scope form object and all its child scope element objects when making the first and second rows editable in the Contact List table (refer to the Edit status screenshot in the previous section, Inline Editing Data in Tables). The element objects with the "_{{$index}}" suffix are those statically added, only one for each column and without replacing the {{$index}} variable values, by the AngularJS original process. The highlighted element objects with index numbers as suffixes are dynamically created for each input element by the above directive code. The inline table input validations would not be in effect without these added custom objects.

Although the on-blur pattern of input validations looks nice, the process logic is more complicated than the on-dirty or on-submit patterns. Some side-effects and derived issues could also be raised. Here are two examples of issues and resolutions related to the on-blur input validations.
-
ng-click dysfunction. When any input box is focused and the value is invalid, triggering the ng-click event for the Add or Cancel button will do nothing but just make the input box blur and render the inline error message. It appears that the on-blur event for the currently focused input box occurs earlier than the ng-click event. Thus the code in the ng-click event handler will then be prevented from being executed. Using the ng-mousedown event instead solves the problem. With the Visual Studio or browser script debugger, the workflow indicates that the code in the ng-mousedown event is executed before the on-blur event could be kicked in. In the sample application, the ng-mousedown event is set for the Add button on the Contact List page (contactList.html) and Cancel type button on both Update/Add Product dialog (_product.html) and Contact List page.
The issue can be reproduced by conducting these steps:
- Change the
ng-mousedown to ng-click for any of these buttons in the HTML file. - Run the application and open any input form.
- Make an invalid entry in any input box.
- Click the button and the issue will be noticed.
-
Setting focus by code renders a validation error in the pristine status. This occurs on the latest versions of browsers MS-Edge, Chrome, and Firefox, not on the IE. Focusing an input element in the Angular way is usually set using the auto-focus attribute within the input element tag. The only place that needs to set focus using the JavaScript code in the sample application is to reset the data form for repeatedly adding new product items on the Add Product dialog. The problem may also be caused by the timing issue for executing the HTML 5 built-in validation attribute such as the required. In the productContorller.clearAddForm() function, if placing the code line for setting the focus into an anonymous function that is then called with the $timeout service, the input element is focused normally when the form is reset.
//Need DOM operation to auto focus the ProductName field
//although using DOM code in a controller is not a good practice.
//Also need $timeout service for MS-Edge, Chrome, Firefox (but not IE).
//Otherwise, the box will be focused with "required" validation error.
$timeout(function () {
    angular.element(document.querySelector('#txtProductName'))[0].focus();
});
To reproduce the issue, just follow these steps:
- Comment out the lines for the function and
$timeout service in the productContorller.clearAddForm(). - Run the application with the MS-Edge, Chrome, or Firefox browser.
- Open the Add Product dialog, add a new item, and save it.
- Continue for adding another item.
- The form will be reset and the issue will be displayed.
Note importantly that developers need to clear browser cached page files and data after changing the code in any HTML or JavaScript file each time.
Active or Passive Command Pattern?
An active command pattern means that a command, such as data submission or editing cancellation, is only available when the command execution is legal and the data is valid. No further intervention should be taken after sending out the command. With the passive pattern, on the other hand, the command is always available and after initiating the command, the process will then check the validity of the execution. A simple case of passive command is the delete command for which the Delete button can be clicked any time. If no data item is selected when clicking the button, a dialog will be popped up to notify the user of selecting data items before clicking the button again. For the active pattern, however, necessary rules are enforced before the Delete button can be clicked by the user. The active pattern should be much better and logically clearer than the passive pattern. In the sample application, all buttons for data submissions and cancellations, whenever possible, are implemented with the active pattern. In the code, these buttons are conditionally enabled or disabled using the AngularJS ng-disabled directive. The below code examples are taken from the contactList.html.
- Add button is only enabled when the status is not the Edit.
ng-disabled="editRowCount > 0 || addRowCount >= maxAddNumber"
- Delete button is only enabled when at least one row is selected in the Edit status.
ng-disabled="(isEditDirty || editRowCount == 0)"
- Save Changes button is only enabled when there is any dirty data and all data items have passed validations.
ng-disabled="(!isEditDirty && !isAddDirty) || contactForm.$invalid"
- Cancel Changes button is only enabled when it's the pristine stage or there is any dirty data.
ng-disabled="!isEditDirty && !isAddDirty && editRowCount == 0 && addRowCount == 0"
Dirty Warning When Leaving Current Page
Every data modifying web page normally notifies users of saving the changed data, if exists, when leaving the page. But since the AngularJS embraces the SPA architecture and the routers are configured to switch pages inside the application, the leaving page scenario varies when it occurs internally or externally regarding the application territory. The events handling the warning notifications are also different. We usually use these two events to send out the dirty warning:
-
The AngularJS scope based $locationChangeStart: This event can be triggered by any internal page switching and also redirections from any external site back to the AngularJS routed application URL. The code logic for automatically closing an opened ngExDialog instance is the example of using this event handler.
-
The native JavaScript window.onbeforeunload: This event is triggered by leaving the AngularJS application for any external site.
These two event handlers are placed in the top level bodyController. The object variable $scope.body and its property dirty can be accessed by all child scopes via the prototype inheritance. Here is the full code block for the bodyController:
.controller('bodyController', ['$scope', 'exDialog', '$location',
function ($scope, exDialog, $location) {
$scope.body = {};
$scope.$on('$locationChangeStart', function (event, newUrl, oldUrl) {
if (newUrl != oldUrl)
{
if ($scope.body.dirty) {
if (window.confirm("Do you really want to discard data changes
\nand leave the page?")) {
if (exDialog.hasOpenDialog()) {
exDialog.closeAll();
}
$scope.body.dirty = false;
}
else {
event.preventDefault();
}
}
else {
if (exDialog.hasOpenDialog()) {
exDialog.closeAll();
}
}
}
});
window.onbeforeunload = function (event) {
if ($scope.body.dirty) {
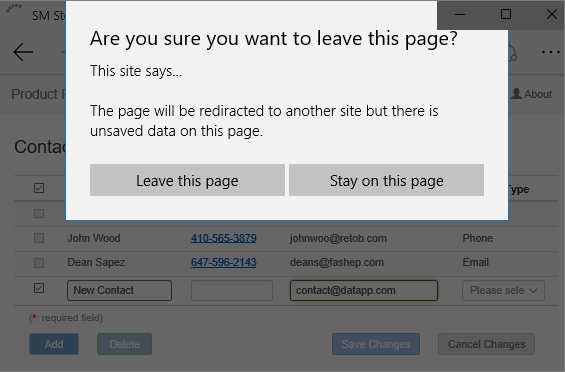
return "The page will be redirected to another site
but there is unsaved data on this page.";
}
};
}])
The value of the $scope.body.dirty is dynamically updated when there is any change in the $dirty property of the scope form and the $scope.$watch is used for form $dirty changes. Otherwise, it's necessary to set the $scope.body.dirty to false after any data submission or cancellation. Doing so can avoid propagating the form dirty flag to the parent scope and causing unwanted dirty warnings if leaving the base or parent page afterwards. The easiest and all-in-one approach to reset the form is to call this line of code:
$scope.productForm.$setPristine();
Something unsatisfied is that we cannot specify our own modal dialog styles. The native window.confirm dialog must be used in the $locationChangeStart event handler because any HTML template-based AngularJS dialog is processed after the routed page switching. Thus it's too late to provide the dialog to the user and obtain the user's feedback for leaving, or staying on, the page. Different browsers may show the built-in confirmation dialog in different styles but the functionality is the same. Below is the dialog shown from the Microsoft Edge:
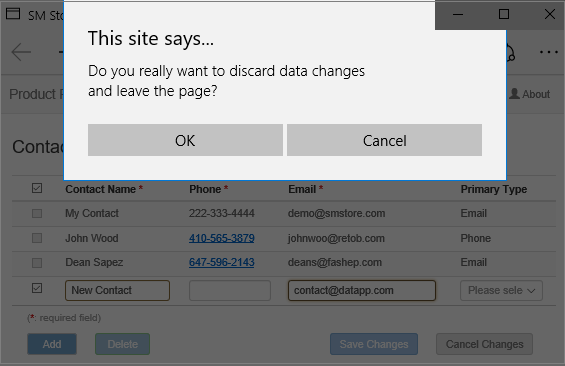
The window.onbeforeunload event will always display the built-in dialog if the code returns a custom string. You can remove the return code to prevent the browser from popping up the dialog but cannot stop the page leaving. Only the Cancel button command can keep the current page if you don't want leave it. This is the built-in security feature for any browser in the market, which has been discussed everywhere across the developer's communities. When redirecting to an external site from the page in this sample application, the dialog on Microsoft Edge is shown like this:
Summary
Data modifications are always the critical parts of any data oriented applications. The AngularJS and Web API make the web-based data CRUD operations more versatile and efficient. This article and the sample application provide the profound technical details, real-world practices, and issue resolutions for the data CRUD using the AngularJS and Web API.
History
- 23rd September, 2015
- 26th November, 2015
- Added descriptions for using the command prompt to start IIS Web API site compiled with the Visual Studio 2015
- Also fixed an issue for adding new contact records in the AngularJS controller.js
- Source code files are updated
- 17th June, 2018
- Added source code files for the sample application updated with the Angular 1.5x components and TypeScripts
- 6th December, 2020
- Adjusted the text in some places to avoid confusions when audiences see the article updated timestamp "6 Dec 2020" which was accidentally set by the codeproject editor.
- I had no plan to update the article and source code after the last update on 17 June 2018. Everything in the article and source code reflect the words and tech situations more than 2 - 3 years ago. The Google team has announced that the AngularJS will be EOL (end of life) by the end of 2021. The significance of this article and sample application is now only for the comparison to the Angular when doing the migration tasks (or learning histories), not for any new implementation.
