Introduction
The task of adding Explorer Context Menus is usually left to installers because when they run, they have the required Admin rights to access the registry. However, it's sometimes nice to be able to modify these at runtime, for instance to add or remove an associated extension as a user option.
ExplorerMenuManager is a class you can use to add, remove or change Explorer Context Menus at runtime. It will help create these either for the current user or for the system.
It is also a simpler, cleaner alternative to implementing a Shell Extension.
Background
While preparing a different article concerning Explorer Shell Extensions and the issue of using .NET managed code for them, I started thinking about simple alternatives. Rather than tacking this on to that article, I decided on a companion article.
Simple is of course, a relative term when dealing with the Registry. The idea behind ExplorerMenuManager was to provide as much functionality as possible and avoid the need for a Shell Extension, but still be easy to implement.
In particular, I wanted the ability to be able to alter associations on the fly. That is, if desired, the app can dissociate one or more extensions and the related context menu.
Context Menus vs Shell Extensions
Shell Extensions are DLLs and which Explorer invokes to get information about a Context Menu. These are listed in your registry as shellex keys. The menu text and so forth is never written to the Registry, but is provided by methods in the DLL Shell Extension. The action to perform is also decided by the Shell Extension which can do the job itself or start some other process.
Conversely, standard or static Context Menus use shell keys with the menu text and command in the Registry. This makes them easy to find and remove if you find them annoying.
From the end user's perspective, these do essentially the same thing, but there are a few differences:
Clicking the menu command on a standard Context Menu with multiple files selected, will start multiple instances of the target app, one for each file selected. There is no way to send many files to one instance (but VB makes it very easy to overcome this -- see below). Using an in-process Shell Extension launcher, all selected files are sent to one instance from the outset.
Another minor difference is when multiple files are selected, a standard menu will only display if all the selected files are registered as the same type. A Shell Extension menu is displayed based on the file Right-Clicked and a mixed bag of files can be sent/processed by a Shell Extension.
Technologically, they are very different. Shell Extensions run as part of Explorer, and can be something other than a Context Menu Handler. They can be Property Page Extensions or Thumbnail Handlers among others. Since these run in-process, a Shell Extensions written in .NET may result in more memory consumed and can be noticeably slower. There are several Microsoft warnings about .NET Shell Extensions, so they may cause problems or fail on occasion (I find them noticeable slower).
This article will cover how to use ExplorerMenuManager to add, change or remove context menu associations by user. ExplorerMenuManager provides the means to install and alter them system wide (HKCR) or by user though this is not advised.
It will also show how to respond in code to fetch the command line from later instances started so that your context menu can appear to sends many files to one instance like a Shell Extension can.
Using the Code
ExplorerMenuManager is a class you use to define and implement your context menu in the Registry. It supports both Adding and Removing menu entries, so that you can allow users to perhaps tick off which extensions they want to associate with your app. It is very easy to use:
Dim ExpMenu As New ExpMenuManager
With ExpMenu
.AddExtensions("zig", "zag", ".zork")
.MenuText = "Open in ZigZag"
.ImageFile = "zigzag.ico"
.ExtendedMenu = False
.Remove = False
End With
- Any Icon you specify must exist in the folder with your EXE
- The image must be a valid 16x16 icon
The various methods and tools are intended to associated the menu you define with the active EXE. As such, it works out the app name, etc. for itself. To run and test from the VS IDE still requires a compiled version in the desired directory along with the Icon, etc. How to configure VS for this is described later.
Context Menus are typically system wide, that is associating ".txt" with Notepad does so for all users. Since this requires writing to HKCR which in turn requires Admin privileges, ExplorerMenuManager will create the instructions required for RegEdit, then optionally start it as an elevated process:
If ExpMenu.CreateRegFileText(True) Then
ExpMenu.RegisterExtensions()
End If
The result would be a new Context Menu entry which is immediately available:
zigfile
    shell
        Open with ZigZag
            commmand            "...pathto\MyMainApp.exe" "%1"
CreateRegFileText creates the text RegEdit requires, RegisterExtensions creates a temp file from that text, then attempts to run RegEdit as an elevated process. If ExpMenu.Remove is True, then the extension associations would have been removed rather than added to the Registry.

You can also use the contents of the RegEditText property to invoke RegEdit yourself; perhaps to allow the user to review the contents before proceeding. In this case, you can replicate what happens in RegisterExtensions and use RegisterByFile instead:
Dim RegFile As String = Path.GetTempFileName()
ExpMenu.CreateRegFileText(True)
File.WriteAllLines(RegFile, ExpMenu.RegEditText)
ExpMenu.RegisterByFile(RegFile, True)
File.Delete(RegFile)
Naturally, great care should be taken with what is written to the file to be fed to RegEdit, especially if the user "helps".
Add/Remove Associations
For cases where you are modifying the associated extensions, it is a two step process: first, all the old extensions need to be removed, then the new set added. Even though there is likely a great deal of overlap between the two sets, this is simpler and more foolproof.
ExplorerMenuManager provides the means to append the second instruction set to the first, to avoid firing RegEdit twice along with the required UAC dialog. Start by removing the association for all possible extensions:
Dim ExpMenu As New ContextMenuManager
With ExpMenu
.AddExtensions(AllPossibleFileExts)
.MenuText = ExpMenuText
.ImageFile = ...
.ExtendedMenu = False
.Remove = Remove
End With
ExpMenu.CreateRegFileText(True)
ExpMenu.RemoveExtension("mp4")
ExpMenu.Remove = False
ExpMenu.AppendRegFileText()
ExpMenu.RegisterExtensions()
As before, you can get the instruction buffer and apply the changes yourself using RegisterByFile. The file these will be registered to will be the currently executing EXE.
Create a Menu Only for the Current User
Almost no apps create user level context menus, but they are possible. This would allow one user to opt out of one or more of the master extensions. The problem with this is that if there is also a master context menu for the root, the user level can be replaced. In some cases, your menu may display twice. It is not recommended, but it can work:
Dim ExpMenu As New ContextMenuManager

With ExpMenu
    .AddExtensions(...)
    ...
    .Remove = False
End With

ExpMenu.ApplyUserMenuEntries()
If .Remove is True, the associations will be removed, otherwise they are added.
Properties, Methods
Sub AddExtension(ext As String)
Sub AddExtensions(ParamArray ext As String())
Adds one or more extensions to be associated with your Explorer Context Menu. In the sample above, the same Context Menu will be associated with each listed extension. Then, the class will add a leading dot to make it a legitimate extension if it is missing.
All the other properties apply to all the extensions passed. That is, one Context Menu and handler is created for all of them. Your app however can implement multiple menus - Open, View, Send.
Property MenuText As String
The menu text to display for your extensions. This should come from a Constant to avoid accidentally adding different versions to the Registry.
Property ImageFile As String
The file name of a valid icon you wish to display with the menu text. The image must be an Icon and it must reside in the same folder as your target app. Do not include a path.
Property ExtendedMenu As Boolean
Set to True if you want your menu entry to show up only with Shift+Right Click.
Property Remove As Boolean
True or False whether the specified extensions should be added or removed from the registry.
ReadOnly Property RegEditText As String()
A string array containing the contents for a RegEdit .reg file, once CreateRegFileText has been invoked.
Function CreateRegFileText(AllUsers As Boolean) As Boolean
Fills the RegEditText with the instruction set for the extensions specified. Removal instructions are generated when Remove is true, otherwise instructions to create associations is generated.
Technically, you can create RegEdit file contents for HKCU menus, but it is somewhat silly to do this through RegEdit which will result in UAC dialogs when they can be applied directly.
See also ApplyUserMenuEntries and AppendRegFileText
Function AppendRegFileText() As Boolean
Appends instructions to the existing set of instructions. This should be used when modifying associations: first get the RegEdit instructions to remove all extensions; reset the Remove property to False; then AppendRegFileTextinstructions to tack on the code to reduiter the new set.
This provides instructions for both the Add and Remove actions into one file.
Function RegisterExtensions(Optional silent As Boolean = False) As Boolean
Invokes RegEdit with the current contents of the RegEditText array. The optional Silent parameter suppresses the 2 warning dialogs from RegEdit, but not UAC.
Function ApplyUserMenuEntries() As Boolean
Creates or removes the required registry entries for your Context Menu in HKCU rather than HKCR. I almost removed this because it is rather odd, but it might be useful in some niche cases.
Note that all the functions return False when there are problems with the definitions you have set up. For instance, an empty MenuText or the Image specified cannot be found in the folder where the EXE is located.
Send CommandLine to First App Instance
One of the few advantages to a Shell Extension is that it can start an instance of the target app, passing all the selected files to it. Normally, with static Context Menu entries in the Registry, multiple instances will start, but VB makes it very easy to "forward" the command line to the first instance.
- Add a method to your form to receive new arguments:
Friend Sub NewArgumentsReceived(args As String())
lbFiles.Items.AddRange(args)
Console.Beep()
End Sub
- Make your app SingleInstance
Project -> Properties -> Application tab
Check the "Make Single Instance Application" checkbox option
- Add Code to Respond to the StartupNextInstance event
Visual Basic's Application Framework provides an event which fires when single-instance application is started and an application instance is already active. The later instances will send the command line to the first instance via a pipe. We can add code to handle those new arguments.
From the same Project Properties tab, click the Application Events button. This will open the Application Events code module. Select MyApplication Events in the left dropdown; and StartupNextInstance in the right. This will open/create the event handler. Here, we need to send the command line received to the form method we just wrote:
Private Sub MyApplication_StartupNextInstance(sender As Object,
e As ApplicationServices.StartupNextInstanceEventArgs) _
Handles Me.StartupNextInstance
Dim f = Application.MainForm
If f.GetType Is GetType(MyMainForm) Then
CType(f, MyMainForm).NewArgumentsReceived(e.CommandLine.ToArray)
End If
End Sub
A few lines of code to respond to arguments passed to later instances. It's only slightly more involved when your app starts from Sub Main and there is no App Framework to provide the StartupNextInstance event. This explains the details implementing it for an app which starts from a Sub Main.
The app started with the first file. Others were passed later via StartupNextInstance.
With multiple files selected, the first instance will receive them one at a time since Explorer will try to start as many instances as there are files selected.
When the first instance starts, the firewall may seek permission for it to "listen for connections from other computers". This is just the pipe mechanism to receive arguments initializing. You may want to inform your users about it, but the forwarding seems to work even if permission is denied.
An Exception can occur starting 2 instances when selecting 2 files associated with the same context menu. If a firewall permission dialog comes up, users cannot usually respond fast enough before the connection request times out. This can also be useful with a Shell Extension which starts an app; typically these would start a new instance.
How To Use It
You can simply include the ExpContextMenu.vb file in your project. There is code to try and resolve the correct name if you use it from a DLL, but it is untested.
The Demo
The demo is a simple app to register or unregister a trio of file extensions. The code will generally be more interesting. As noted elsewhere, since it listens for command lines passed by later instances, running it may result in a firewall action depending on how yours is configured.
To test or run it, you must have a compiled copy in your test folder. This is required: ExplorerMenuManager won't create menu entries for a file which does not exist. It will also be needed for testing command line forwarding.
- Create a test folder somewhere such as C:\Temp
- Copy the files located in TestFiles to that test folder. These are fake/empty text files with the extensions needed and the icon used in the demo.
- Configure VS to start in that folder. This is to emulate deployed runtime conditions:
- Open Project Properties
- On the Debug Tab, Start Options, set the working directory to the Test folder you created
- Compile the demo and copy the EXE to the same test folder.
Note: The demo doesn't suppress any of the RegEdit confirmation dialogs. RegEdit's silent mode can be invoked using the optional silent parameter:
ExpMenu.RegisterRegFile(RegFile, True)
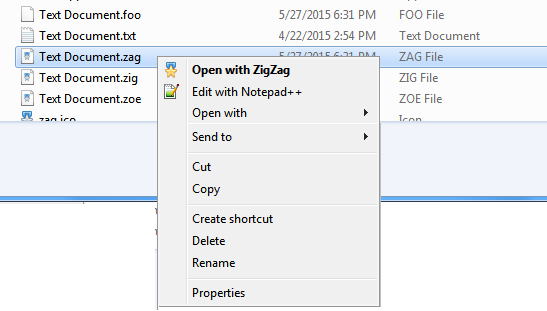
Run the demo either from VS or the compiled file. Register one or two of the file extensions listed. Then from Explorer, right click and you should see the new entry on the menu:
Unregister them and the menu will cease to appear.
The Icon file must reside in the same folder as the target app, and both the icon files and EXE must exist. The demo includes a folder of Test Files which are nothing but empty Text files with extension names used in the demo.
If you have a compiled copy of the app in the test folder, you can also demo commandline forwarding:
- Run either the VS project or the disk file as the first app instance (the VS instance will count as the first provided you have set the Start Options, Working Directory to your test folder)
- If you haven't done so, register zig or zag files for your app
- From explorer, open your context menu and click a file registered to the app (.zig, .zag, .zoe for the demo). This should start the EXE on disk which will forward the command line arguments to the first instance.
Summary
A standard or static Context Menu is more lightweight and easier to implement than a Shell Extension with the main limitation that they do not automatically send multiple files to a single instance of the target app.
ExplorerMenuManager provides the means to easily add and remove context menu handlers and avoid Shell Extensions. Its primary purpose is to provide the flexibility to allow individual users to tailor your context menu to their needs. As such, ExplorerMenuManager is mainly geared to work with global associations, but can work on a per-user model.
The demo also shows how to overcome the multiple instance limitation by handling the MyApplication.StartupNextInstance event to receive new command line arguments in a Single Instance application.
History
- 2015.09.09 - Initial version
This member has not yet provided a Biography. Assume it's interesting and varied, and probably something to do with programming.


